background image

Starting up the ice maker and dispenser

Preparations before starting up the ice maker and dispenser

The ice maker can be connected either directly to a water supply line if fitted
with a filter (option A) or to a drinking water container if fitted with a water
pump (option B).

Cut the water line to the right length to prevent it from kinking. The
recommended maximum length for the water line is 12 m. The pressure drop
resulting from an excessively long water line could adversely affect the ice cube
maker capacity.

Keep the water line away from heat sources.

The water supply line should be installed and checked by professionals.

When calling for refrigerated water for the first time, keep pressure on the
dispenser lever for one minute several times until water flows out, in order to
allow the water tank inside the appliance to fill up. Be sure not to hold the
dispenser lever pressed for too long, otherwise the water valve may overheat.

Option A:

Option B:

Water supply line installation
The pressure of the cold water supplied to the ice maker should be within 1.5-8.5
bar.
It is recommended to use drinking water for producing ice cubes since the filter
does not sterilise bacteria.

The water pump must be connected to its own outlet and properly grounded.
Removal or modification of the water pump and modification or repair of the
water supply line by unauthorised persons are not permissible.
To prevent fire, do not store or use flammable products such as fuel near the
water pump.
The water pump is to be used solely with room temperature water; it is not
suitable for use with chemicals, fruit juice or other grainy drinks, coffee or other
hot liquids.
If the water pump will not be used for en extended period of time, pull out its
power plug.
Periodically check the water tank to make sure that the water level is sufficient.
Do not push, shake or knock the water pump.
Place the water pump and drinking water container on a sturdy and level surface.
After opening the small lid of the drinking water container, protect the opening
with a dust cover. Guide one end of a hose to the bottom of the container and
connect the other end to the water pump inlet (indicated by an INLET symbol).
Connect one end of another hose to the water pump outlet (indicated by an
OUTLET symbol) and the other end to the water valve inlet under the back of the
refrigerator.

26

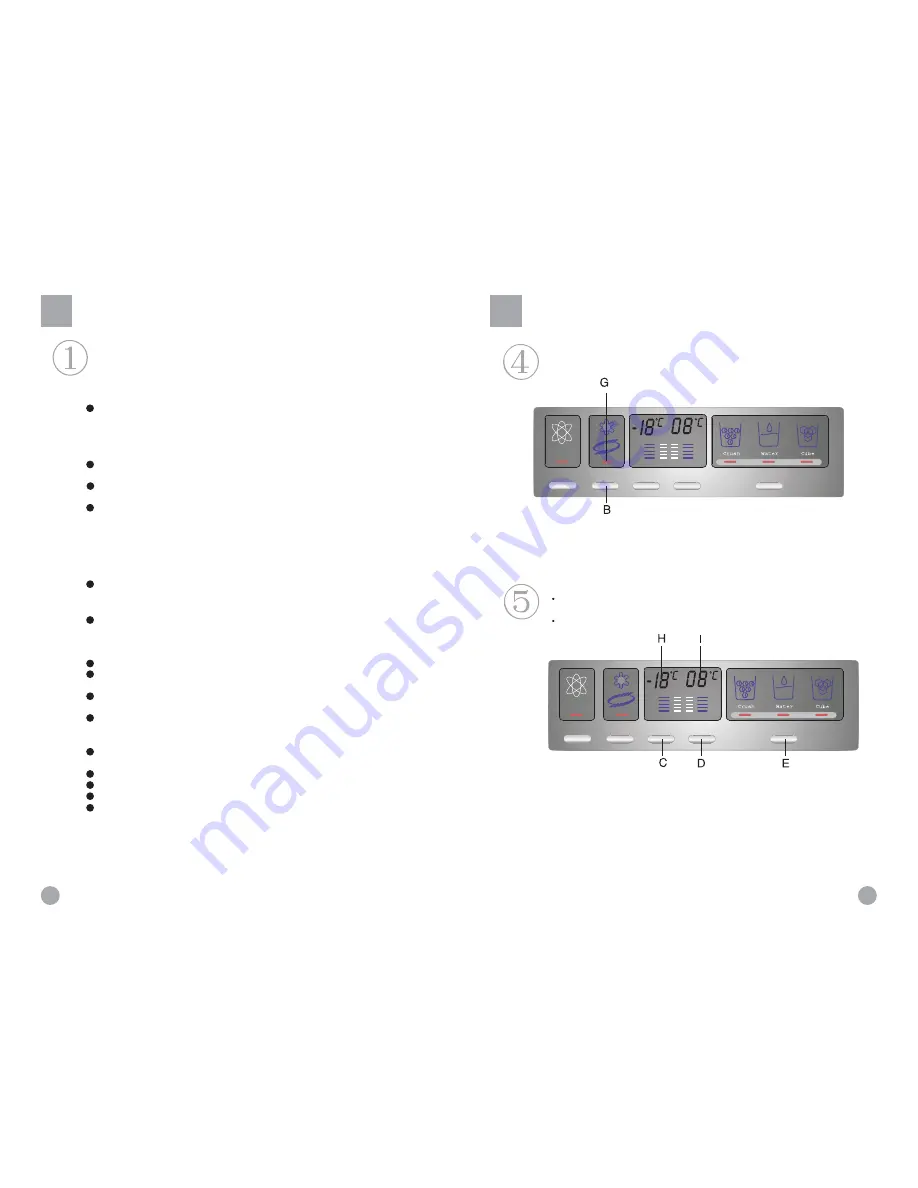
Using the digital display

Superfrost

It has been scientifically proven that a Superfrost type device is necessary to freeze foods
quickly and thoroughly. Press key B, upon which indicator G lights up and the Superfrost
action is turned on. Press the key again to turn off the Superfrost action, upon which
indicator G goes off. (In Intelligent mode, it is not necessary to turn on Superfrost.)

Temperature adjustments

At start-up, the Intelligent operating mode is selected. Press the Intelligent

mode key to cancel the Intelligent operating mode.

Temperature adjustment (requires the Intelligent mode to be cancelled)

Refrigerator temperature adjustment: Press key D, upon which indicator I starts blinking.
Each time key D is pressed, the temperature setting is increased by one of level from 1 to 5
(3 °C). If you keep pressing key D, the cycle starts over again from level 1 (7°C).
Freezer temperature adjustment: Press key C, upon which indicator H starts blinking. Each
time key C is pressed, the temperature setting is increased by one level from 1 to 5 (-22 °C).
If you keep pressing key C, the cycle starts over again from level 1 (-15°C).
Ice/water selection: Press key E.
Help yourself to ice cubes/crushed ice/refrigerated water. Your selection becomes available
when the appropriate indicator lights up.

15

Summary of Contents for HRF-663FF

Page 1: ...Refrigerator Owner s Manual HRF 663ATA2 HRF 663ITA2...

Page 2: ...p 13 Digital display operation 14 16 Refrigerator compartment 17 19 Notes on refrigeration 20 Tips on refrigeration 21 Home bar 22 23 Freezer compartment 24 Notes on freezing 25 Ice maker and dispense...

Page 3: ...Combo was developed according to our customers wishes Thanks to the latest space saving insulating materials the freezer and refrigerator compartments now offer even more space The shelves and baskets...

Page 4: ...for damages sustained during transportation Do not connect the appliance if it is damaged In case of damage contact your supplier Make sure that no part of the refrigerant circuit is damaged when tran...

Page 5: ...oltage is outside of the 187 242V range malfunctions and damages of the controls thermostat or compressor may result unless a regulator of at least 750W was installed A dedicated grounded outlet is re...

Page 6: ...or for a long time This is normal during initial operation Normal after loading with large amounts of foods Appliance door not fully closed Appliance door is opened frequently Ambient temperature is h...

Page 7: ...d t o o frequently or for too long Exposed to direct sunshine a stove or other heat source Poor ventilation The back or sides of the appliance are blocked 36 Precautions To avoid injury keep fingers a...

Page 8: ...ing the fan produces an audible sound Moan Moan The specified power consumption at an ambient temperature of 25 with 5 in the refrigerator and 18 in the freezer after 24 hours of normal operation comp...

Page 9: ...ressor may produce an audible sound when starting or stopping The sound of the refrigerant flowing through the evaporator and compressor is normal A continuous or intermittent flowing sound after oper...

Page 10: ...rn off the appliance take out the food remove the frost clean the interior and leave the door open to prevent odour build up Transportation Unplug the power cord Remove all foods from the refrigerator...

Page 11: ...age or other malfunction reduces the storage life span and quality of the foods Putting the appliance out of operation If the appliance is to remain idle for a long period of time you must press the p...

Page 12: ...or to remove it Next lift the door enough to be able fully pull out the water line Hinge cover Wires Upper hinge Grounding wire Upper hinge Screw Lift Lift until water line can be fully removed Lower...

Page 13: ...Do not consume the first seven or so glasses of water and 20 or so ice cubes after starting up the appliance for the first time or following a long period of inoperation Do not place ice cubes other...

Page 14: ...against the ice water lever as shown in the illustration 1 Dispensing crushed ice Press the appropriate button so that the indicator for crushed ice lights up Lightly press against the lever so that c...

Page 15: ...rned on again Operating modes Recommendation The Intelligent mode allows the appliance to achieve the best and most energy efficient cooling effect regardless of ambient temperature variations and wit...

Page 16: ...ine may freeze Open the valve and flush the water line to check the line connections for possible leaks Close the valve again when the water is clean and clear The ice maker does not become operationa...

Page 17: ...ime pull out its power plug Periodically check the water tank to make sure that the water level is sufficient Do not push shake or knock the water pump Place the water pump and drinking water containe...

Page 18: ...and indicator I is turned on 16 Notes on freezing Let warm foods and drinks cool down to room temperature before putting them in the freezer compartment Pack the food into portions of up to 2 5 kg sui...

Page 19: ...cream should not be placed in the bottle rack but rather inside the freezer compartment to avoid that they spoil as a result of being exposed to the temperature changes from opening and closing the do...

Page 20: ...then pull the shelf out in direction 2 Finally tilt the shelf in direction 3 and remove the veggie drawer once the door is open 90 18 Home bar only for HRF 663ATA2 Keep children away from the home ba...

Page 21: ...midity inside the veggie drawer which is desirable for keeping cucumbers grapes kiwi plums etc Increasing the opening reduces the humidity inside the veggie drawer which is suitable for keeping strawb...

Page 22: ...tion Do not overstock the refrigerator Be sure to leave space between foods and between the foods and the interior compartment walls 20 Tips on refrigeration Remove the leaves of root vegetables to pr...

Reviews: