background image

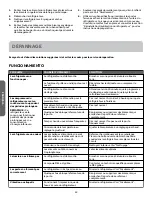
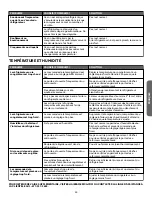
TEMPERATURE AND MOISTURE

PROBLEM

POSSIBLE CAUSE(S)

SOLUTION

Refrigerator or freezer is

too warm.

Temperature control is not set cold

enough.

Adjust the compartment to a colder setting;

allow 24 hours for the temperature to adjust.

Door opened frequently or left ajar.

Limit door openings. Check for items keeping

the door from closing completely.

Warm food added recently.

Allow time for food and refrigerator to cool.

Not enough space between the back of

the refrigerator and the wall for the air

to circulate properly.

Allow 2" (5 cm) space between the back of the

refrigerator and the wall.

Items against rear interior wall are

blocking airflow.

Store items only inside the trim of the glass

shelves; don’t place items against sides of the

compartments or directly in front of any vents.

Refrigerator or freezer is

too cold.

Temperature control is set too cold.

Adjust temperature to the next less cold setting.

Allow 24 hours for temperature to stabilize.

Moisture on exterior/

interior of refrigerator

High humidity

This is normal during times of high humidity. Dry

surface and adjust temperature to slightly colder

setting.

Door opened frequently or left ajar.

Limit door openings. Check for items keeping

the door from closing completely.

Open container of liquid in refrigerator

Cover or seal container.

Frost or ice crystals on

frozen food

Door opened frequently or left ajar.

Limit door openings. Check for items keeping

the door from closing completely.

Items blocking freezer air vents are

preventing proper air flow.

Move items away from rear interior wall.

Food freezing in

refrigerator

Items placed too close to the air vents.

Move items away from back and top of the

refrigerator.

Temperature control set too cold.

Adjust the temperature to a less cold setting.

FOR MORE HELP, VISIT HAIERAMERICA.COM OR CALL THE CONSUMER HELP LINE AT 1-877-337-3639.

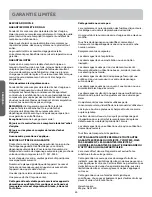
LIMITED WARRANTY

IN-HOME SERVICE
FULL ONE YEAR WARRANTY
For 12 months from the date of original retail purchase, Haier

will repair or replace any part free of charge including labor

that fails due to a defect in materials or workmanship.
Haier may replace or repair at their sole discretion any part

or subsystem including the entire product.
Product must be accessible, without encumbrance and

installed properly to receive warranty repair service.
LIMITED WARRANTY
After one year from the original retail purchase date, Haier

will provide a part at no cost, as indicated below, to replace

said part as a result of a defect in materials or workmanship.

Haier is solely responsible for the cost of the part. All other

costs such as labor, trip charge, etc are the responsibility of

the owner.

Second through Fifth Year
For 60 months from the date of original retail purchase. The

components of the sealed system (e.g. hermetic

compressor, condenser and evaporator) from manufacturing

defects. Any damage to such components caused by

mechanical abuse or improper shipping and handling will not

be covered.
NOTE: This warranty commences on the date the item

was purchased, and the original purchase receipt must

be presented to the authorized service representative

before warranty repairs are rendered.
Exceptions: Commercial Use Warranty
90 days labor from date of original purchase
90 days parts from date of original purchase
No other warranty applies.
FOR WARRANTY SERVICE
All service must be performed by a Haier authorized service

center. For the name and telephone number of the nearest

authorized service center, please call 1-877-337-3639.

12

Summary of Contents for HRF15N3BGF

Page 1: ...de de l utilisateur Instrucciones de instalaci n y Manual del usuario HRF15N3 French Door Bottom Mount Refrigerator R frig rateur avec porte double battant et cong lateur en bas Refrigerador de dos pu...

Page 2: ......
Page 3: ...LLATION INSTRUCTIONS 4 Step 1 Unpack Refrigerator 4 Step 2 Make Electrical Connection 5 Step 3 Leveling and Door Adjustment If Needed 5 REFRIGERATOR USE 6 Opening and Closing Doors 6 Using the Control...

Page 4: ...NG To reduce the risk of fire electrical shock injury to persons or damage when using the refrigerator follow basic precautions including the following Plug the power cord into a grounded 3 prong outl...

Page 5: ...rid of your old refrigerator please follow these instructions to help prevent accidents Before You Throw Away Your Old Refrigerator or Freezer Take off the doors Leave the shelves in place so that ch...

Page 6: ...lug Do not use an adapter Do not use an extension cord Failure to do so can result in death re or electrical shock Before you move your refrigerator into its final location it is important to make sur...

Page 7: ...with pots pans furniture toys or other objects Scratching hitting jarring or stressing the glass may weaken its structure causing an increased likelihood of breakage at a later date For your protecti...

Page 8: ...ck Cool Dehumidify g h j i k a b c e f d A Refrigerator Compartment Indicator B Freezer Compartment Indicator C Temperature Indicator D Quick Freeze Indicator E Quick Cool Indicator F Dehumidify Indic...

Page 9: ...igerator has cooled completely your food may spoil If the temperature is too warm or too cold in the refrigerator or freezer first check the air vents to be sure they are not blocked before adjusting...

Page 10: ...steps 1 3 to deselect Dehumidify SABBATH The Sabbath function is designed for those whose religious observances require turning off the lights All interior lights and alarms will be disabled 1 If loc...

Page 11: ...ldup of odors Wipe up spills immediately Because air circulates between both sections any odors formed in one section will transfer to the other You must thoroughly clean both sections to eliminate od...

Page 12: ...open for longer than 7 minutes IMPORTANT Your refrigerator is equipped with LED lighting These lights are designed to last for the life of your refrigerator However if the lights stop operating pleas...

Page 13: ...eseal packaging Place an opened box of baking soda in the refrigerator replace every 3 months Interior needs to be cleaned Clean the interior See Cleaning Food stored too long Dispose of spoiled food...

Page 14: ...rom back and top of the refrigerator Temperature control set too cold Adjust the temperature to a less cold setting FOR MORE HELP VISIT HAIERAMERICA COM OR CALL THE CONSUMER HELP LINE AT 1 877 337 363...

Page 15: ...and disposable parts Labor service transportation and shipping charges for the removal and replacement of defective parts beyond the initial 12 month period Damage from other than normal household us...

Page 16: ...1 D ballage du r frig rateur 17 tape 2 Raccordement lectrique 18 tape 3 Nivellement et ajustement des portes si n cessaire 18 UTILISATION DU R FRIG RATEUR 19 Ouverture et fermeture des portes 19 Util...

Page 17: ...erre Ne pas enlever la prise de liaison la terre Ne pas utiliser d adaptateur Ne pas utiliser de rallonge D connecter la source de courant lectrique avant l entretien Replacer pi ces et panneaux avant...

Page 18: ...un d c s une explosion ou un incendie AVERTISSEMENT IMPORTANT Ce r frig rateur est con u pour un usage domestique l int rieur uniquement Pour obtenir une a ration appropri e pour votre r frig rateur l...

Page 19: ...ne blessure au dos ou d autres blessures AVERTISSEMENT AVERTISSEMENT Risque de bris de verre Ne pas heurter les portes en verre du r frig rateur Prot ger la surface et les rebords de verre durant l in...

Page 20: ...VERTISSEMENT Brancher sur une prise 3 alv oles reli e la terre REMARQUE Ce r frig rateur se met en marche d s qu il est branch la source d alimentation TAPE 3 NIVELLEMENT ET AJUSTEMENT DES PORTES SI N...

Page 21: ...oin de la temp rature D T moin Quick Freeze cong lation rapide E T moin Quick Cool refroidissement rapide F T moin Dehumidify d shumidific ation G Bouton Temp Zone zone de temp rature H Bouton Temp Se...

Page 22: ...trop ti de ou trop froide dans le r frig rateur ou le cong lateur v rifier d abord les vents pour s assurer qu ils ne sont pas bloqu s avant de r gler les commandes R GLAGE DES COMMANDES Ne pas ajuste...

Page 23: ...tomatiquement apr s 24 heures DEHUMIDIFY D SHUMIDIFICATION Si de l humidit se forme sur le joint charni re verticale sur la gauche de la porte du r frig rateur s lectionner la fonction Dehumidify d sh...

Page 24: ...e s accroche aux supports arri re de la tablette BALCONNETS AMOVIBLES Les balconnets peuvent tre enlev s pour faciliter le nettoyage 1 Placer les mains de chaque c t du balconnet et soulever vers le h...

Page 25: ...bjets contre le verre Le fait d rafler de heurter de cogner contre le verre ou d exercer une pression dessus peut affaiblir sa structure et augmenter le risque que le verre se brise ult rieurement L e...

Page 26: ...a t con u pour fonctionner pendant des p riodes prolong es avec ne consommation d nergie inf rieure Le r frig rateur est branch pour la premi re fois Ceci est normal Accorder 24 heures pour que le r...

Page 27: ...tement Ranger les articles l int rieur des bordures des tablettes de verre ne pas placer d articles contre les parois des compartiments ou directement devant les ouvertures d a ration Le r frig rateur...

Page 28: ...description claire du probl me rencontr Une preuve d achat re u de vente Cette garantie est valable pour le service des appareils domestiques aux tats Unis contigus et au Canada et lorsque le service...

Page 29: ...m ro de plaque signal tique et la date d achat La plaque signal tique est situ e sur une tiquette l int rieur du r frig rateur Pour faciliter l obtention d un service sous garantie agrafer la preuve d...

Page 30: ...so 1 Desempaque el refrigerador 31 Paso 2 Conexi n del suministro el ctrico 32 Paso 3 Nivelaci n y ajuste de la puerta si es necesario 32 USO DEL REFRIGERADOR 33 C mo abrir y cerrar las puertas 33 Uso...

Page 31: ...y obedezca siempre todos los mensajes de seguridad INSTRUCCIONES IMPORTANTES DE SEGURIDAD ADVERTENCIA Para reducir el riesgo de incendio choque el ctrico lesiones a personas o da os al utilizar el ref...

Page 32: ...trucciones a continuaci n para evitar accidentes Antes de descartar su aparato refrigerador o congelador viejo Quite las puertas Deje los estantes en su lugar as los ni os no pueden meterse adentro co...

Page 33: ...a tierra de 3 terminales No quite el terminal de conexi n a tierra del cable de alimentaci n No use un adaptador No use un cable el ctrico de extensi n No seguir estas instrucciones puede ocasionar la...

Page 34: ...olpe brusco Los estantes y tapas de vidrio son muy pesados Tenga un cuidado especial al quitarlos para evitar el impacto al caerse No golpee el vidrio con ollas sartenes muebles juguetes ni otros obje...

Page 35: ...de la puerta del lado derecho uniendo las dos puertas del refrigerador NOTA Antes de cerrar la puerta del lado izquierdo aseg rese de que la junta con bisagras verticales se pliegue hacia dentro Si s...

Page 36: ...18 C Cuando el refrigerador se conecta por primera vez la pantalla mostrar los ajustes de temperatura recomendados IMPORTANTE El ajuste recomendado debe ser el correcto para un uso dom stico normal d...

Page 37: ...ction Set Sabbath Quick Frz Quick Cool Dehumidify Temp Set F 3 Presione el bot n Confirm Selection Confirmar selecci n 4 La pantalla de la temperatura mostrar qF para indicar que la funci n Quick Free...

Page 38: ...rontales y traseros Empuje el estante hacia la parte trasera del refrigerador hasta la parte posterior de los ganchos del estante alrededor de los soportes del estante trasero RECIPIENTES DE LA PUERTA...

Page 39: ...a o suave para evitar las manchas de agua NOTA Si est limpiando un modelo con paneles de vidrio en las puertas no golpee el vidrio con ollas sartenes muebles juguetes ni cualquier otro objeto Si se ra...

Page 40: ...con frecuencia o durante largos per odos de tiempo NOTA Este refrigerador ha sido dise ado para funcionar durante per odos m s largos de tiempo con un consumo de energ a m s bajo El refrigerador se en...

Page 41: ...la parte posterior de los compartimientos est n bloqueando el flujo de aire adecuado Almacene los art culos nicamente dentro de los estantes de vidrio no coloque los art culos contra los lados de los...

Page 42: ...compra Una descripci n clara del problema Un comprobante de compra recibo de compra Esta garant a cubre servicios para electrodom sticos dentro de los Estados Unidos continental y Canad y donde est d...

Page 43: ...e modelo y de serie y la fecha de compra La placa con el n mero de modelo o de serie est ubicada en una etiqueta dentro del refrigerador Engrape la prueba de compra a este manual para asistirle cuando...

Page 44: ...sommateurs Haier Customer Satisfaction Center au 1 877 337 3639 UNE PREUVE D ACHAT DATEE EST REQUISE POUR BENEFICIER DE LA GARANTIE IMPORTANTE No regrese este producto a la tienda Si tiene alg n probl...

Reviews: