Thank you for buying this under counter freezer. To ensure that you get the best results from your
new freezer, please take time to read through these simple instructions in this booklet.
Please ensure that the packaging material is disposal of in accordance with the current
environmental requirements.
If the appliance is visibly damaged, do not connect it to the power supply, contact the store from
where you purchased the appliance.
ELECTRICAL CONNECTION (UK ONLY)
For your safety please read the following information.
Warning: This appliance must be earthed.
The appliance must be connected to a 220 - 240 volts 50 cycle AC supply by means of a three pin
socket, suitably earthed and should be protected by a 13 amp fuse in the plug.
The appliance is supplied with a standard 13 amp 3-pin plug fitted with a 13-amp fuse.
Should the fuse require replacement, it must be replaced with a fuse rated at 13 amp and approved
to BS1362.
If the mains plug is unsuitable for the socket outlet in your home or is removed for any other
reason, then the cut off plug should be disposed of safely, do not insert the cut off plug into a
mains outlet to prevent the hazard of electric shock. Remove the fuse before disposal.
There is a danger of electric shock if the cut off plug is inserted into any 13-amp socket outlet.
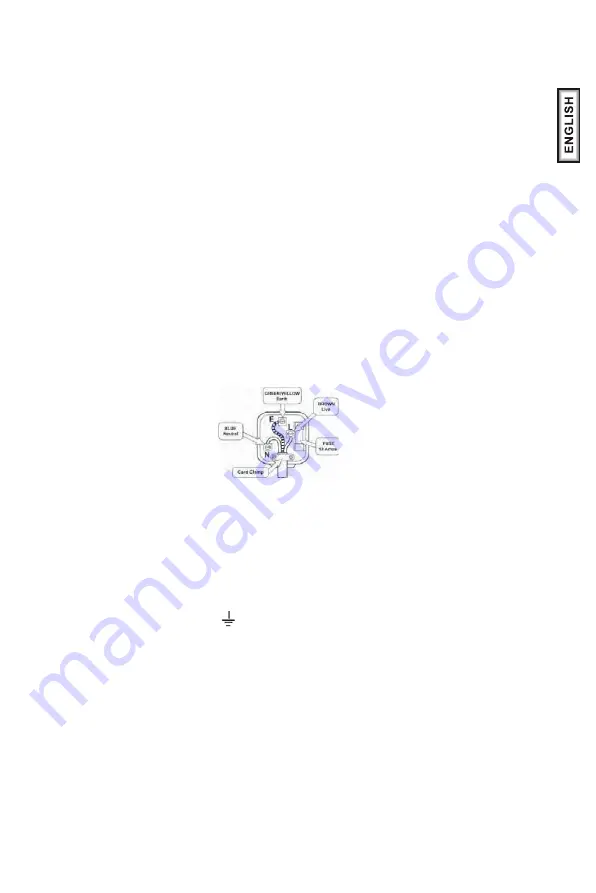
How to wire a 13 amp plug:
Important
The wires in the mains lead on this appliance are colored in accordance with the following code:
Green and Yellow - Earth
Blue – Neutral
Brown – Live
As the colours may not correspond with the markings identifying the terminals in your plug
proceed as follows.
The green and yellow wire must be connected to the terminal in the plug which is marked with the
letter E or with the earth symbol or colored green and yellow.
The blue wire must be connected to the terminal marked N.
The brown wire must be connected to the terminal marked L.
You must make sure the mains cord is firmly secured under the cord clamp.
Warnings:
Keep ventilation openings, in the appliance enclosure or in the built in structure,
clear of obstructions.
Do not use mechanical devices or other means to accelerate the defrost process,
other than those recommended by the manufacturer.
Do not damage the refrigerant circuit.
Do not use electrical devices inside the food storage compartments of the appliance,
unless they are of the type recommended by the manufacturer.
1
Summary of Contents for HTTZ-506W
Page 1: ...DD1 122 2018 09 22 ...
Page 2: ...HTTZ 506W HTTZ 506S HTTZ 607W 77 ...
Page 3: ......
Page 15: ...912 930 77 HTTZ 506W S ...
Page 16: ...Directive 2012 19 EU 13 ...
Page 17: ...Congélateur sous plan MODE D EMPLOI HTTZ 506W HTTZ 506S HTTZ 607W 77 ...
Page 18: ... 0 1 2 3 1 4 5 6 2 1 ...
Page 20: ... 7 7 37 AB C D D D E B D F G D H F G BBIJ 3 ...
Page 22: ... 7 8 9 33 C K C F G L ML H B FN N G A E J AE F G O O P Q R P Q R S S S K S TU A 5 ...
Page 26: ... 7 3 8 7 A 7 D D D 0 2 8 1 8 7 F G P X Q J B F G A F P AE QG 9 ...
Page 28: ... 8 A D 6 6 0 3 E E 6 11 ...
Page 29: ...HTTZ 506W S 12 912 930 77 ...
Page 31: ...Unterstellgefriergerät BENUTZUNGSHINWEISE HTTZ 506W HTTZ 506S HTTZ 607W 77 ...
Page 43: ...HTTZ 506W S 12 912 930 77 ...
Page 45: ...Congelatore sottobanco ISTRUZIONI D USO HTTZ 506W HTTZ 506S HTTZ 607W 77 ...
Page 57: ...HTTZ 506W S 12 912 930 77 ...
Page 58: ...ISTRUZIONI IMPORTANTI PER LO SMALTIMENTO 13 ...
Page 63: ...4 ...
Page 71: ...HTTZ 506W S 12 912 930 77 ...
Page 73: ...Arca congeladora MANUAL DE INSTRUÇÕES HTTZ 506W HTTZ 506S HTTZ 607W 77 ...
Page 85: ...HTTZ 506W S 12 912 930 77 ...
Page 87: ...Diepvries GEBRUIKSHANDLEIDING HTTZ 506W HTTZ 506S HTTZ 607W 77 ...
Page 99: ...HTTZ 506W S 12 912 930 77 ...
Page 101: ...6NĜtĖRYi mUD QLþND NÁVOD K OBSLUZE HTTZ 506W HTTZ 506S HTTZ 607W 77 ...
Page 105: ...3 _ Ovládací Jednotka 4 HTTZ 506W HTTZ 506S HTTZ 607W 77 HTTZ 506W HTTZ 506S HTTZ 607W 77 ...
Page 113: ...HTTZ 506W S 12 912 930 77 ...
Page 115: ...Congelator INSTRUCTIUNI DE UTILIZARE HTTZ 506W HTTZ 506S HTTZ 607W 77 ...
Page 128: ...Zamrażarka podblatowa INSTRUKCJA UŻYTKOWNIKA HTTZ 506W HTTZ 506S HTTZ 607W 77 ...
Page 141: ...Fagyasztószekrény Használati útmutató HTTZ 506W HTTZ 506S HTTZ 607W 77 ...
Page 153: ...HTTZ 506W S 12 912 930 77 ...
Page 155: ...Mrazni ka Návod k použití HTTZ 506W HTTZ 506S HTTZ 607W 77 ...
Page 156: ...2 Revision 06 2011 y Obsah 6 8 7 7 9 7 7 10 T 11 T 13 7 7 7 _ 6ORYDN ...
Page 157: ...3 Revision 06 2011 Symboly Horké povrchy mohou být provedeny pouze odborným pracovníkem ...
Page 161: ...7 Revision 06 2011 potravin Ovládání termostatem Poloha Min chladná T pokojová teplota ...
Page 162: ...8 Revision 06 2011 7 y Instalace 7 _ JEJÍM UVEDENÍ DO PROVOZU ZA 8 9 9 ...
Page 166: ...12 Revision 06 2011 7 7 _ _ 7 7 _ Problém _ _ 7 Servis ...
Page 167: ......
Page 169: ...ИНСТРУКЦИИ ЗА ПОТРЕБИТЕЛЯ ɎɊɂɁȿɊ ɁȺ ɉɈɋɌȺȼəɇȿ ɉɈȾ ɉɅɈɌ HTTZ 506W HTTZ 506S HTTZ 607W 77 ...
Page 181: ...HTTZ 506W S 12 912 930 77 ...
Page 183: ...HTTZ 506W HTTZ 506S HTTZ 607W 77 ...
Page 188: ... Ï7 Ï 7 7 _ 5 HTTZ 506W HTTZ 506S HTTZ 607W 77 HTTZ 506W HTTZ 506S HTTZ 607W 77 ...
Page 195: ...Model HFZ 136AA Model HFN 136 12 ...
Page 197: ...Mrazni ka Návod k použití HTTZ 506W HTTZ 506S HTTZ 607W 77 ...
Page 198: ...2 Revision 06 2011 y Obsah 6 8 7 7 9 7 7 10 T 11 T 13 7 7 7 _ ...
Page 199: ...3 Revision 06 2011 Symboly Horké povrchy mohou být provedeny pouze odborným pracovníkem ...
Page 203: ...7 Revision 06 2011 potravin Ovládání termostatem Poloha Min chladná pokojová teplota ...
Page 204: ...8 Revision 06 2011 1 2 3 4 7 y Instalace 7 _ JEJÍM UVEDENÍ DO PROVOZU ZA 8 9 9 ...
Page 208: ...12 Revision 06 2011 7 7 _ _ 7 7 _ Problém _ _ 7 Servis 7 7 _ ...
Page 211: ...Mrazni ka Návod na použitie HTTZ 506W HTTZ 506S HTTZ 607W 77 ...
Page 212: ...16 Revision 06 2011 Obsah 6 6 8 7 7 9 7 7 10 T 11 12 T 13 7 7 7 7 _ ...
Page 225: ...CKHAR X01 ...


