background image

2

1

3

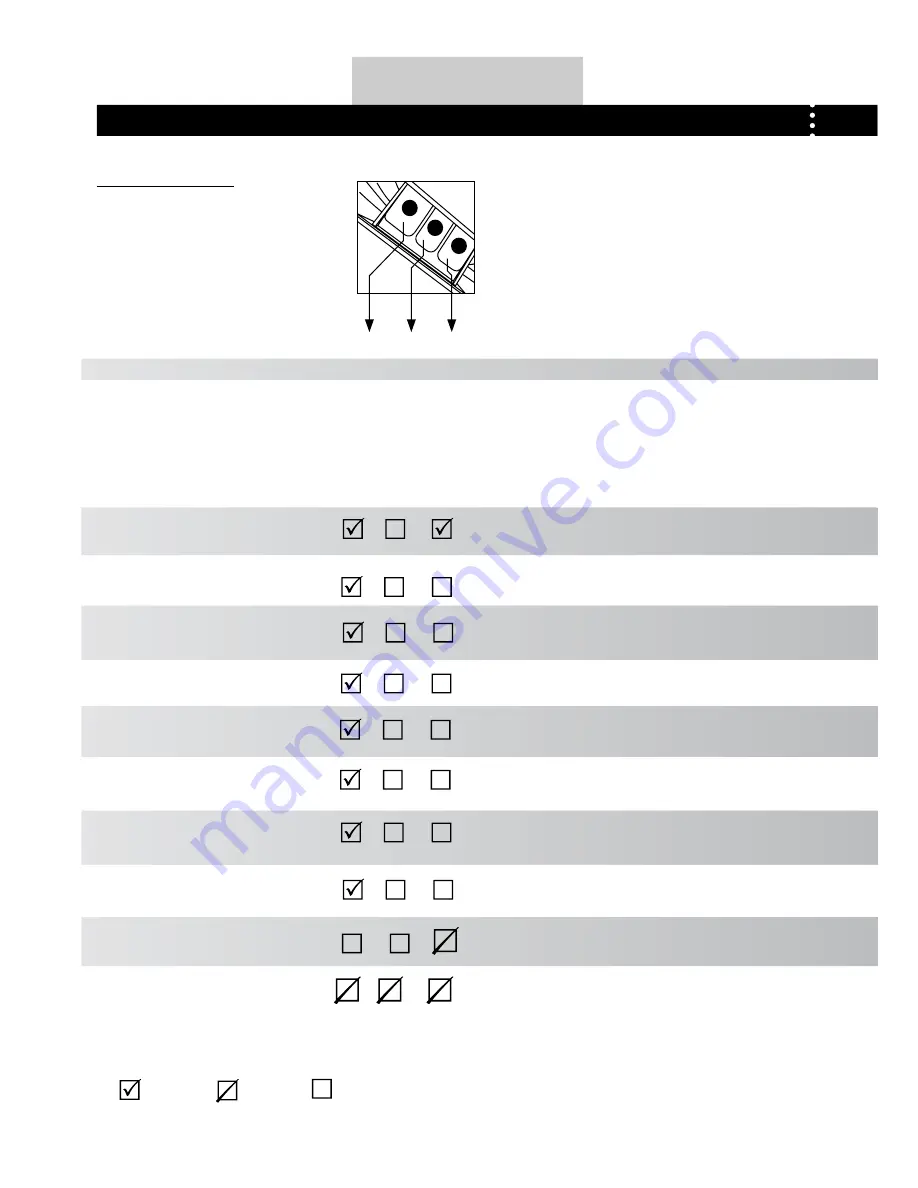
1   Detergent compartment for prewash mode
2   Detergent compartment
3   Compartment for softener and 

     other additives

10

using the  APPLiAnCe

progrAm selection

PROgRAM MODES


   Preset  spin speed

Program

Maximum    Preset   2

  3

  1

Recommended    Laundry

hW80-1401B-u      hW70-1401B-u    hW70-1401s-u      
hW70-1401-u        hW70-1201B-u     hW70-1201s-u
hW70-1201-u        hW60-1401B-u     hW60-1401s-u      
hW60-1401-u        hW60-1201B-u     hW60-1201s-u

hW60-1201-u


1 ¬ 

- - to 90 °C 40°C

Heavy soiling 

1000rpm

1000rpm

2 ¬ 

- - to 90 °C 40°C

Cotton fabrics

1000rpm

1000rpm

3 ¬ 

- - to 60 °C 40°C

Cotton or synthetic

1000rpm

1000rpm

4 ¬ Wool

- - to 40 °C       - -°C

Woolen fabrics

600rpm

600rpm

5 ¬ 

- - to 60 °C 30°C

different materials

1000rpm

1000rpm

6 ¬

- - to 40 °C 30°C

Sports wear

1000rpm

1000rpm

7 ¬ 

- - to 40 °C - -°C

Slight-soil cotton, linen and 
synthetic fabrics

1000rpm

1000rpm

8 ¬ 

- - to 30 °C - -°C

Fast colour synthetic

800rpm

800rpm

9 ¬ 

- - 

- -°C

/

1000rpm

1000rpm

10 ¬ 

- -

- -°C


/

1000rpm

 1000rpm

Yes

No

Optional


 Temperature

Prewash

Cotton

Synthetic

Mix

Sport

Quick

Express15

Rinse

Spin/drain

Summary of Contents for HW60-1201-U

Page 1: ...omatic Drum Washing Machine USER MANUAL HW80 1401B U HW70 1401B U HW70 1401S U HW70 1401 U HW70 1201B U HW70 1201S U HW70 1201 U HW60 1401B U HW60 1401S U HW60 1401 U HW60 1201B U HW60 1201S U HW60 1201 U ...

Page 2: ... local authority to learn about disposal and recycling The product and packaging should be taken to your local collection point for recycling Some collection points accept products free of charge We apologise for any inconvenience caused by minor inconsistencies in these instructions which may occur as a resultof product improvement and development KESA ELECTRICALS U K HU1 3AU 05 12 2010 legend Fo...

Page 3: ...eep this manual in a convenient place so you can always refer to it for the safe and proper use of the appliance If you sell the appliance give it away or leave it behind when you move house make sure you also pass on this manual so that the new owner can become familiar with the appliance and safety warnings Accessories Check the accessories and literature in accordance with this list HW80 1401 H...

Page 4: ...uding the polystyrene base Upon opening the package water drops may be seen on the plastic bag and the porthole This is normal phenomenon resulting from water tests in the factory Description This diagram may be slightly different from the layout of the washing machine you have just purchased due to technical improvements Preparation Drain hose Water inlet valve Power cord Back cover screws Back c...

Page 5: ...is not used by persons with reduced physical sensory or mental capabilities lack of experience and knowledge without supervision or instruction by a person responsible for their safety Supervise children to ensure that they do not play with the appliance DO NOT Touch or use the appliance when barefoot or with wet or damp hands or feet Use flammable detergent or dry cleaning agent Use any flammable...

Page 6: ...Note 1 When you replace the back cover the convexity must face to outside and you have to insert the back cover from the two gaps as shown in fig 5 2 Keep the transportation bolts and synthetic stabilisers in a safe place for later use Adjusting the washing machine There are adjustable feet under the bottom of the washing machine Before use they should be adjusted so that the machine is level This...

Page 7: ...the drain hose to the clip at the back of the washing machine to prevent it from dropping off Note The drain hose should not be submerged in water and should be securely fixed and leak free If the drain hose is placed on the ground or if the pipe is at a height of less than 80cm the washing machine will continuously drain while being filled self siphoning Connecting to the power supply Before conn...
Page 8: ...hen the washing machine is connected to the power socket and a program is selected lightly touch this button to start operation During a wash cycle touch it lightly operation will stop and the digits on the screen start blinking Touch it again to resume operation To cancel a wash program during a wash cycle touch this button when the digits on the screen start blinking press the Power switch the p...

Page 9: ... laundry is not balanced during spinning the time may be automatically prolonged These are normal phenomena I Intense button If the laundry is heavily soiled press this button before starting the program When the button is pressed the washing time increases J Extra rinse button Press this button the washing machine will perform additional rinses Press the button once to select one additional rinse...

Page 10: ...1201B U HW60 1201S U HW60 1201 U 1 to 90 C 40 C Heavy soiling 1000rpm 1000rpm 2 to 90 C 40 C Cotton fabrics 1000rpm 1000rpm 3 to 60 C 40 C Cotton or synthetic 1000rpm 1000rpm 4 Wool to 40 C C Woolen fabrics 600rpm 600rpm 5 to 60 C 30 C Different materials 1000rpm 1000rpm 6 to 40 C 30 C Sports wear 1000rpm 1000rpm 7 to 40 C C Slight soil cotton linen and synthetic fabrics 1000rpm 1000rpm 8 to 30 C ...

Page 11: ...5L 36 5L 43L 30 C 1 25 Quick 1kg 2kg 2kg 0 06kwh 0 065kwh 0 075kwh 33L 37 5L 38L C 0 40 Express15 1kg 2kg 2kg 0 02kwh 0 02kwh 0 02kwh 20L 22L 23L C 0 15 EN 60456 test program Energy label program with Standard 60 C and max spin speed and Intense function NOTE Check the rating label located on the front of the machine behind the door to see the maximum load for your model 1S U 01S U 01S U 01S U HW8...

Page 12: ...arts like buttons etc may lead to repair work which user has to pay by themselves and can cause damage in the machine Garments without hems underwear finely woven textile such as fine curtains are to be put into wash bag it is better not to wash them in a washing machine Close zippers and hooks make sure the buttons are sewn on tightly and place small items such as socks belts bras etc in the wash...

Page 13: ...add more detergent than needed Please follow the dosage recommendation on the detergent package Adding detergent Slide out the detergent drawer and put the required detergent and softening agent into the corresponding compartments Push back the drawer gently Refer to the instructions on the drawer Caution For prewashing program detergent should be added to both compartments 1 and 2 For other progr...

Page 14: ...sign will appear on the display Open the washer door and take out the laundry After washing Turn off the water supply and unplug the power cord Open the washer door to prevent formation of moisture and odours Let the door open while not used Tips for saving energy Collect clothes for one full wash load 1 Avoid overloading the washing machine 2 Prewash only heavily soiled clothes 3 Reduce the amoun...

Page 15: ...ts Cotton Approximately 300g Underwear Blended fabrics Approximately 70g LOAD REFERENCE Care chart Resistant material Delicate fabric Washable at 95 C Washable at 60 C Washable at 40 C Washable at 30 C Hand wash Dry clean only Wool Seal Bleachable in cold water Do not bleach Iron at 200 C Iron at 150 C Iron at 100 C Don t iron Dry cleaning with any solvent Dry cleaning with pericloride Dry cleanin...

Page 16: ...aning the machine Unplug the machine during cleaning and maintenance Use a soft cloth dampened with soap liquid to clean the machine case and rubber components Do not use organic chemicals or corrosive solvents Cleaning the filter Clean the filter once a month 1 Open the bottom cover 2 Remove the filter by turning counterclockwise 3 Flush the filter clean with running water 4 Replace the filter by...

Page 17: ...on bolts removed before installation to prevent damage as shown below Remove the blanking plugs 1 Remove the back cover 2 Insert the synthetic stabilisers and the transportation bolts 3 Tighten the bolts with a spanner 4 Replace the back cover 5 Long periods of disuse If the washing machine is left idle for a long period pull out the electrical plug and turn off the water supply Open the washer do...

Page 18: ...be recovered and the display will show bEEP ON CODES CAUSES SOLUTIONS Err1 Door is not properly shut _ Shut the door properly Err2 Drainage error water not emptied within 6 minutes _ Clean the filter and check the drain hose for blockage If error still exists please contact the maintenance personnel Err3 Temperature sensor not properly connected or damaged _ Contact the maintenance personnel Err4 ...

Page 19: ... the drain hose is not in water Drainage failure Drain hose is blocked Drain hose end is higher than 100 cm above the floor level The filter is blocked _ Unblock the drain hose _ Make sure the drain hose end is lower than 100 cm above floor level _ Unblock the filter Strong vibration while spinning Not all transportation bolts have been removed Washing machine is located on an uneven surface or is...

Page 20: ...pliance must be connected to a 220 240 volts 50 cycle AC supply by means of a three pin socket suitably earthed and should be protected by a 13 amp fuse in the plug The appliance is supplied with a standard 13 amp 3 pin plug fitted with a 13 amp fuse Should the fuse require replacement it must be replaced with a fuse rated at 13 amps and approved to BS1362 If the mains plug is unsuitable for the s...

Reviews: