background image

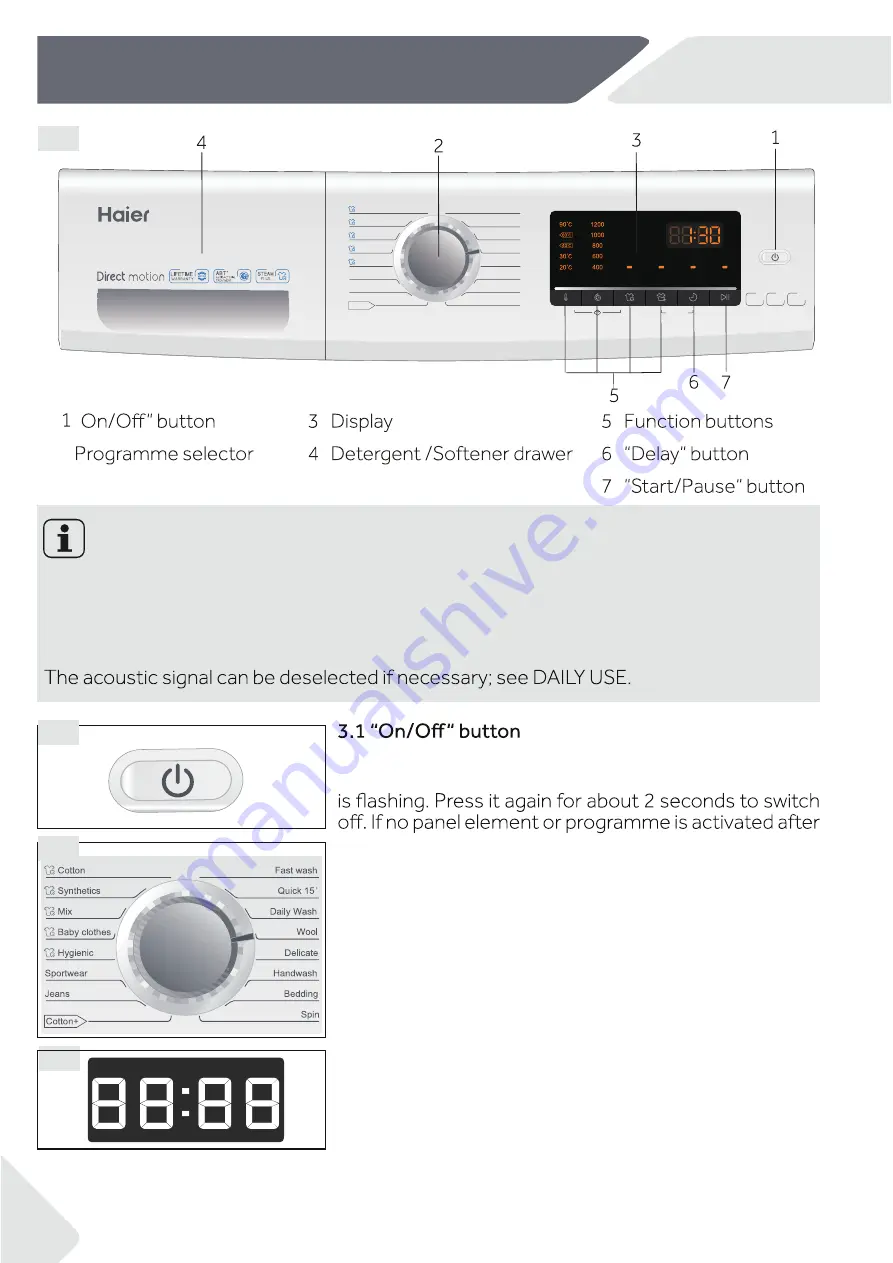
3-Control panel


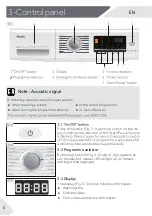
Note : Acoustic signal

In following cases an acoustic signal sounds:


when pressing a button 


when turning the programme selector


at the end of programme


in case of failures

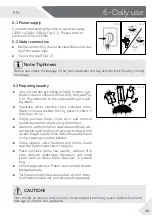
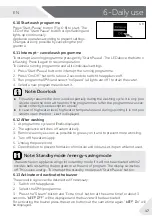
Press this button (Fig. 3-1) gently to switch on, the dis-

play is shining, the indicator of the “Start/Pause” button 

a while machine will shut down automatically.

3.2 Programme selector 

By turning the knob (Fig. 3-2) one of 16 programmes 

can be selected, related LED will light up, its default 

settings will be displayed.

3.3 Display

The display (Fig. 3-3) shows following information:


Washing time


End time delay


Error codes and service information

3-1

3-2

3

3-3

1200

rpm

Capacity

+++

A

Energy

Speed up

Temp

.

Speed 

Start/pause

Extra rinse

Delay

Steam

Cotton

Synthetics

Mix

Sport

Jeans

Baby Care 

Hygienic 

Fast wash

Spin

Bedding

Handwash

Delicate

Daily Wash

Quick 15

Wool

HW70-B1239

7kg

2

''

EN

8

Summary of Contents for HW70-B1239

Page 1: ...EN User manual Washing machine HW70 B1239 ...

Page 2: ...behind when you move house make sure you also pass this manual so that the new owner can become familiar with the appliance and safety warnings Legend Warning Important Safety information General information and tips Environmental information Disposal Help protect the environment and human health Put thepackaginginapplicablecontainerstorecycleit Help to recycle waste of electrical and electronic a...

Page 3: ...n 4 2 Product description 7 3 Control panel 8 4 Programmes 11 5 Consumption 12 6 Daily use 13 7 Eco friendly washing 18 8 Care and cleaning 19 9 Troubleshooting 22 10 Installation 25 11 Technical data 29 12 Customer service 31 ...

Page 4: ... children under 3 years of age from the appliance un less they are constantly supervised Children shall not play with the appliance Do not let children or pets come close to the appliance when the door is open Store washing agents out of reach of children 9 3 3 4 83 8 3 3 vent laundry from being entangled If necessary use an appropri ate bag or net Do not touch or use the appliance when barefoot o...

Page 5: ... are supervised if they carry out cleaning and maintenance Disconnect the appliance from the electrical supply before un dertaking any routine maintenance Keep the lower part of the porthole clean and open door and detergent drawer if appliance is not in use to prevent odours Do not use water spray or steam to clean the appliance Replace a damaged supply cord only by the manufacturer its 3 3 E 8 3...

Page 6: ...e is above 5 C Do not place the appliance directly on a carpet or close to a wall or furniture Do not install the appliance in direct sunlight or in the near of heat sources e g stoves heaters Make sure that the electrical information on the rating plate agrees with the power supply If it does not contact an electrician Do not use multi plug adapters and extension cables Make sure only the deliver...

Page 7: ...ter inlet valve 6 Drain hose 2 2 Accessories Check the accessories and literature in occordance with this list Fig 2 3 Inlet hose assembly 5 Blanking plugs Drain hose bracket F3 Warranty card 2 3 1200 Capacity rpm 7kg A Energy Speed up HW70 B1239 Temp Speed Start pause Extra rinse Delay Steam Cotton Synthetics Mix Sportwear Jeans Baby clothes Cotton Hygienic Fast wash Spin Bedding Handwash Delicat...

Page 8: ...matically 3 2 Programme selector By turning the knob Fig 3 2 one of 16 programmes can be selected related LED will light up its default settings will be displayed 3 3 Display The display Fig 3 3 shows following information Washing time End time delay Error codes and service information 3 1 3 2 3 3 3 1200 rpm Capacity A Energy Speed up Temp Speed Start pause Extra rinse Delay Steam Cotton Synthetic...

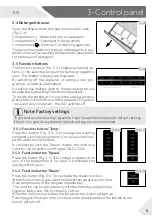
Page 9: ... 2 456 7 Note Factory settings 8 9 1 0 1 1 1 00 3 0 7 If there is no special requirement default settings are recommended 40123 4 Press this button Fig 3 5 1 to change the washing temperature of the programme If no value is illuminat ed the water will not heated In conjunction with the Steam button the child lock 3 9 A B46 4CADE7 3 5 2 Functio 4531167 Press this button Fig 3 5 2 to change or desel...

Page 10: ...able if laun dry is slightly soiled Press simultaneously button Extra rinse and Delay Fig 3 5 5 for about 3 seconds to activate the Speed up function u is displayed This function is not available in all programmes see PROGRAMMES 4 1 8 7 Press this button Fig 3 6 to start the programme with a delay End time delay could be increased in steps of FG 31 GHI2JK 7 L 1 M 0 0 means end of programme cycle w...

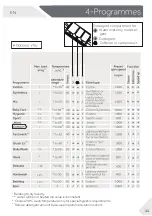
Page 11: ...e 90 C wash temperature only for special hygienic requirements 4 Reduce detergent amount because programme duration is short EN 1 75 1 75 7 7 3 3 5 3 5 3 5 7 3 5 3 4 4 3 40 Detergent compartment for 1 Water inlet only no deter gent 2 Detergent Softener or care product 7 3 5 7 1 7 1 1 75 ...

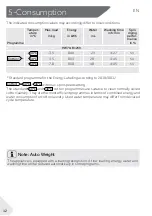
Page 12: ...C 7 0 0 50 40 4 45 53 O P 1 1 1 3 1 5 1 4 9 00 1 JGQG FG 5RS Cotton 60 C 40 C with max spin speed setting The standard 60 C and 40 C cotton programmes are suitable to clean normally soiled 0 1 7 8 1 T 1 1 1 3 9 1 1 3 1 0 1 7 R 1 1 1 1 31 0 1 cycle temperature Note Auto Weight The appliance is equipped with a loading recognition At low loading energy water and washing time will be reduced automatic...

Page 13: ...htly X0 N 0 V 0 1 1 hem delicate underwear Dessous and small items such as socks belts bras etc in a wash bag R 3 0 0 1 3 3 91 9 H bedspreads etc Turn jeans and printed decorated or color inten sive textiles inside out possibly wash separately 6 3 6 1 Power supply Connect the washing machine to a power supply 220V to 240V 50Hz Fig 6 1 Please refer to section INSTALLATION 6 2 Water connection Befor...

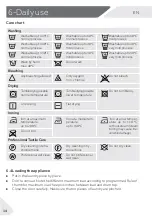
Page 14: ...le normal temperature Tumbledryingpossible lower temperature Do not tumble dry Line drying Flat drying Ironing Iron at a maximum temperature up to 200 C Iron at a medial tem perature up to 150 C Iron at a low temper ature up to 110 C withoutsteam steam ironing may cause irre versibledamage Do not iron H I1 8 01 1 J8 1 Dry cleaning in tetra chloroethene Dry cleaning in hy drocarbons Do not dry clea...

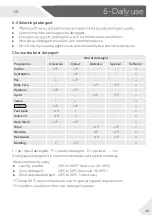
Page 15: ... o o Sport L P L P o Jeans L L o Hygienic L P L P o Fast wash L P L o Quick 15 L P L o Daily Wash L P L P o Baby Care L P L P o Delicate L P L P o Handwash L P L P o Bedding P L P o L gel liquid detergent P powder detergent O optional _ no If using liquid detergent it is not recommended to activate the time delay We recomment by using Laundry powder 20 C to 90 C best use 40 60 C Color detergent 20...

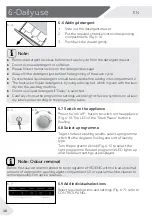
Page 16: ...t is by using a dosing ball which is given with the laun dry into the washing machine Do not use liquid detergent if Delay is selected Carefully choose the programme settings according to the care symbols on all laun dry labels and according to the programme table P 51 1 8 3 B 8221 To get the best washing results select a programme 0 01 2 type Turn the programme knob Fig 6 6 to select the right pr...

Page 17: ... and all its individual settings 1 Press Start Pause button to interrupt the running programme 2 B FD ED F G1 0G 1 H 055 0 3 I1 5 044 JB9 0 F J5 K L0 0 M 0 0 4 Select a new programme and start it Note Door lock For safety reasons the door is locked partially during the washing cycle It is only pos sible to open the door at the end of the programme or after the programme was can celled correctly se...

Page 18: ...ad size Do not overload hand width clearance above laundry For slightly soiled laundry select the Quick Wash programme Apply exact dosages of each washing agent Choose the lowest adequate washing temperature modern detergents are ef 2 0 G QRS Raise default settings only due to heavy staining Select max spinning speed if a domestic dryer is used ...

Page 19: ...run programme HYGIENIC with no load in order to remove possible corruptive residues quarterly It is better to use a small amount of special machine cleaner in washing agent compartment 2 B C 6A A 6 6A A DA To prevent blockage of water supply by solid substanc U 4 0 1 0 2 N0 N 5 1 5 0 1 0 supply 0 0 G0 U LV 8 3 of the appliance as well as on the tap V 1 0 0 0 G 1 LV WXYM 9 0 0 8 4 Cleaning the drum...

Page 20: ...l plug Fig 8 6 2 1 0 155 2 LV WX M 3 Open the door to prevent formation of moisture and odours Let door open while not used Before next usage check carefully power cord water inlet and drain hose Make sure everything is properly installed and without leakage WARNING J 0 I U 0 5145 0 G N 2 3 0 2 0 5 0 1 0 0 cooled down Note Hygiene After long periods of disuse we recommended to run programme HYGIEN...

Page 21: ...EN 8 Care and cleaning 21 CAUTION B145 0 0 G 0 0 1 1 9 1 water can escape 41 G 5 0 402 0 0U0 9 0 0 1 2 5145 1 1 0 Fig 8 14 10 I _ 1 2 LV WXZ M 11 N A05 8 14 8 15 ...

Page 22: ...e appliance and disconnect the mains plug from the mains socket 0 T1 54 1 G N 2 G2 T10 0 _5 G 01 improper repairs can cause considerable consequential damages A damaged power cable should only be replaced by the manufacturer its service 0 4 0 2 T10 5 0N 0 0c0 9 1 Information codes Following codes are displayed only for information referring to the washing cycle No measures must be performed Code M...

Page 23: ... pressure Door is not properly closed Close the door properly Water supply failure Ensure the water supply Machine is draining G Height of drain hose is below 80 cm Make sure that drain hose is properly installed Drain hose end could reach into water Make sure the drain hose is not in water Drainage failure Drain hose is blocked G U 0 B145 G U 0 5145 Drain hose end is higher than 100 cm 0G N A N M...

Page 24: ...N 04 A 0 drum and or deter gent drawer Detergent is not a appropriate Check detergent recommen dations Excessive use of detergent Reduceamountofdetergent Automatic adjust ment of washing time Washing programme duration will be adjusted This is normal and doesn t af fect functionality Spinning fails G0 0 01 2 Check machine load and laun dry and run a spinning pro gramme again 0 0 2 0 ing result Deg...

Page 25: ...1 1 2 2 3 3 4 4 EN 25 ...

Page 26: ...5 5 6 6 5 5 7 7 4 5 EN ...

Page 27: ...EN tion Fig 10 8 10 8 10 9 10 10 end to the appliance Fig 10 9 Tighten the 3 4 thread Fig 10 10 10 11 Put the plug into the socket Fig 10 11 ...

Page 28: ...pwards bottom side towards operator 3 Take out the noise reduction pads and remove the double sided adhesive protective film the noise reduction pads under the washing machine cabinet as shown in Figure 10 13 two longer pads in position 1and 3 two shorter pads in position 2 and 4 Finally set the machine upright again Warm tip Noise reduction pad is optional could help to reduce noise please assembl...

Page 29: ...w the appliance is used dM 0 8 0 g 2 0 0 e 4 g 4 Based on the standard 60 C cotton programme at full load and the standard 40 C cotton programme at partial load 5 Standard 60 C cotton programme and standard 40 C cotton programme are standard 0 5 044 40 0G 0 0 5 044 0 1 0G 0 40 2 01 2 0 2 0 4 g programmes in terms of combined energy and water consumption 6 In case there is a power management system...

Page 30: ...the correspon ding harmonised standards which provide for CE marking 11 Technical data EN 30 11 2 Additional technical data HW70 B1239 Dimension HxWxD in mm 850x595x460 Voltage in V 220 240 V 50Hz Current in A 10 Max power in W 2000 Water pressure in MPa Netto weight in kg 62 ...

Page 31: ... 1 L 8 1 3 2 68 8M 616 03 8I 2 3 5 1 II1 68 D 1 0 N European Haier addresses Country Postal address Country Postal address Italy Haier Europe Trading SRL Via De Cristoforis 12 21100 Varese ITALY Haier France SAS 3 5 rue des Graviers 92200 Neuilly sur Seine FRANCE Spain Portugal Haier Iberia SL Calle Marruecos 200 08019 Barcelona SPAIN Belgium FR Belgium NL Netherlands Luxembourg Haier Benelux SA A...

Page 32: ...0020506943KP ...
Reviews: