background image

Automatic


washing


machine

This


manual


is


for

HWM130-9188DD

User's   manual

Please read this manual 
carefully before using. 
Retain it for future reference.

Summary of Contents for HWM130-9188DD

Page 1: ...Automatic washing machine This manual is for HWM130 9188DD User s manual Please read this manual carefully before using Retain it for future reference ...

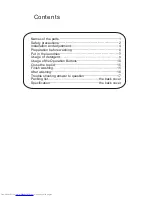
Page 2: ...ent 4 Preparation before washing Put in the laundries Usage of detergent Usage of the Operation Buttons 10 Close the top lid 15 Finish washing 15 After washing 16 Trouble shooting answer to question 17 Packing list Specification the back cover the back cover Contents ...

Page 3: ...n to perform Performing of those actions may result in damage of the machine or injure the personal safety of the user Please understand the shapes of the washing machine and accessories may be different from the sketch figures in this manual due to product improvement 1 Outer tub cover Ä Ú Ô ì º Í þ Ã û Æ Detergent box Handle Top lid component Filter frame Lint filter Inner tub Pulsator Cabinet A...

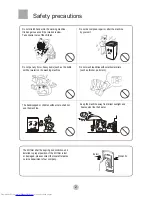
Page 4: ...t water on the washing machine Do not wash laundries with volatile materials such as thinner petrol etc Keep the machine away from direct sunlight and heat source like the heater The handicapped or children without care shall not use the machine The lint filter shall be kept in good condition and installed to proper position If the lint filter is lost or damaged please contact the local after sale...

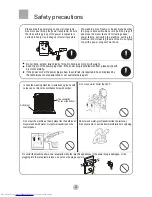
Page 5: ...Please plug the power plug on special receptacle Be sure to use three pins power receptacle Ensure that the earthing prong of the power receptacle is earthed reliably Use leakage protector if possible The washing machinemust be positioned sothat the plug is accessible Be sure to pull the plug off and close the water faucet in following cases power failure delivering the machine setting the machine...

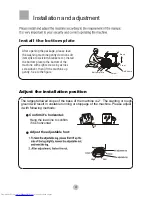
Page 6: ... horizontal Hang the lead line to confirm if it is horizontal Adjust the adjustable foot Installation and adjustment Back Front Screw Bottom plate Soft items Install the bottom plate After opening thepackage please lean the washing machinegently down onsoft items like to welcloth blanket etc Install the bottom plateto the bottomof the machine with eight screws by across screwdriver thenlift the ma...

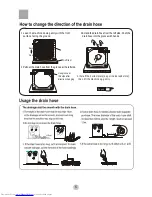
Page 7: ...he drain hose from the left side Push the drain hose into the groove with hands 2 Pull out the drain hose from the groove at the left side Back Front Soft item Use groove at this side after direction changing 4 Install the bottomplate as per indicatedbefore then lift themachine up gently Page 4 5 ...

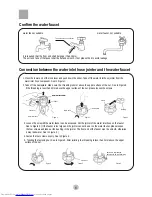
Page 8: ...t must be smooth otherwise it may leak water See to Figure 3 1 Press the lower end of the lock lever and push down the slider Take off the water inlet hose jointer from the water inlet hose component See to Figure 1 4 Fasten the four screws evenly See to Figure 4 5 Twisting the fastening nut See to Figure 5 After twisting the threading is less than 2mm above the upper surface of the nut water inle...

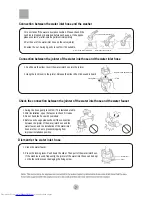
Page 9: ... the jointer 2 Hang the lock lever to the jointer Release the slider till a click sound is heard Locking level Slider water absorption cushion nut of the water inlethose the jointer of the water inlet hose Slider Locking level jointer of the water inletvalve 1 Close the water faucet 2 Press the locking lever Push down the slider Then pull of the water inlet hose If the machine is used frequently t...

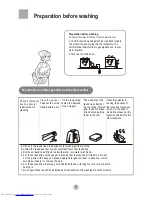
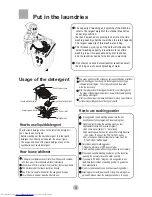
Page 10: ... heavysoil please first remove the dirt like mud or dust For the parts with heavy soil please apply detergent on them in advance which can make it easier to remove the soil e For those laundries that may get lint balland those with long fur turn it over before putting in f Do not put those laundries polluted by chemicals into the washing machine directly Check if thelaund ries has special requirem...

Page 11: ...se rich foam washing powder If you select program it is suggested to use liquid detergent instead of washing powder to guarantee the washing effect SPEEDY Please add suitable washing powder as per the laundries quantity the set water level and water quantity It is suggested to add washing powder into the box directly under fuzzy program and reserve program How to use whitener The whitener shall no...

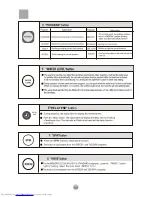
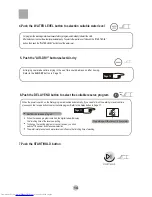
Page 12: ...al changesby children Child lock function Push the POWER button to switch on the power Under power on mode push it to switch off the power Push the POWER button to switch on the power If the START HOLD button is not pushed the machine will switch off the power automatically after 5 minutes A POWER button After the power is switched on press it to start the machine During working push it to pause D...

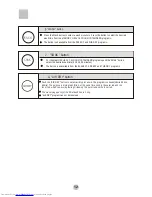
Page 13: ...11 E DELAY END button DELAY END ...

Page 14: ...ect the desired soak time 5 10 20 30 minutes J SOAK button The button is unavailable from the BLANKET SPEEDY and TUB DRY programs G button RYING D AIR DRY program can not be reserved G button AIR DRY The max drying apacity of the fibre laundries is 3 0kg Push the AIR DRY button to select air dry procedure The program is chosen 15min 30min inner tub which can avoid growing mildew on the outer tub a...

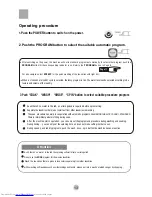
Page 15: ...pinning time and can not make setting in other cases 3 Push SOAK WASH RINSE SPIN button to select suitable procedure program During speedy and tub dry programs push the wash rinse spin button the machine have no reaction Separate the laundries that are not colorfast from other laundries in washing The soak procedure can work in cooperation with automatic programs like MEMORY STANDARD There is inte...

Page 16: ... the reserve button to select suitable program Delay Refer to the Delay button in Page 11 When the reserve program is started the digital tube will display the finishing time of the reserve washing To change the running program or cancel reserve you shall switch off the power and make new selection The water inlet pressure and water level can influence the finishing time of washing The washing wil...

Page 17: ... Finish washing Excluding during filling water procerdure If you open the top lid the machine will stop working and alarm before spinning When the washing is finished the power will be switched off automatically 15 ...

Page 18: ...mantle Install The back cover of lint filter Install Dismantle Down Up Up The front cover of lint filter 1 Push down the spring piece of the top lint filter to make the claws out of the filter cover and then pull out the lint filter to get it down figure1 2 Pull the back of the lint filter and then you can get down it off the front cover of the lint filter figure2 3 Sweep the rubbish in the lint f...

Page 19: ...r If there are real breakdowns please come to the special maintenance department or after sale service department of our company Do not repair it by yourself It is to avoid splashing during water inlet The pulsator pauses during water inlet in wash and rinse 17 Phenomena The reason How to settle No or slow drain the digitron displays E1 buzzing Running pauses during spin the digitron displays E2 b...

Page 20: ...Weight Inlet pressure Water level Water quantity L 220V 240V 50Hz 13 0kg 13 0kg 0 03MPa 1 0MPa L 660mm W 660mm H1055mm 57kg 1 21 2 32 3 42 4 51 5 60 6 69 7 77 8 94 Packing list Name User s manual Quantity 1 1 1 8 Automatic washing machine Warranty Card Water inlet hose Tapping screw 1 ...

Reviews: