background image

The capacity of washing and spinning of the 
machine refer to the largest weight of the 
standard laundries under dry condition  that
can be washed or spinned in one time. One
time washing quantity shall be lower than the 
rated capacity.
The thickness, size, type of the cloth will inf-
luence the actual washing capacity. It is sui-
table for one time washing to put in reasona-
ble amount of laundries and the laundries can
 be turned round in washing.
Do not select high water level for laundries 
less than 1.0kg, so as to avoid splashing of 
water.
To wash thin laundries like the stocking, silk 
etc., please first put them into washing mesh 
bag (which can be purchased separately)
before wash.

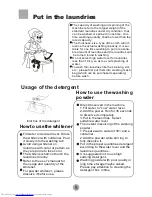
Put in the laundries

How to use the whitener

Fill water to decided level. Dilute
the whitener with container. Pour
it slowly into the washing tub.
Avoid using whitener on
laundries with color or pattern as
they are prone to lose color.
The whitener shall not touch the
laundries directly.
Refer to the user's manual for
the usage and quantity of the
whitener.
For powder whitener, please
dissolve it before use.

Inlet box of the detergent

How to use the washing 
powder

Direct dissolved in the machine
1.Fill water to "Low" water level.
2.Add the power. Run for 30 seconds 
to dissolve it completely.
3.Put in the laundries. Select 
suitable water level.
The instant dissolving of the washing
powder:
1.Prepare warm water of 30

and a 

container.
2.Add the powder while stirring to
fully dissolve it.
Put in the proper quantities detergent
according to the water level and the 
laundries quantities .
It is suggested not to use high 
sudsing detergent.
Washing powder with poor quality or 
long time storage maybe caked. 
Please pay attention to cleaning the 
detergent box in time

Usage of the detergent

8

Summary of Contents for HWM55-10

Page 1: ...Full Automatic Washing Machine with Pump This manual is for Please read this manual carefully before using Retain it for future reference HWM55 10 User s manual 0030806972C ...

Page 2: ...tion and adjustment 4 Preparation before washing 7 Put in the laundries 8 Usage of the detergent 8 Use the operation buttons 9 Close the top lid 13 Finish washing 13 Disposal after washing 14 Trouble shooting Answer to question 15 Packing list Specifications 16 ...
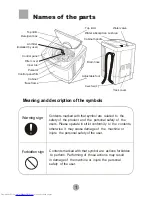
Page 3: ... of the machine or injure the personal safety of the user Contents marked with that symbol are actions forbidden to perform Performing of those actions may result in damage of the machine or injure the personal safety of the user 1 Adjustable foot Fixed foot 3 ack cover Cabinet ase frame Drain hose Control panel film Control panel Filter cover Pulsator Inner tub Detergent box Top lid B Cabinet han...

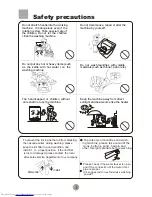
Page 4: ...he machine Do not use wet hand to ins ert or pull out the power plug In case the washing machine is installed on ground with carpet do not block the ventilation hole with carpet Do not let the machine share one receptacle with other electric appliances If the power plug is damaged or the plugging into the receptacle is loose do not use the plug any more Do not wash water proof laundries like the r...

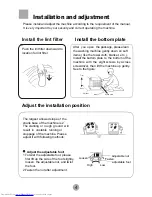
Page 5: ...ake special care of the children Do not let the children climb the washing machine Petrol Thinner Dismantle Install To prevent the lint inside the tub from blocking the cascade outlet during washing please keep the lint filter in good condition and install it to proper position If the lint filter is lost or damaged please contact the local after sales service department of our company Toprotect yo...

Page 6: ... the machine with the eight screws by a cross screwdriver then lift the machine up gently See to the figure Adjust the installation position Please install and adjust the machine according to the requirement of the manual It is very important to your security and correct operating the machine Push the lint filter downward to location for lint filter 1 To twist the adjustable foot please first lift...

Page 7: ... 1 2m 0 7m H 5 1 Dismount the back cover of the washing machine 3 protrude the drain hose from the hole on the right side of the bottom and fast it onto the bottom with the rack and screws Set the bracket on the drain hose There is a hole on the cabinet to hang the drain hose as figure 3 2 Take off the drain hose frame Put down the drain hose Take off the drain hose rack As indicated in Figure 1 P...

Page 8: ...ve Figure 2 1 Swaying the hose gently to confirm if it is fastened stable 2 After installation open the tap to check if it leaks 3 Do not bend the hose with overstrain 4 Before each usage please check if the connection between the water inlet hose and the water tap is firm so as to prevent dropping from improve Installation position 1 After using Close the water tap 2 Pull off the water inlet hose...

Page 9: ...ns shall be put in loosely Pay attention to followings before washing the laundries a Please check if the laundries are applicable for washing b Separate those not colorfast from other laundries c For laundries not water absorbing please put them into water with hands d For laundries with much soil please remove the soil first You can add detergent on the part with serious soil directly It is much...

Page 10: ...container Pour it slowly into the washing tub Avoid using whitener on laundries with color or pattern as they are prone to lose color The whitener shall not touch the laundries directly Refer to the user s manual for the usage and quantity of the whitener For powder whitener please dissolve it before use Inlet box of the detergent How to use the washing powder Direct dissolved in the machine 1 Fil...

Page 11: ...r load below 2kg PROGRAM SELECTION button You can select from the following four programs Prog ram WATER LEVEL SELECTION button If QUICK WASH is selected water level will indicate 2 After water level reaches 2 it will wash while water filling and wash normally upon the water level reaching 4 The use selects a suitable water level depending on the load After washing for q min pressing WATER LEVEL b...

Page 12: ...ndicate in reservation To indicate during sensing To indicate remaining min During program running To indicate remaining reserved time hrs during reservation period To indicate fault symbols for abnormal conditions see page 16 POWER ON OFF START PAUSE RESERVATION SURPLUS MIN RESERVE HOURS LATER Lock Child safety lock program Start up Push the RESERVATION and SPIN and POWER ON OFF buttons at the sa...

Page 13: ...t other program push the PROGRAM SELECTION button till the corresponding indicator is on Refer to the PROGRAM SELECTION button in Page 10 In selecting the STANDARD or JEANS programs the machine will execute fuzzy program to control the complete procedure automa tically according to the cloth weight and water temperature to select water level current and washing time Page 13 Page 10 1 Push the POWE...

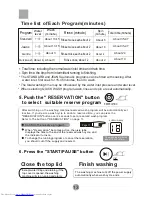
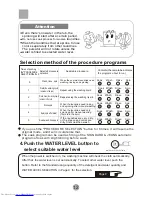
Page 14: ...undries are very dirty or the sleeve and collar are dirty first soak then wash Repeat using the washing liquid Selected procedure selection Wash the washing liquid remains in the tub Wash rinse therinsingliquid remainsinthetub Rinse spin Spin spin after drain Soak wash rinse spin Wash rinse spin When the common laundries need washing rinsing and spinning Repeat using the washing liquid 0 When the ...

Page 15: ...s opened the washing machine will stop running and alarm The washing machine cuts off thepower supply automatically when wash cycle ends START PAUSE RESERVATION Page 11 SURPLUS MIN RESERVE HOURS LATER Gentle Jeans Quick wash About 6 About 35 47 About 10 About 24 About 13 15 About 3 About 4 About 3 About 2 About 2 Total time including the normal water inlet time and drain time Spin time the time fr...

Page 16: ...o pull off the power plug before maintenance 2 Do not store water in the washing machine for a long period Drain the water completely after each using If the cabinet is dirty wipe it with wet cloth Do not flush it directly with water Wipe it with neutral detergent Do not wipe it with thinner petrol alcohol etc Thinner Alcohol Petrol The filter screen of the water inlet valve is likely to be blocke...

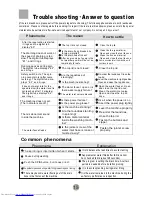
Page 17: ...l tub display E0 Safety switch acts The spin ning cannot work after twice revising The digital tube dis plays E3 and it rings It does not water inlet or the speed is slow the water level is not reached after 15 minutes The digital tube displays E4 and it rings The draining does not work or the speed of draining is too slow The digital tub displays E1 and it rings Is there power failure Use it when...

Page 18: ...nside the document bag Storage position Full automatic washing machine Inside the document bag Inside the accessory bag Between the upper cushion of the washing machine package and the upper seal of the package carton Packing list Lint filter Inside the document bag One piece One piece One piece 16 Specifications Water level Water quantity about Water inlet pressure 0 03MPa 1MPa Rated washing spin...

Reviews: