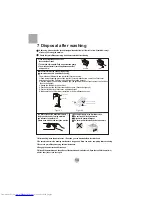
background image

User's manual

This manual is for

HWM62-0566

Please read this manual 
carefully before using. 
Retain it for future reference.

Fully automatic washing machine

Summary of Contents for HWM62-0566

Page 1: ...User s manual This manual is for HWM62 0566 Please read this manual carefully before using Retain it for future reference Fully automatic washing machine ...

Page 2: ...ist Specification Installation and adjustment Usage of the drain hose Preparation before washing Put in the laundries Usage of the detergent Close the top lid Installation the water inlet hose Disposal after washing Finish washing Use the operation buttons Answer to question ...

Page 3: ...tions forbidden to perform Performing of those actions may result in damage of the machine or injure the personal safety of the user Control panel seat Lint filter Inner tub Attachment block Cabinet Fixed leg 3 pieces Adjustable leg Detergent box Top lid component Inner cover component Pulsator Water inlet valve Water absorption cushion Front control board Back cover Power line Adjustable foot sea...

Page 4: ...it is required to replace it by the technicians of our special shop or the after sale service department Keep the pin of the power plug clean Do not put the machine at damp place like the bathroom Never wash it with water Do not place wet laundries on the control panel Do not use water hotter than 50 C In case the washing machine is in stalled on ground with carpet do not block the ventilation hol...

Page 5: ...proper position during washing If the lint filter is lost or damaged please contact the customer care agent of our company To protect your laundries and washing machine please take out all of the coins buttons sand hairpin and other foreign materials before washing Install Dismantle Please check if the water faucet is open and if the connection of the water inlet pipe is proper It is suggested to ...

Page 6: ...h Do not dismount the inner cover component after washing Outer tub cover Outer tub cover shaft groove Inner cover shaft Inner cover component Figure 1 Right hand Left hand Figure 2 Before using the washing machine firstly please install the inner cover component I After opening the package please lean the washing machine gently down on soft items like towel cloth blanket etc Install the bottom pl...

Page 7: ...e sure of the correct of installation it is suggested to change the direction of the drain hose with our company serviceman 2 Take off the drain hose from base nip flat the drain hose mouth dismantle the hang hook take the drain hose into cabinet from the left of base As indicated figure 2 1 Loosen the screws of back cover dismantle the back cover then take off the drain hose As indicated figure 1...

Page 8: ...e faucet must be smooth otherwise it may leak water See to Figure 3 1 Press the lower end of the lock lever and push down the slider Take off the water inlet hose jointer from the water inlet hose component See to Figure 1 3 Fasten the four screws evenly See to Figure 4 remark Before installation the threading is 4mm above the upper surface of the nut After installation the threading is 2mm above ...

Page 9: ...the jointer 2 Hang the lock lever to the jointer Release the slider till a click sound is heard Locking lever Slider water absorption cushion nut of the water inlet hose the jointer of the water inlet hose Slider Locking lever jointer of the water inlet valve 1 Close the water faucet 2 Press the locking lever Push down the slider Then pull of the water inlet hose If the machine is used frequently ...

Page 10: ...ies with buttons into other laundries The quantity of the laundries shall not be too large Stretch and loosen the laundries before putting them in the tub a Check if the laundries are applicable for washing with machine b Divide the laundries that are not colorfast from other laundries c Put those laundries difficult to absorb water into water with hand d For those laundries with heavy soil please...

Page 11: ...while stirring to fully dissolve it In selecting The super quick program it is suggested to adopt liquid detergent instead of washing powder to guarantee the washing effect Put in the proper quantities detergent according to the water level and the laundries quantities It is suggested not to use high sudsing detergent Washing powder with poor quality or long time storage maybe caked Please pay att...

Page 12: ...SE RESERVE Reserve button The digitron displays remain time before washing is finished in minutes Push reserve button the digitron displays the reserve time of washing in hours The indicator flashes to indicate that the reserve function is operating Push reserve button to display the reserve mode PROCESS FUNCTION Start pause button After the poweris switched on press it to start the machine During...

Page 13: ...ry which can avoid growing mildew Power button Push the power button to switch on the power Under power on mode push it to switch off the power Push the power button to switch on the power If the start pause button is not pushed the machine will switch off the power automatically after 5 minutes Water level button You can also set water level by yourself After the machine is started it will not se...

Page 14: ... is controlled automatically Push the PROCESS FUNCTION button to select suitable procedure and function Attention Even there s no water in the tub a certain period is required before spin starting Wash and spin after putting the damageable clothes into tuck net to avoid scathe The pulsator will rotate brokenly when the water level reach to 4 Do not use the soak program for the woolen textiles The ...

Page 15: ...the rinsing liquid remains in the tub Repeat using the washing liquid When prevent the laundries from corrugating and the laundries do not need spinning When the laundries need rinsing and spinning after manual washing Press WATER LEVEL button select suitable water level After switching on the power when select the common and standard program the washing machine will execute fuzzy program automati...

Page 16: ...tfilter 4 Put the backof the lintfilter into thefront cover Seeto the figure2 5 Put the lintfilter into filtercover andmake it tight 6 Make sure thelint filter iswell installed orit can influenceyour use Filter cover Lint filter Figure 2 dismantle install The front cover of lint filter The back cover of lint filter The filter screen of the water inlet valve is l ikely to be blocked by foreign mate...

Page 17: ...normal sound inside the machine Phenomenan The reason How to settle Trouble shooting Answer to question If there s breakdown please pull off the power plug before checking The following phenomena are not breakdowns sometimes Please confirm again before sending it to repair If there are real breakdowns please come to the special maintenance department or after sale service department of our company...

Page 18: ...se to the water faucet The end connecting to the water inlet hose jointer Inner cover component One piece Fully automatic washing machine Water level Water quantity about Injection pressure Specification Warranty card One set One piece Put into the innner tub Put into the inner tub One piece One piece Water inlet hose 0 03MPa 1MPa Rated washing spinning capacity 6 2 6 2 ...

Reviews: