background image

iPod/iPhone OPERATION

9

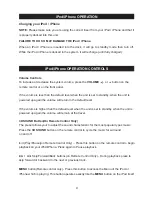
Charging your iPod / iPhone

NOTE:

FAILURE TO DO SO MAY DAMAGE THE iPod / iPhone.

Please make sure you are using the correct insert

and that it

is properly docked into this unit.

When an iPod / iPhone is inserted into the dock, it will go to standby mode then turn off.

While the iPod / iPhone is docked in the system, it will recharge (until fully charged).

from your iPod / iPhone

iPod/iPhone OPERATION CONTROLS

Volume Controls

VOLUME

To increase or decrease the system volume, press the

or      button on the

remote control or on the front panel.

If the volume is less than the default level when the unit is set to standby, when the unit is

powered up again the volume will return to the default level.

If the volume is higher than the default level when the unit is set to standby, when the unit is

powered up again the volume will remain at that level.

3D SOUND Button(On Remote Control Only)

3D SOUND

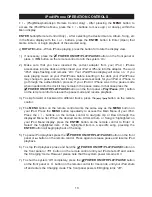
MENU

MENU

The preset allows your to adjust the sound characteristic for the most popular types music.

Press the

button on the remote control to cycle the music for surround

on and off.

(Play/Pause)(on Remote Control Only) – Press this button on the remote control to begin

playback on your iPod/iPhone. Press again to Pause playback.

/         Skip Forward/Back buttons(on Remote Control Only) - During playback press to

skip forward or backward to the next or previous track.

button(Remote control only) - Press this button to access the Menu of the iPod or

iPhone which is playing. This button operates exactly like the

button on the iPod itself.

/

Summary of Contents for IPDS-10

Page 1: ...USER MANUAL Model IPDS 10 iPod iPhone Rotational Docking Station ...

Page 2: ...ATORS 6 REMOTE CONTROL 7 OPERATING INSTRUCTIONS 8 iPod iPhone OPERATION 9 iPod iPhone OPERATION CONTROLS 10 TROUBLESHOOTING GUIDE 12 TECHNICAL SPECIFICATION 13 DOCK ADAPTOR APPLE DEVICE COMPATIBILITY CHART 14 4 CONNECTING EXTERNAL DEVICES 5 VIDEO OPERATION 11 MAINTENANCE 13 APPLE DEVICE COMPATIBILITY CHART WARRANTY 16 15 ...

Page 3: ...ventilation should not be impeded by covering the ventilation openings with items such as newspapers table cloths curtains etc Give minimum 100 mm distances around the apparatus for sufficient ventilation To prevent fire or shock hazard do not expose this unit to rain or moisture Do not subject the product to harsh impacts Do not drop the appliance This may result in damage to the product and loss...

Page 4: ... unit has been damaged in any way such as power supply cord of plug is damaged Liquid has been spilled of objects have fallen into the unit the unit has been exposed to rain or moisture or has been dropped does not operate normally Batteries shall not be exposed to excessive heat such as sunshine fire or the like Attention should be drawn to the environmental aspects or battery disposal This produ...

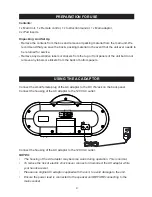
Page 5: ...x Main adaptor 4 x iPod inserts Connect the housing of the AC adaptor to the 120V AC outlet NOTES The housing of the AC adaptor may become warm during operation This is normal To reduce the risk of electric shock never connect or disconnect the AC adaptor while your hands are wet Please use original AC adaptor supplied with the unit to avoid damage to the unit Ensure the power lead is connected to...

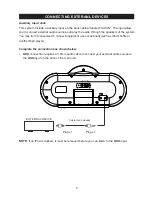
Page 6: ...to connect external audio sources and play the audio through the speakers of the system You may find it convenient to connect equipment use occasionally such as iPod shuffle or another Mp3 player Complete the connections as shown below AUX AUX connection requires a 3 5mm audio cable to connect your external audio source to the input on the back of the main unit AUX IN DC IN 8 5V Pr Y Pb COMPONENT ...

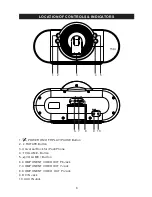
Page 7: ...n 2 ROTATE Button 3 Universal Dock for iPod iPhone 4 VOLUME Button 5 VOLUME Button 6 COMPONENT VIDEO OUT Pb Jack 7 COMPONENT VIDEO OUT Y Jack 8 COMPONENT VIDEO OUT Pr Jack 9 DC IN Jack 10 AUX IN Jack AUX IN DC IN 8 5V Pr Y Pb COMPONENT VIDEO OUT 1 2 3 4 5 6 7 8 9 10 ...

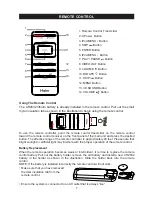
Page 8: ...te operation becomes weak or intermittent it is time to replace the remote control battery Pull out the battery holder remove the old battery and install a new CR2032 battery in the holder as shown in the illustration Slide the holder back into the remote control NOTE If the battery is installed incorrectly the remote control will not work Battery Replacement Make sure that you have removed the ml...

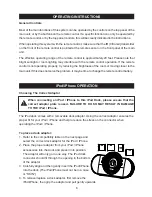
Page 9: ...te control battery OPERATING INSTRUCTIONS 8 iPod iPhone OPERATION Choosing The Correct Adaptor When connecting an iPod iPhone to this iPod Dock please ensure that the correct adaptor plate is used FAILURE TO DO SO MAY RESULT IN DAMAGE TO THE iPod iPhone The iPod dock comes with 4 removable dock adaptor Using the correct adaptor ensures the proper fit for your iPod iPhone and help to reduce the str...

Page 10: ...he volume will return to the default level If the volume is higher than the default level when the unit is set to standby when the unit is powered up again the volume will remain at that level 3D SOUND Button On Remote Control Only 3D SOUND MENU MENU The preset allows your to adjust the sound characteristic for the most popular types music Press the button on the remote control to cycle the music ...

Page 11: ...g the desired Genre Album Song etc in the Menu display with the or buttons press the button to Enter Open that Genre Album or begin playback of the selected song button When iPhone playing press the button for rotate the display view or press button on the remote control button on the front panel o 4 The button on the remote control works the same way as the button on your iPod Press the button re...

Page 12: ...w to enable video output on you model of iPod iPhone Remarks When you have your iPod outputting video and the unit connected to your TV you may need to change the output setting to TV output Press the button on the remote control to escape the current video playback select the Video by using button then press button to resume on TV screen Due to the software used in iPod Nano 3G iPod Classic to ch...

Page 13: ...or obstruction on the connections in the dock and on the iPod Then reseat it in the dock Remove the iPod from the dock and check for obstruction on the connections in the dock and on the iPod Then reseat it in the dock Please make sure your iPod is working properly before docking into the unit Please refer to the iPod manual for details This unit cannot control those iPod or other devices Remove t...

Page 14: ...te Control Φ TECHNICAL SPECIFICATION 13 Specifications subject to change without notice MAINTENANCE Cleaning The Unit Caution To prevent fire or shock hazard disconnect your unit from the main power source when cleaning If the cabinet becomes dusty wipe it with a soft dry cloth Do not use any wax or polish sprays on the cabinet If the cabinet becomes dirty or smudged with fingerprints it may be cl...

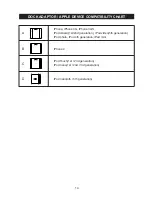
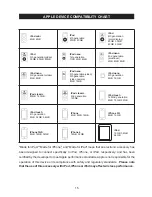
Page 15: ...4 iPod touch 5G nano 4G nano A B C D iPhone iPhone 3G iPhone 3GS iPod classic 1st 2nd generation iPod video 5th generation iPod photo iPod 4th generation iPod mini iPhone 4 iPod Touch 1st 2nd generation iPod nano 1st 2nd 3rd generation iPod nano 4th 5th generation ...

Page 16: ...en designed to connect specifically to iPod iPhone or iPad respectively and has been certified by the developer to meetApple performance standards Apple is not responsible for the operation of this device or its compliance with safety and regulatory standards Please note that the use of this accessory with iPod iPhone or iPad may affect wireless performance Made for iPod Made for iPhone and Made f...

Page 17: ...cribed herein shall be the sole and exclusive warranties granted by Haier and shall be the sole and exclusive remedy available to the purchaser Correction of defects in the manner and for the period of time described herein shall constitute complete fulfillment of all abilities and Responsibility of Haier to the purchaser with respect to the product and shall constitute full satisfaction of all cl...

Reviews: