background image

Keys and Ports

Front panel

Back panel

1

MENU: menu display/enter the sub-menu/confirm the adjustment.

2

V-/V+  

volume adjustment and adjust the parameters in the menu.

3

P-/P+

program minus and plus, select the menu options

4

TV/AV all input source select:PC-RGB/COMPONENT/AV/S-VIDEO/

      TV/exit the menu .
5

POWER: press to be on /standby mode.

6

Power indicator 

7

Remote control signal receiver window.

1

2
3
4. VGA input
5. Component audio/video input
6. 
7  VGA audio input
8

headphone output

9. DC power input

Connect antenna or CATV 75 

 coaxial cable to receive TV/

     CATV signal.

external video input

external audio input

S-VIDEO input

Note: Please do not use the S-VIDEO and  AV terminals simultaneously.

1

2

4

3

5

6

7

Summary of Contents for L20AV6-A0

Page 1: ...USER S MANUAL LCD TV RECEIVER Please read this manual carefully before using your television and keep this manual in a good place for future reference MODEL L20AV6 A0 ...

Page 2: ... menu operation Viewing TV Programs Tuning Auto search Manual search Fine tune Skip Ajusting the Picture and the Sound Multiple picture modes Multiple sound modes Setting function Setting OSD Language Setting OSD postion Video advance reset and source input Connnection Connectiong additional equipments Troubleshooting Specifications PC mode function 2 3 5 6 6 6 7 8 9 10 10 11 12 13 14 14 15 16 16 ...

Page 3: ...d to clean the display Wring the water while clean the display and then use a dry cloth to clean it Never use any liquid or inhalator cleanser CAUTION TO REDUCE THE RISK OF ELECTRIC SHOCK DO NOT REMOVE COVER OR BACK NO USER SERVICEABLE PARTS INSIDE FOR ANY PROBLEM REFER SERVICING TO QUALIFIED SERVICE PERSONNEL THERE IS A LIGHTNING ARROW SYMBOL IN THE TRIANGLE THIS SYMBOL INDICATES HIGH VOLTAGE IS ...

Page 4: ...cord away from heat sources to avoid electric shocks or fire hazards Do not connect excessive sockets in parallel or share the same socket by multiple plugs to avoid fire hazards The product must be placed on a solid and stable surface to avoid collapse Unauthorized disassembly of the television is prohibited to avoid electric shocks or fire hazards Contact authorized after sales service if techni...

Page 5: ...onnection might cause fire When antenna is used measures should be taken to prevent water from flowing down along the cable into the television Unplug the television use soft fabric never chemicals if you are going to make cleaning of the product Make sure that no water drops in the product The plug and electric cable must be kept clean to avoid electric shocks or fire hazards Disconnect the telev...

Page 6: ...o obstacle between the remote controller and television set As strong light may interfere the signals change your position to operate the remote controller if the television cannot be turned on or off as you expect Keep the remote controller away from heat source or humid area to ensure effective performance of the remote controller Make sure that two 5 1 5V alkaline batteries are loaded The batte...

Page 7: ... PC RGB COMPONENT AV S VIDEO TV exit the menu 5 POWER press to be on standby mode 6 Power indicator 7 Remote control signal receiver window 1 2 3 4 VGA input 5 Component audio video input 6 7 VGA audio input 8 headphone output 9 DC power input Connect antenna or CATV 75 coaxial cable to receive TV CATV signal external video input external audio input S VIDEO input Note Please do not use the S VIDE...

Page 8: ...he TV from standby mode Press again to switch off the TV to standby mode Select the option up and down in menu or select channels when there is no OSD Left and right orientation in menu option or adjust the volume when there is no OSD Number key Press to select the channel number PC RGB COMPONENT AV S VIDEO TV or exit the menu Q VIEW Back to the last channel SLEEP Can be used to set time to change...

Page 9: ...Press VOL or CH to select the option 3 Press MENU button to enter the sub menu and select the system you want to adjust 4 Press VOL button to adjust the parameters after select the right options 5 Press TV AV to exit the menu Power on off DC Standby Button Power supply auto off function Direct digit Choosing Button 1 6 7 8 9 2 3 4 5 0 Below are methods on how to power on off the TV set with the sw...

Page 10: ...ts channel you should await about 2 seconds to the channel 2 Use CH button Press CH to increase the channel position number Press CH to decrease the channel position number It might be because the color has been set improperly Press MENU and CH to select TV SETTING menu and press MENU to enter If the sound is abnormal press Q VIEW button you can return to the channels you were watching just now in...

Page 11: ...urn and the TV set will return to the first channel Note The order of the automatic search is due to the frequency of the program generally speaking it is used only at the first time you search the program and once the order of the program has been confirmed you don t have to use this function otherwise the order of the program will be changed IMAGE SETTING TV SETTING OSD SETTING VIDEO ADVANCE RES...

Page 12: ...y 1 Press MENU button and CH to select TV SETTING 2 Press MENU button to enter the TV SETTING and CH to select MANUAL SEARCH 3 Press MENU button to enter the AUTO SEARCH Press VOL to select UP or DOWN and MENU to confirm 168 MHZ 1 6 7 8 9 2 3 4 5 0 IMAGE SETTING TV SETTING OSD SETTING VIDEO ADVANCE RESET INPUT SOURCE SOUND SETTING 720 576 50HZ CHANNEL SOUND SKIP THIS AUTO FINE FINE TUNE MANUAL SEA...

Page 13: ...it the menu The same way to select FINE TUNE press MENU and then VOL button to start until receive the best picture and sound then press TV AV to exit FINE TUNE 1 6 7 8 9 2 3 4 5 0 IMAGE SETTING TV SETTING OSD SETTING VIDEO ADVANCE RESET INPUT SOURCE SOUND SETTING 720 576 50HZ CHANNEL SOUND SKIP THIS AUTO FINE FINE TUNE MANUAL SEARCH AUTO SEARCH OFF ON 4 VOL is used to tune the lower frequency is ...

Page 14: ... that to select your favorite channels only If you want to recover the skipped channel 1 Use digit choosing buttons to select the number of the channel to be recovered 2 Do the above steps again 3 Press VOL button to set SKIP OFF 2 Press MENU and CH to select TV SETTING then press MENU to enter the sub menu DISPLAY 1 6 7 8 9 2 3 4 5 0 IMAGE SETTING TV SETTING OSD SETTING VIDEO ADVANCE RESET INPUT ...

Page 15: ...F MILD NATURE VIVID USER BRIGHTNESS CONTRAST COLOR TINT SHARPNESS Set the parameter of USER 2 Press CH to select the option you want to adjust and MENU button to confirm Then press VOL to adjust DARK WEAK LIGHT GREEN SOFT BRIGHT STRONG THICK RED SHARP 1 Press MENU button to display the main menu and CH to select IMAGE SETTING and then press MENU to enter Note The item of TINT appears when the N sy...

Page 16: ...sound 2 Press CH to select the system you want to adjust and press MENU to confirm then press VOL to adjust The parameter will store in USER mode 1 Press MENU and CH to select SOUND SETTING and press MENU to enter TREBLE BASS BALANCE MUTE VOLUME 0 S STD This function can let you regulate the volume to the preconcerted parameter quickly BASS TREBLE BALANCE VOLUME WEAK WEAK WEAKEN RIGHT CHANNEL WEAK...

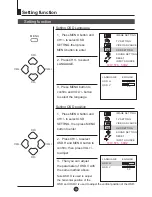
Page 17: ...od above 2 Press CH to select OSD H and MENU button to confirm then press VOL to adjust 1 Press MENU button and CH to select OSD SETTING then press MENU button to enter Note OSD H is used to adjust the horizontal position of the OSD and OSD V is used to adjust the vertical position of the OSD IMAGE SETTING TV SETTING OSD SETTING VIDEO ADVANCE RESET INPUT SOURCE SOUND SETTING 720 576 50HZ IMAGE SET...

Page 18: ...n 2 Press MENU to confirm then the picture and sound will restore the factory default 1 Press MENU button and then CH to select RESET BLUE SCREEN ON When BLUE SCREEN is ON and there is no signal the screen will display blue when BLUE SCREEN is OFF and there is no signal the screen will display black Source input PC RGB AV S VIDEO TV Video advance reset and source input COMPONENT IMAGE SETTING TV S...

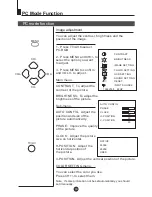
Page 19: ... confirm and VOL to adjust Main menu CONTRAST To adjust the contrast of the picture BRIGHTNESS To adjust the brightness of the picture Sub menu AUTO CONFIG Adjust the position and size of the picture automatically PHASE Improve the quality of the picture CLOCK Adjust the picture size on horizontal H POSITION Adjust the horizontal position of the picture V POSITION Adjust the vertical position of t...

Page 20: ...io input Headphone port Plug the headphone in the television headphone port then the television program sound will be heard from the headphone not by the television speaker Press VOL buttons to increase or decrease the sound volume No sound will be heard if MUTE button is pressed To video RGB input To audio input DVD VCD or other units To component input Signal flow Note Please do not use the S VI...

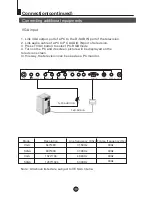
Page 21: ...d its screen picture will be displayed on the television screen In this way the television can be used as a PC monitor VGA input To PCAUDIO IN Note All above listed are subject to VESA Criteria Connection continued Connecting additional equipments Frame frequency Hz Line frequency Khz VGA SVGA XGA 640 480 31 5KHz 60Hz 800 600 37 9KHz 60Hz 1024 768 48 4KHz 60Hz 60Hz SXGA 1280 1024 63 9KHz Mode Reso...

Page 22: ...ved Poor sound Verify if sound system is correct Refer to some chapter for adjust No picture in some channel Verify if correct channel is selected Adjust the antenna Make adjustments by Fine Tune and Manual Search No color for some channel program black and white Verify if the same problem exists in other channels Check out of picture and sound systems Refer to relative instructions in the Manual ...

Page 23: ... 450mm NG 7 4Kg Power Connected to the AC DC adapter Color Sound system PAL DK I BG Power consuption 60W Antenna input 75 Audio output 1 5W 1 5W External input AV input PC input S video input COMPONENTinput PC audio input 12V DC input Antenna input AC DC adapter Input 100V 240V 50 60Hz Output 12V 5A Temperature Working 5 35 15 45 Storage Accessories AC DC adapter Remote control Power cable Owner s...

Page 24: ...V0 1 0090506956A ...

Reviews: