background image

WARNING AND CAUTION

4

To prevent fire, do not use or store any
flammable materials near the unit.

To prevent fire, do not place the unit near 
a damp wall.

To prevent electric shock, ensure that 
any external antenna connected to the set 
is clear of contact with any power lines.

Do not plug / unplug the unit while your
hands are wet.  This may cause an electric
 shock.

Please ensure a solid connection with 
the AC wall socket in order to avoid 
shock and potential fire.

To prevent electric shock or fire, please 
note to prevent rain from entering the set 
along the wire connected to the outside 
antenna.

When cleaning, please unplug the unit.  
Use a soft cotton cloth.  Do not use any 
abrasive cleansers, and prevent water 
from entering the set.

If any plugs or input wires are dirty, unplug 
the set and clean.  This will prevent risk of 
electric shock or fire.

If the set is not going to be used for an 
extended period, unplug the unit from 
the AC wall outlet.

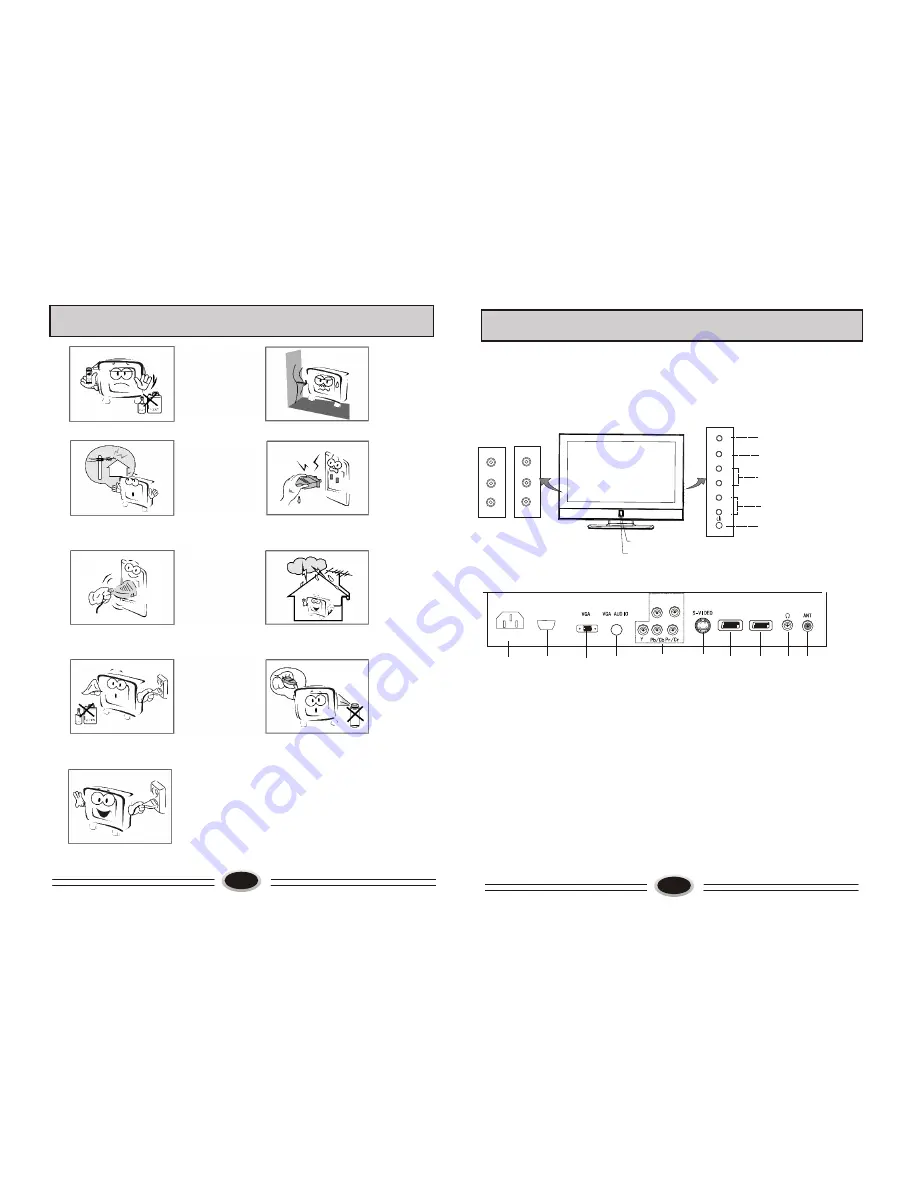
BUTTONS AND INTERFACE  POSITION

5

Front control panel

Back interface

1. Antenna input 
2. Earphone output
3. SCART2 input 
4. SCART1 input 
5. S-VIDEO input
6. YPbPr input
7. VGA audio input interface
8. VGA input
9. HDMI input
10.Power input socket

Power button

Program up/down button

Volume up/down button

TV/AV switch button

Menu button

CH-

TV/AV

MENU

CH+

VOL-

VOL+

Power indicator

Remote sensor

L

4

7A5A

L40A5A

3

6

8

10

7

2

1

POWER

9

HDMI

L

-

AUDIO

-

R

5

4

SCART1

SCART2

-

AUDIO

VIDEO

L

R

AUDIO

VIDEO

L

R

L26A5A
L32A5A
L37A5A
L

4

2A5A

Summary of Contents for L26A5A

Page 1: ...L32A5A L37A5A L40A5A L42A5A L47A5A L26A5A L32A5A L37A5A L40A5A L42A5A L47A5A LCD COLOUR TELEVISION OPERATING INSTRUCTIONS Wide view angle display high contrast Nicam Teletext HDMI Double scarts 01 009...

Page 2: ...rol 7 Remote control panel 8 Basic operation 9 Screen display 10 TV program setting 11 Image control 14 Audio control 15 Function setting 16 Time setting 18 Signal source setting 19 Child lock setting...

Page 3: ...AY SCRATCH THE LCD SCREEN NOTE SERVICING THE UNIT YOURSELF IS UNAUTHORIZED AND COULD LEAD TO INJURY OR PRODUCT DAMAGE 2 WARNING AND CAUTION Please ensure that the set has adequate ventilation Do not p...

Page 4: ...nit Use a soft cotton cloth Do not use any abrasive cleansers and prevent water from entering the set If any plugs or input wires are dirty unplug the set and clean This will prevent risk of electric...

Page 5: ...battery types Install the batteries as the correct polarities Do not use rechargeable batteries 6 Base Airproof board 1 As figure removing the four M4 20 screws the base will be disassembled 2 As fig...

Page 6: ...channel number will display on the screen and it will disappear without operation in 5 seconds 2 Pressing power button again the TV set will enter standby status Standby set connecting the power supp...

Page 7: ...o stop auto search during searching Note The order of the auto scan is due to the frequency of the program generally speaking it is used only at the first time you search the program and once the orde...

Page 8: ...OL POSITION CH CHAR TUNING PROGRAM NUMB 11 COLOUR SYS PAL SOUND SYS D K FINE TUNE MANUAL SEARCH AUTO SEARCH EDIT PROGRAM COUNTRY CHINA 001 002 003 004 005 006 007 008 009 010 COPY OK CANCEL MENU RETUR...

Page 9: ...50 AUTO VOLUME ON EQUALIZER SURROUND OFF DIGITAL BASS ON 1 Press MENU button to make the main menu display 2 Press VOL button to select PICTURE menu press CH button to enter 3 Press CH button to sele...

Page 10: ...ke the main menu display 2 Press VOL button to select FUNCTION menu press CH button to enter 3 Press CH button to select OSD SETTING item press VOL button to enter the sub menu 4 Press CH button to se...

Page 11: ...the remote controller to set the sleep timer you need CLOCK 1 Press MENU button to make the main menu display 2 Press VOL button to select TIMER menu press CH button to enter 3 Press CH button to sel...

Page 12: ...OL button to select signal input source pressing H LOCK button can open or lock the selected source 2 Press CH button to select CHANNEL item press CH button to select digit press VOL button to change...

Page 13: ...et is similar to TV OTHER SETTING FUNCTION TM 22 Teletext 20 Cancel mode This feature allows the TV picture to be displayed while next page to be searched is entered and found Only the top teletext li...

Page 14: ...the back radio frequency input of the LCD 2 Connect the antenna to VCR antenna input 3 Press TV AV button to select TV mode 4 Press PLAY button in VCR to start watching S VIDEO input If you use S term...

Page 15: ...al or Weak Volume Scramble 3 Do not let the TV set stay on a static images as this can lead to permanent residual images If this situation occurs the TV set may recover automatically after 12 hours if...

Reviews: