background image

LEC32B1380 
LEC32B1380W

TFT-LED LCD TV

Summary of Contents for LEC32B1380

Page 1: ...LEC32B1380 LEC32B1380W TFT LED LCD TV ...

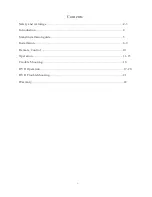
Page 2: ...1 Contents Safety and warnings 2 3 Introduction 4 Stand installation guide 5 Installation 6 9 Remote Control 10 Operation 11 15 Trouble Shooting 16 DVD Operation 17 20 DVD TroubleShooting 21 Warranty 2 2 ...

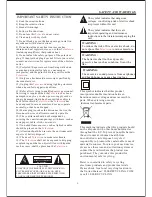
Page 3: ...llen intothe the has been exposed torain or moisture does not operate normally orhas been dropped 14 Mains plugis used asthe disconnect device the disconnect device shallremain readily operable 15 The ventilationshould not beimpeded by covering the ventilationopenings with items such as newspapers table cloth curtains etc 16 No nakedflame sources suchas lighted candles should be placedon the 17 At...

Page 4: ...u should pay special attention to children Serious injury may result if it falls Do not place your television on an unstable cart stand shelf or table Serious injury to an individual and damage to the television may result if it falls or When the television receiver is not used for an extended period of time it isadvisable to disconnect the ACpower cord from the ACoutlet Avoid exposing the televis...

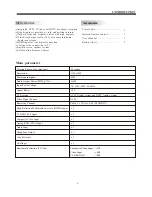
Page 5: ...uilt in stereo speaker system Full function Remote Control x 2 Resolution TV System Video Signal System Receiving Channel Horizontal definition TV line 16 9 NTSC Cable 1 135 Air 2 69 A TV DTV x 1 High Definition Multimedia Interface HDMI Input Audio Input x 2 Composite Video Input 350 x 1 YCb Pb Cr Pr 400 Video Input 400 x 1 Input Power Voltage AC 100V 240V 50 60Hz ATSC Digital system and NTSC Ana...

Page 6: ...ottom with the included 3 screws 2 Place the TV with the display side down on a flat surface Use a cloth or the material from the TV packaging to protect the screen 3 Place the base stand neck in the slot on the bottom of the TV and push firmly upwards Attach with the included screw ...

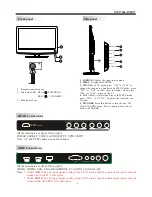
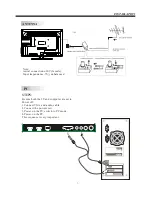
Page 7: ...t back to STANDBY Side panel REAR Connections All the terminals are from left to right POWER SOCKET VIDEO AUDIO INPUT YPbPr INPUT Note AV and YPbPr share one audio channel SIDE Connections All the terminals are from left to right HDMI1 HDMI2 USB VGA HEADPHONE PC AUDIO COAXIAL RF Note 1 When HDMI1 has an input signal coming from a DVI source then the audio input signal must be connected to the PC a...

Page 8: ...balanced 7 STEPS PC Be sure both the TV and computer are set to Power off 1 Connect VGA and audio cable 2 Connect the power cord 3 Power on the TV switch to PC mode 4 Power on the PC This sequence is very important HDMI1 HDMI1 HDMI2 HDMI2 USB USB VGA HEADPHONE RF PC AUDIO COAXIAL ...

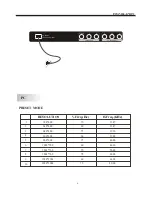
Page 9: ...0 480 640 480 800 600 800 600 1024 768 1024 768 1024 768 1280 1024 1280 1024 70 60 75 60 75 60 70 75 60 75 31 47 31 47 37 50 37 88 46 88 48 36 56 48 60 02 63 98 80 00 RESOLUTION V Freq Hz H Freq KHz Y Pb Pr VIDEO AC INPUT 100 240V 50 60Hz L R COMPOSITE COMPONENT ...

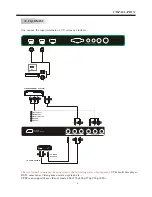
Page 10: ...ormats 480i 576i 480p 576p 720p 1080i You can use the input terminals on TV set rear as follows HDMI HDMI1 HDMI1 HDMI2 HDMI2 USB USB VGA HEADPHONE RF PC AUDIO COAXIAL Yellow video White audio L Red audio R or Pr Y W R W R G B R Blue Pb Green Y B G VIDEO EQUIPMENT with YPbPr W R G B R W R W R TO AUDIO OUTPUTS VIDEO EQUIPMENT TO VIDEO OUTPUTS Y Pb Pr VIDEO AC INPUT 100 240V 50 60Hz L R COMPOSITE COM...

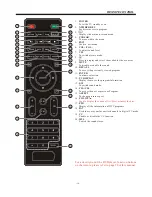
Page 11: ...ccessthe previously viewedprogram 11 ENTER Confirms selection 12 TV DISPLAY Displays removes the programInformation 13 S M To switchsound mode 14 CH CH To accessthe next orprevious Program 15 ASPECT To changepicture aspect 16 CH LIST 17 EPG Display all theinformation of DTVprograms 18 FAV Used to access your favourite channels in digital TV mode 19 CC Enable or disable the CC function 20 MTS Switc...

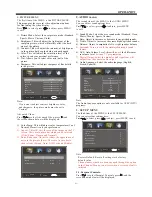
Page 12: ...trast 50 Brightness 50 Color 50 Tint 0 Sharpness Advanced Video 50 Select Adjust Menu Exit 2 AUDIO menu The second item of the MENU is the AUDIO MENU You can adjust sound here Press to select press to adjust press MENU to exit 1 options Sound Mode Select the user sound mode Standard News Music Theater Sports Custom 2 Bass Adjust to increase or decrease lower pitched sounds 3 Treble Adjust to incre...

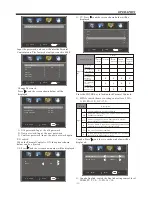
Page 13: ...V Fantasy violence V Violence S Sexual situation L Adult language D Sexually suggestive dialog Suggested age TV Y All children TV Y7 Direct to order children TV G General audience TV PG Parental Guidance suggested TV 14 Parents strongly cautioned TV MA Mature audience only X X X X X X X X X X X X Content 2 MPAA switch themovie rating control level N A G PG PG 13 R NC 17 X Rating Description Age G ...

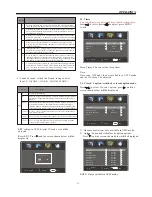
Page 14: ...nce but may be integrated intothe plot in a humorousor unrealistic manner 8ans General but inadvisablefor young children Maybe viewed by a wide public audience but couldcontain scenes disturbing to children under 8 whocannot distinguish between imaginaryand real situations Recommended for viewingwith paren tal guidance 13ans Over 13 years Couldcontain scenes of frequent violentscenes and intense v...

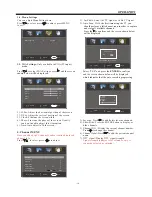
Page 15: ...or adjusted Menu Language English Select Adjust Menu Exit 3 5 VGASettings Only available inVGA PCinput mode 1 H Pos Adjust the horizontalposition of thescreen 2 V Pos Adjustthe vertical positionof the screen 3 Clock Finetune the screenwidth 4 Phase Finetune the phaseof the screen Usually don t adjust this item 5 Auto Auto adjustto fit thescreen you need to option Press to selectVGA Settings press ...

Page 16: ...lect Music The screen shown below will be displayed USB C Photo Music Everything I do mp3 C laoge 17 001 018 Total size 3 7 GB Unused size 3 7 GB Sealed With AKiss mp3 mp3 mp3 mp3 mp3 mp3 mp3 mp3 Everything I do mp3 Title Artist Album Year Bit Rate 128kbps Play 05 49 06 33 Random Use select the Jpg files or folders to play EXIT to stop playing or go to the menu press ENTER press previous Use selec...

Page 17: ...etup Press standby key on the remote control for inspecting No color Normal audio Color control Picture breaking up Normal audio or weak Retune channel No color Noise TVsystem Normal audio antenna position direction or connection TROUBLE SHOOTING Trouble phenomenon Symptom Ghost 16 The LCD TV panelis built with very high precisiontechnology giving you fine picture details in vibrant color Occasion...

Page 18: ...authorized by Macro vision Corporation and is intended for homeand other limited viewing uses only Unless otherwise authorized by Macrovision Corporation Reverse engineering ordisassembly is prohibited The product complieswith the KODAK Picture CD formatand will display KODAK Picture CDs The KODAK Picture CD Compatible logo is a trademark of EastmanKodak Company and is used with permission Manufac...

Page 19: ...splay the Video submenu desired MPEG4 Subtitle optional Note Not all players support this item SYSTEM SETUP Aspect Ratio Select the aspect ratio Notes TV System Select the differentTV system For more information of output format refer to the instructions or your TV set RATING SETUP Select Rating in the setupmenu and display the Rating submenu The image displayratio is relatedto the recordeddisc fo...

Page 20: ...ent repeatplaying mode Mode Select differentplaying mode as follows Normal Shuffle modeis cancelled Shuffle Shuffle modeenabled When playback reaches the end of the currentchapter track playback jumps to a random chapter track As the end of each chapter track is reached another random chapter track will be played until all tracks chapters have been played or the Shufflemode is cancelled by togglin...

Page 21: ...ON OFF SETUP Press the buttonto enter thesystem setting menu Press thebutton again toexit the menu RETURN When DVD SVCD VCD displaying press RETURN button to the menu PBC ONonly DISPLAY Press the buttonto show theinformation of the current playingdisc ENTER Press the buttonto confirm yourchoice on screen REV During DVD CDMp3 or VCD playback press REV to scan inreverse The player willreview the dis...

Page 22: ...edor stained BAD DISC DISPLAYED Ensure the discis not warped damaged or deformed Ensure the discis not badlystained or damaged Ensure the discformat is compatiblewith the player Please check whetheryou have triedto play a software CD If so please restartthe player REMOTE NOT WORKING Make sure theMain unit sPOWER button ison Ensure the remotebatteries are working Point the remotecontrol directly at...

Page 23: ...WARRANTY 22 ...

Page 24: ......

Reviews: