background image

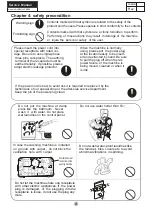
Actual Circuit Diagram

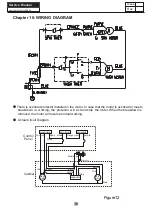
There is overload protector installed in the motor. In case that the motor is overload or meets

 breakdown  in  working, the  protector  will  act and stop  the motor. When the breakdown is

 removed, the motor will resume normal working.

Figure12

Chapter 10: WIRING DIAGRAM

18

Service  Manual

Issue

Rev.

Model NO:LMD6124PBBB0

spin timer

microswitch

wash timer

wash

motor

capacitor

fuse

red

red

red

yellow

yellow

Grey

Grey

Grey

brown

brown brown

blue

Yellow/green

orange orange

purple

purple

purple

yellow

blue

Cabinet

Control

 Panel

spin 

motor

Summary of Contents for LMD6124PBBB0

Page 1: ...uals of potential dangers in attempting to service a product Products powered by electricity should be serviced or repaired only by experienced professional technicians Any attempt to service or repair the product or products dealt with in this service information by anyone else could result in serious injury or death WARNING C 2010 Haier washing Machine All rights reserved Unauthorized copying an...

Page 2: ...7 1 Net dimension 10 7 2 Name parts 11 8 Maintenance service and check method 12 8 1 Wash parts 12 8 2 Spin parts 13 8 3 Spin parts 14 9 17 10 Wiring diagram 18 Features 2 3 Specifications 3 Warning and cautions Installation and accessory parts Trouble shooting Answer to question Appearance brief introduction Service Manual Model NO LMD6124PBBB0 Issue Rev ...

Page 3: ...current and washing time Choose spinning time Separate washing and spinning Full plastic washing tub and spinning tub Concavo convex on veins in Tub side Special drain lid Wide range voltage design not be afraid of fluctuating Unique Wash board design more clean Chapter 2 FEATURES 2 Service Manual Issue Rev Model NO LMD6124PBBB0 ...

Page 4: ...thetics Cabinet material P Plastic Z Zincking C Cold P Rolled stainless steel Inner drum stainless steel s plastic p S Drain type U drain up D drain down D Door glass g plastic p Adjustable feet Technical data Voltage frequency V Hz 220V 60Hz Wash power W 420 Spin power W 280 Special function Air Bubble Feet wheel Water fall current Dimensions measurements Height built under mm 1020 Width mm 915 D...

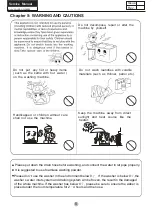
Page 5: ... Never wash it with water Do not place wet laundries on the control panel Do not use water hotter than 50 In case the washing machine is installed on ground with carpet do not block the ventilation hole with carpet Ventilation hole at the bottom of the washing machine Do not wash water proof laundries like the raincoat bike covers etc to avoid abnormal vibrations in spinning Do not let the machine...

Page 6: ...t is suggested to use foamless washing powder Please put down the drain hose before washing and connect the water in let pipe properly Do not put any hot or heavy items such as the kettle with hot water on the washing machine Do not decompose repair or alter the machine by yourself Handicapped or children without care shall not use the machine Keep the machine away from direct sunlight and heat so...

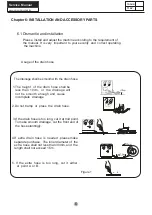
Page 7: ... the drain hose is too long cut it at mid point To make smooth drainage cut the front end of the hose slantingly 4 If extra drain hose is needed please make separate purchase The inner diameter of the extra hose shall not less than 30mm and the length shall not exceed 1 5m 10cm Please install and adjust the machine according to the requirement of the manual It is very important to your security an...

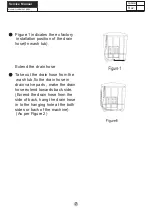
Page 8: ...rain hose In wash tub Extend the drain hose Take out the drain hose from the wash tub fix the drain hose in drain valve parts make the drain hose extend towards back side Exrend the drain hose from the side of back hang the drain hose in to the hanging hole at the both sides or back of the machine As per Figure 2 ...

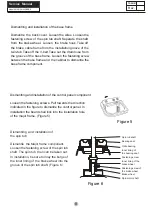
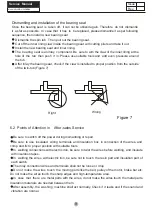
Page 9: ...ponent Loosen the fastening screw of the spin tub shaft The spin tub then can be taken out In installation be sure to inlay the bulge of the inner lining of the brake wheel into the groove of the spin tub shaft Figure 6 Figure 5 8 Dismantling and installation of the base frame Dismantle the back cover Loosen the wires Loosen the fastening screw of the spin tub shaft Separate the shaft from the bra...

Page 10: ...s of Attention in After sales Service Be sure to switch off the power during dismantling or repair Be sure to use insulated wiring terminals and insulation box in connection of the wires and crimp and fix to proper position with suitable tools In welding connections with electric iron be sure to twist the wires before welding and insulate with insulation tapes In welding the wires with electric ir...

Page 11: ...7 1 Net dimension Chapter 7 APPEARANCE BRIEF INTRODUCTION 10 Service Manual Issue Rev Figura 8 Unit mm Model NO LMD6124PBBB0 H W D height 1020mm width 915mm depth 558mm LMD6124PBBB0 ...

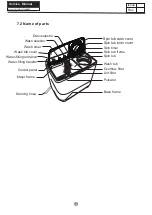
Page 12: ...Spin tub inner cover Spin timer Spin tub frame Spin tub Overflow filter Wash tub Lint filter Pulsator Base frame Water filling entrance Water filling transfer Control panel Draining hose Major frame Wash timer Wash selector Spin tub outer cover Drain selector Wash tub cover ...

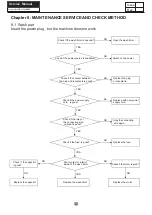
Page 13: ...ace the capacitor Check if the capacitor is good Poor contact or inferior inside of the wash timer Open the wash timer Check if the power source is available Check if the contact between the plug and receptacle is good Check if the power supply cord is good Check if the fuse is good Check if the wash timer is opened NO NO NO No NO NO NO NO NO NO Check if the inlay of the connecting wire terminal i...

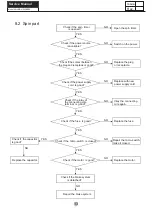
Page 14: ...place with new power supply cord Check if the contact between the plug and receptacle is good Check if the power supply cord is good Replace the fuse Inlay the connecting wire again Check if the fuse is good Check if the micro switch is closed Check if the inlay of the connecting wire terminal is good Replace the capacitor Check if the capacitor is good Replace the motor Repair the micro switch ma...

Page 15: ...wiring of the wash timer proper Is the radiating pulley loose Is the pulsator rubbing the bottom of the twin tub The pulsator only rotates towards one direction YES NO YES YES YES NO YES NO NO Replace the motor Fasten the motor tightly Adjust the tension of the belt Fasten the radiating pulley Adjust the gap between the pulsator and the twin tub Adjust the wiring to proper position YES NO 14 8 3 c...

Page 16: ...e sundries Set the machine horizontally Yes Yes No Yes No No Yes No No No Yes If there is different noise during the spin tub running Add the oil between the bearing and the spin tub If the bearing is rustiness it must be changed If the damping spring is fastened tightly or crackly Adjust or change the damping spring If there is different noise when the motor is running Change the spin motor Issue...

Page 17: ...eck if the Drain pullback band loosened or snapped Check if there is anything in the drain valve Check if there is anything block up the drain outlet on the washing tub side Install the knob again Replace the knob Replace or adjust the drain pullback band Clean the sundries in drain valve Clean the sundries in tub 16 Service Manual Issue Rev Model NO LMD6124PBBB0 ...

Page 18: ...by foreign materials Is the drain hose frozen Is the drain hose blocked by foreign material Are there laundries falling to the outer side of the spin tub The draining does not work Are there hair pin coins or metal items brought inside the tub Is the machine slanting Is the gland pressed evenly Are there laundries falling to the outer side of the spin tub Are the laundries in spin tub too much It ...

Page 19: ... motor When the breakdown is removed the motor will resume normal working Figure12 Chapter 10 WIRING DIAGRAM 18 Service Manual Issue Rev Model NO LMD6124PBBB0 spin timer microswitch wash timer wash motor capacitor fuse red red red yellow yellow Grey Grey Grey brown brown brown blue Yellow green orange orange purple purple purple yellow blue Cabinet Control Panel spin motor ...
Page 20: ...Haier Industrial Park No 1 Haier Road 266101 Qingdao China http www haier com Sincere Forever Group ...

Reviews: