background image


1

HAIER 


Fuzzy Computerized 

Automatic Washing Machine 


            Service Manual 


        PART #   WD-8888-71 


                                      HAIER AMERICA TRADING, LLC 

www.haieramerica.com 

Summary of Contents for WD-8888-71

Page 1: ...1 HAIER Fuzzy Computerized Automatic Washing Machine Service Manual PART WD 8888 71 HAIER AMERICA TRADING LLC www haieramerica com ...

Page 2: ...ntents 2 Features 3 Specifications 4 Safety Precaution 5 Warning And Caution 6 Net Dimension 8 Installation And Accessory Parts 9 Parts And Functions 13 Program Diagram 14 Maintenance And Troubleshooting 17 Wiring Diagram 30 ...

Page 3: ... quick program suitable for washing small quantity light soil laundries The full set of washing programs can shorten the wash time significantly Boiling current It produces boiling current under the powerful driving of the pulsator and inner tub with dual power drive system The water current is even and powerful Basin shape large pulsator The large pulsator can produce stronger drive strength on t...

Page 4: ...4 SPECIFICATION ...

Page 5: ...or reform it Do not press or clamp it with heavy items If the power cord and power plug are bad or the receptacle is loose be sure to have it replaced by the technicians of our special shop or our agent or the after sales service department to avoid any risk Keep the prong of the power plug clean If dust is found on the power plug please wipe it off with dry clothe In case the washing machine is i...

Page 6: ...tub It is dangerous even if the rotation speed is slow Take special care of the children Keep children away from the washing machine to avoid them climbing on Do not decompose repair or alter the machine by yourself Do not wash waterproof laundry like the raincoat bike covers down textiles etc to avoid abnormal vibrations in spinning and damages to the laundries Do not wash laundry with volatile m...

Page 7: ... foreign materials before washing Please keep the lint filter in good condition and install it to proper position during washing If the lint filter is lost or damaged please contact the local after sales service department of our company Please check if the water faucet is open and if the connection of the water inlet pipe is proper It is suggested to use foamless washing powder ...

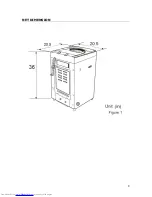
Page 8: ...8 NET DIMENSION ...
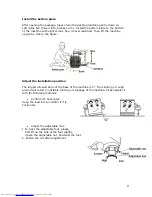
Page 9: ...an the water level in washtub to avoid siphon phenomenon Install the water inlet hose 1 Insert a new flat washer into each end of the inlet hoses Firmly seat the washer in the coupling As figure 1 2 Respectively attach the water inlet hoses to the water faucet Using pliers tighten the coupling As figure 2 NOTE Do not over tighten Damage to the valves can result 3 Run water through the faucets and ...

Page 10: ...er component Please install the inner cover component as per followings in your first usage of the washing machine 1 Open the top lid of the washing machine 2 Put the inner cover component on the outer tub cover aiming the inner cover shaft to the installation hole of the corresponding outer tub cover shaft groove 3 Firstly insert the inner cover shaft of one side into the corresponding outer tub ...

Page 11: ...e Adjust the installation position The largest allowed slope of the base of the machine is 2 The slanting or rough ground will result in unstable running or stoppage of the machine Please adjust it with the following methods Confirm it s horizontal Hang the lead line to confirm if it is horizontal Adjust the adjustable foot 1 To twist the adjustable foot please first lift up the side of the foot s...

Page 12: ...12 ...

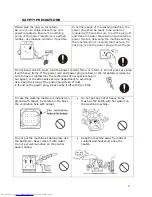
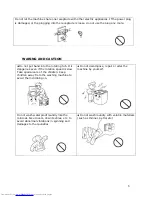
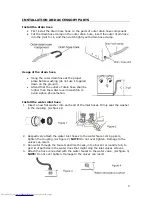
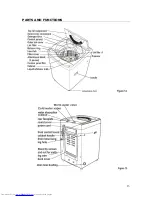
Page 13: ...13 PARTS AND FUNCTIONS ...
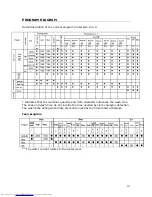
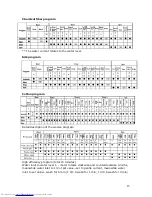
Page 14: ...that the laundries quantity and cloth character influences the wash time The soak and wash time do not include the time needed by cloth character detection The wash time during wash rinse procedure includes the 30 seconds of balance Jean program The water current relates to the water level ...

Page 15: ...ription of the woolen program High efficiency program total 15 minutes Water inlet to water level 1 motor rotates clockwise and counterclockwise 0 3s 5s meanwhile water inlet to 1 2 of set value set to gentle current meanwhile water inlet to set value wash for 5 min 1 0 1 0 wash for 1 min 1 3 0 6 wash for 3 min ...

Page 16: ...ff for 30s spin consecutively the cool water valve is switched on off for 35s 30s spin consecutively for 1 min inertia spin for 20s brake buzzer alarms and finish washing Past haste program total 6 minutes Water inlet to water level 1 motor rotates clockwise and counterclockwise 0 3s 5s meanwhile water inlet to the set water level 2 set to gentle current meanwhile water inlet to water level 3 wash...

Page 17: ... not work or is slow After about 15 minutes later the digitron displays E4 Is the water tap opened or is there water supply failure Is the water inlet valve blocked Is the water pressure too low Open the water tap Push the Start Pause button once Clean the water inlet valve then push the Start Pause button once Push the start Pause button once Not wash Is there power failure Is the power plug inse...

Page 18: ...once and the digitron displays C1 It enters the finish check procedure of the no water test Push the reserve button to switch between the C1 C2 and C3 test programs After each switching it will wait for 3 seconds and then enter the relative self test program 2 Switch the program Push the RESERVE button and the program will switch in the following sequence 3 Program description Buzzer test C1 The r...

Page 19: ...e digitron displays C3 The spin and normal indicator lights are on After 3 seconds the spin digitron displays C5 The spin digitron flashes After 5 minutes of spinning it will switch off the power automatically Check the top lid opening and tub bumping during spinning and test the breakdown alarm During this procedure only the reserve and start pause buttons are enabled In the moment while it just ...

Page 20: ...20 ...

Page 21: ...21 2 No water filling 3 No rotation in washing or rotating to one direction only ...

Page 22: ...22 ...

Page 23: ...23 4 No draining 5 Keep filling water ...

Page 24: ...24 ...

Page 25: ...25 6 No spinning 7 Too much spinning noise ...

Page 26: ...26 ...

Page 27: ...27 8 Too much noise in washing ...

Page 28: ...28 9 The measured laundry load is inaccurate 10 Break time out ...

Page 29: ...29 ...

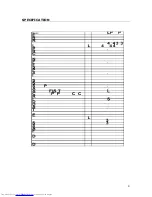
Page 30: ...30 WIRING DIAGRAM Actual Circuit Diagram Circuit Diagram ...

Reviews: