background image

49-5000786   Rev. 0

5

ENGLISH  

1

8

2
3

6
4

7

5

10

11

9

18

12

14

16

19

13

17

15

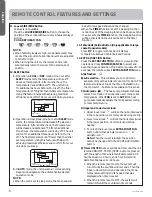
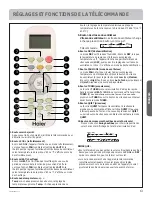
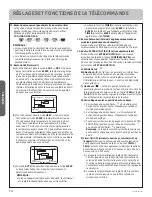
1. Power Button

Press the ON/OFF button on the remote control to start 
or stop the unit.

2. COOL Button

In COOL mode, the unit operates in cooling. When FAN is 
set to AUTO, the heat pump automatically adjusts the fan 
speed according to the room temperature. The   will be 
displayed during COOL mode.

3. HEAT Button

In HEAT mode, warm air will blow out after a short period 
of the time due to cold-air prevention function. When 
FAN is set to AUTO, the heat pump automatically adjusts 
the fan speed according to room temperature. The   will 
be displayed during HEAT mode.

4. Tempe/- Buttons

Temp + : Every time the button is pressed, the 
temperature setting increases. Temp - : Every time the 
button is pressed, temperature setting decreases. The 
operating temperature range is 60°F-86°F (16°C-30°C).

5. FAN SPEED Button

FAN SPEED: For each press the fan speed changes as 
follows:

Remote control:    

Display

circulated

LOW

MED

HI

AUTO

6. DRY Button

DRY mode is used to reduce humidity. In DRY mode, when 
room temperature becomes lower than temp setting 
+2°F, unit will run intermittently at LOW speed  regardless 
of FAN setting. The   will be displayed during DRY mode.

7. FAN MODE Button

FAN mode circulates air only; there is no temperature 
adjustment available. Use the fan speed button (5) to 
adjust fan speed from low, medium to high. Auto, Turbo 
and Quiet are not available.

8. TURBO Button

The TURBO function is used for fastest air flow in Heating 
or Cooling modes. Control will display the TURBOìæòñ

on the bottom right side of the remote display. Pressing 
the TURBO button again or the FAN SPEED button will 
turn TURBO off.

9. Quiet Button

The QUIET function switches the fan to the lowest speed. 
The control will display the QUIETìæòñ òñ÷ëèåò÷÷òð

left side of the remote display. Pressing the QUIET button 
again or the FAN SPEED button will turn QUIET off.

10. Louver UP/DOWN Button

Press the LOUVER UP/DOWN button to choose the 
position of the horizontal airflow louvers. Status display 
of air flow

COOL/DRY

HEAT

Auto

Auto

NOTE:
• It is advisable not to keep the vertical louver in the 

downward position for an extended period of time in 
COOL or DRY mode, otherwise condensate water may 
form on the louver. 

• When turning the unit on, the remote control will 

automatically return the louver to the previous set swing 
position. When turning the unit off, the louver will rotate to 
the full open position prior to closing.

REMOTE CONTROL FEATURES AND SETTINGS

Summary of Contents for WJ01X24721

Page 1: ...e Manual del usuario WJ01X24721 Cassette Indoor Panel Panneau d int rieur cassette Panel interior tipo cassette 49 5000786 Rev 0 06 23 GEA Health Turbo Fan Heat Cool Dry Sleep Lock Temp Quiet Extra Fu...

Page 2: ...2 49 5000786 Rev 0 ENGLISH...

Page 3: ...information on this page To receive a 10 year compressor and parts warranty registration is required within 60 days of installation Thank you for purchasing this Haier product This installation manual...

Page 4: ...eignements dans ce manuel doivent tre observ s afin de minimiser le risque d incendie de d charge lectrique ou de blessure Utilisez cet lectrom nager uniquement aux fins auxquelles il est fait mention...

Page 5: ...OW speed regardless of FAN setting The will be displayed during DRY mode 7 FAN MODE Button FAN mode circulates air only there is no temperature adjustment available Use the fan speed button 5 to adjus...

Page 6: ...When the TIMER function is set the sleeping function cannot be set If the sleeping function has been set and the user sets the TIMER function the sleeping function will be canceled and the unit will...

Page 7: ...the system to maintain 50 F This is used to prevent freezing during long unoccupied periods of time 15 Confirm Cancel Button Saves and exits the EXTRA FUNCTION selection 16 HEALTH Button Feature is n...

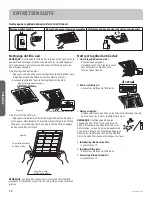
Page 8: ...ve the net Clean the air inlet grille 1 Open the air inlet grille Pull the two handles at the same time Slowly pull them out When closing it do this in reverse 2 Remove the air filter Refer to Air fil...

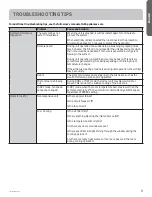
Page 9: ...nges If the airflow is creating a loud noise during unit operation the air filter may be too dirty Odors The system circulates odors lingering in the airstream such as the smell of furniture paint and...

Page 10: ...10 49 5000786 Rev 0 ENGLISH For warranty detail please refer to installation manual LIMITED WARRANTY...

Page 11: ...leur et la date d achat Agrafez votre preuve d achat ce manuel pour faciliter le service de la garantie en cas de besoin _______________________________________ Num ro de mod le ______________________...

Page 12: ...assez d un produit qui contient un frigorig ne informez vous aupr s de l organisme responsable d en disposer Ces syst mes de thermopompe R410A exigent que les entrepreneurs et les techniciens utilisen...

Page 13: ...rmittence vitesse basse LOW quel que soit le r glage de la vitesse du ventilateur L ic ne s affiche en mode de d shumidification 7 Bouton FAN MODE mode du ventilateur Le mode FAN ne fait que circuler...

Page 14: ...on SLEEP Si la fonction SLEEP a t r gl e et que l utilisateur r gle la fonction TIMER la fonction SLEEP est annul e et l appareil est r gl la fonction TIMER 13 Bouton Fahrenheit Celsius s applique uni...

Page 15: ...on des piles 1 Retirez le couvercle des piles 2 Ins rez 2 piles AAA tel qu illustr en respectant la polarit des piles 3 Remettez le couvercle en place REMARQUE La distance entre la t l commande et le...

Page 16: ...tr e d air 1 Ouvrir la grille d entr e d air Tirez les deux poign es simultan ment Tirez les lentement vers l ext rieur Lorsque vous la fermez faites l inverse 2 Retirer le filtre air Consultez Nettoy...

Page 17: ...sale peut tre l origine d une circulation d air bruyante durant le fonctionnement de l appareil Odeurs Le syst me fait circuler des odeurs qui persistent dans l air telles que peut en d gager meubles...

Page 18: ...18 49 5000786 Rev 0 FRAN AIS Pour des renseignements d taill s sur la garantie veuillez vous reporter au manuel d installation GARANTIE LIMIT E...

Page 19: ...dentro de los 60 d as desde el momento de la instalaci n Gracias por adquirir este producto de Haier Este manual del propietario le ayudar a lograr el mejor rendimiento de su nuevo acondicionador de a...

Page 20: ...a la compa a a cargo sobre c mo deshacerse del mismo Estos sistemas de bombas de calentamiento R410A requieren que los contratistas y t cnicos usen herramientas equipos y est ndares de seguridad apro...

Page 21: ...de forma intermitente en la velocidad LOW sin importar cu l sea la configuraci n de FAN El ser exhibido durante el modo DRY 7 Bot n FAN MODE Modo de Ventilaci n El modo Ventilador hace circular aire...

Page 22: ...d ser cancelada y la unidad ser configurada en la funci n del temporizador 13 Bot n Fahrenheit Celsius S lo aplicable en los modelos con panel tipo cassette grande Presione F C para alternar la temper...

Page 23: ...e 2 bater as AAA como se muestra en la ilustraci n observando la polaridad de la bater a 3 Vuelva a instalar la tapa de la bater a NOTA La distancia desde el control remoto hasta el receptor deber ser...

Page 24: ...secci n de Limpieza del filtro de aire 3 Limpie la rejilla Use un cepillo suave agua y un detergente neutro para limpiar y luego enjuague la rejilla en su totalidad NOTA No use agua caliente en una t...

Page 25: ...urante el funcionamiento de la unidad es posible que el filtro de aire tambi n est sucio Olores El sistema hizo circular olores que permanecieron en la circulaci n del aire tales como el olor de muebl...

Page 26: ...26 49 5000513 Rev 1 ESPA OL Para acceder a detalles de la garant a por favor consulte el manual de instalaci n GARANT A LIMITADA...

Page 27: ...49 5000513 Rev 1 27 ESPA OL NOTAS...

Page 28: ...GARANT A IMPORTANT Do Not Return This Product To The Store If you have a problem with this product please call 1 877 337 3639 for the name and telephone number of the nearest authorized service center...

Reviews: