
◆
Connection method
ATTENTION
!
This appliance must be installed in
compliance with the current
regulations and only installed in rooms
equipped with adequate ventilation.
Consult the instruction manual before
proceeding with installation or use of
the appliance.
Correct Disposal of This Product:
This marking indicates that this product should not be disposed of together with other
household waste. To prevent possible harm to the environment or human health from
uncontrolled waste disposal, recycle it responsibly to promote sustainable re-use of
material resources. To return your unwanted product, please use local return and collect
systems or contact the retailer where the product was purchased. They should be able to
take the appliance for environmentally-safe recycling.
Rubber hose
Pipe clamp
Red line
Intake joint
After the installation, make sure the gas connecting pipe is not twisted, squeezed, bent
and is not in touch with any movable part of the cabinet, such as drawers, rails, etc .;
avoid high temperature area.
Do not install the gas hob above poorly ventilated ovens, refrigerators, freezers,
dishwashers, sterilizer, or other types of kitchen appliances.
At least 100mm vacant space shall be reserved below the bottom of hob after the gas hob
is embedded into cabinet and all items are prohibited to be stored in the vacant space. To
ensure good ventilation and cooling of the gas hob, open 2 openings of about 50mm in
diameter on the back or side of the cabinet to the atmosphere to avoid the explosion
caused by the accumulation of unburned gas mixture. If the cabinet is not perforated, take
ventilation measures.
Note
Note
4. USER MANUAL
5. ROUTINE INSPECTION AND MAINTENANCE
The picture shows the burner parts diagram and
please refer to purchased products for details.
6. TROUBLESHOOTING AND HANDLING
●
Gas-dedicated rubber hose
If you select the gas-dedicated rubber hose (length should not
exceed 1.5m) with diameter of 9.5mm, please connect the
rubber hose to the intake joint of red marking of gas hob and fix
it firmly with pipe clamps. The rubber hose used should meet
the relevant safety standards within service period.
◆
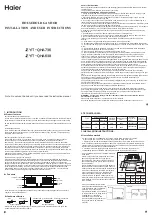
Ignite and adjust the fire
Before using for the first time, make sure the gas type specified on the nameplate of the gas hob is the
same as the type of gas you are currently using, and confirm that the burner parts, pot rack, knobs,
gas-dedicated connecting pipe and gas pipe are correctly installed. There will be residual air in the gas
line for the first-time use and ignition will be difficult, which is a normal phenomenon. Please repeat
igniting until it’s normal.
First of all, install a D dry battery in the battery box at the bottom of the gas hob and follow the order in
the diagram to ignite and adjust the fire.
Warm water
Cotton brush
Neutral detergent
Fine steel needle
Cooktop cleaning diagram
Burner parts diagram
Soapy water leakage
detection diagram
Fire cover cleaning diagram
1
2
4
3
5
Note
Note: when adjusting the fire, please do not adjust
the position near "OFF" to avoid flameout. It is
normal to hear the sound of "bang" when it’s off.
Open the indoor gas
main valve
Adjust the fire
Main gas valve diagram
Low
Medium
High
Off
Turn the knob clockwise
to the vertical "off"
position, turn off the
gas hob
Make sure to close the
indoor gas main valve
after using the hob.
Press the knob downwards and turn
counterclockwise to the horizontal
position (the state of high flame).
After the fire holes are all ignited,
continue to press for 3-5 seconds
and release for use after the
flameout protection is launched; if
the flame is extinguished when
releasing, turn the knob clockwise to
off position and repeat the above
ignition operation.
Fault
Cause
Troubleshooting method
No ignition
Flame is
extinguished when
releasing
Failure or difficulty
in ignition in pulsed
ignition
Dead battery
Dirty or wet top
Parts failure
Contact service center for maintenance
Re-ignite and keep 3-5 seconds after ignition
Clean the top with a soft cloth
Hold the knob, press the valve body to the end
and ignite
Ignition porcelain far away from the
fire hole
Replace with new battery
please adjust the discharge distance to 3-5mm
Clean the top with a soft cloth and wipe dry
Re-install and confirm the correct polarity
No battery, poor contact or reverse
installation
Battery
Pulser
Safety valve
Not working due to short press time
Thermocouple
Dirty top
Valve body is not fully pressed
Valve is not open or not fully open
Fire cover is not installed in place
Confirm that the fire cover is properly installed in place
Fire hole is blocked
Dirty or wet top
Clean the top with a soft cloth
Clean with dry and soft cloth
Replace with new gas dedicated connecting pipe
Damp or spilled water
Flattened or bent
Low battery, slow discharge frequency
Too high or too low gas outlet pressure
Use gas hob dedicated reducing valve in line with
national standards or check the gas supply for gas
Replace with new battery
Clear and clean the fire hole dirt
Verify that the valve is fully open
Valve body
Gas valve
Fire cover
Battery
Gas
Fire cover
Air regulator
Fire cover is not installed in place
Excessive air output
Confirm that the fire cover is corrected installed
in place
Re-adjust the air regulator until the flame is burning
properlye
Loud burning noise
Lifted flame and
blow-off
Connecting
pipe
Ignition
porcelain
needle
Ignition
porcelain
needle
Fault
Cause
Troubleshooting method
Thermocouple
Gas source
Unstable gas pressure
Fire cover is not installed in place
Please contact the gas company to handle it
Please contact the gas company to handle it
Replace with new gas dedicated connecting pipe
Confirm that the fire cover is properly installed in place
Confirm that the fire cover is properly installed in place
Clear and clean fire hole dirt
Calcium contained in moisture causes red flame, but
it doesn’t affect burning
Replace two new batteries
Confirm that the fire cover is properly installed in place
Fire cover
Air regulator
Fire cover
Air source
Gas leakage
Fire cover
Gas
Battery
Sensor
No flame out after
long high-heat
burning of left stove
Overheating
protection unit
Damaged
Long buzz alarm
after left stove
ignition
Solenoid valve
Damaged
Turn off knob, alarm sound disappears and contact
after-sales service center for repair
Contact after-sales service center for repair
Damaged
Turn off knob, alarm sound disappears and contact
after-sales service center for repair
Fire cover is not installed in place
Blocked fire hole
High gas humidity
Low battery voltage prompt at low
battery state
Too little air output
Fire cover is not installed in place
Impurities contained in gas
Connecting pipe ages, cracks, breaks
or falls off
Fire cover is not installed in place and gas
is leaked while igniting
Readjust air regulator until the flame is burning
correctly
Confirm that the fire cover is properly installed in place
Dirty top
Clean the top with a soft cloth
Flameout in use
Unstable flame
Long and yellow
flame
Foul smell
Uncertain length
of flame
Red flame
Alarm at ignition
Long buzz after 2
minutes of ignition,
alarm and switch off
◆
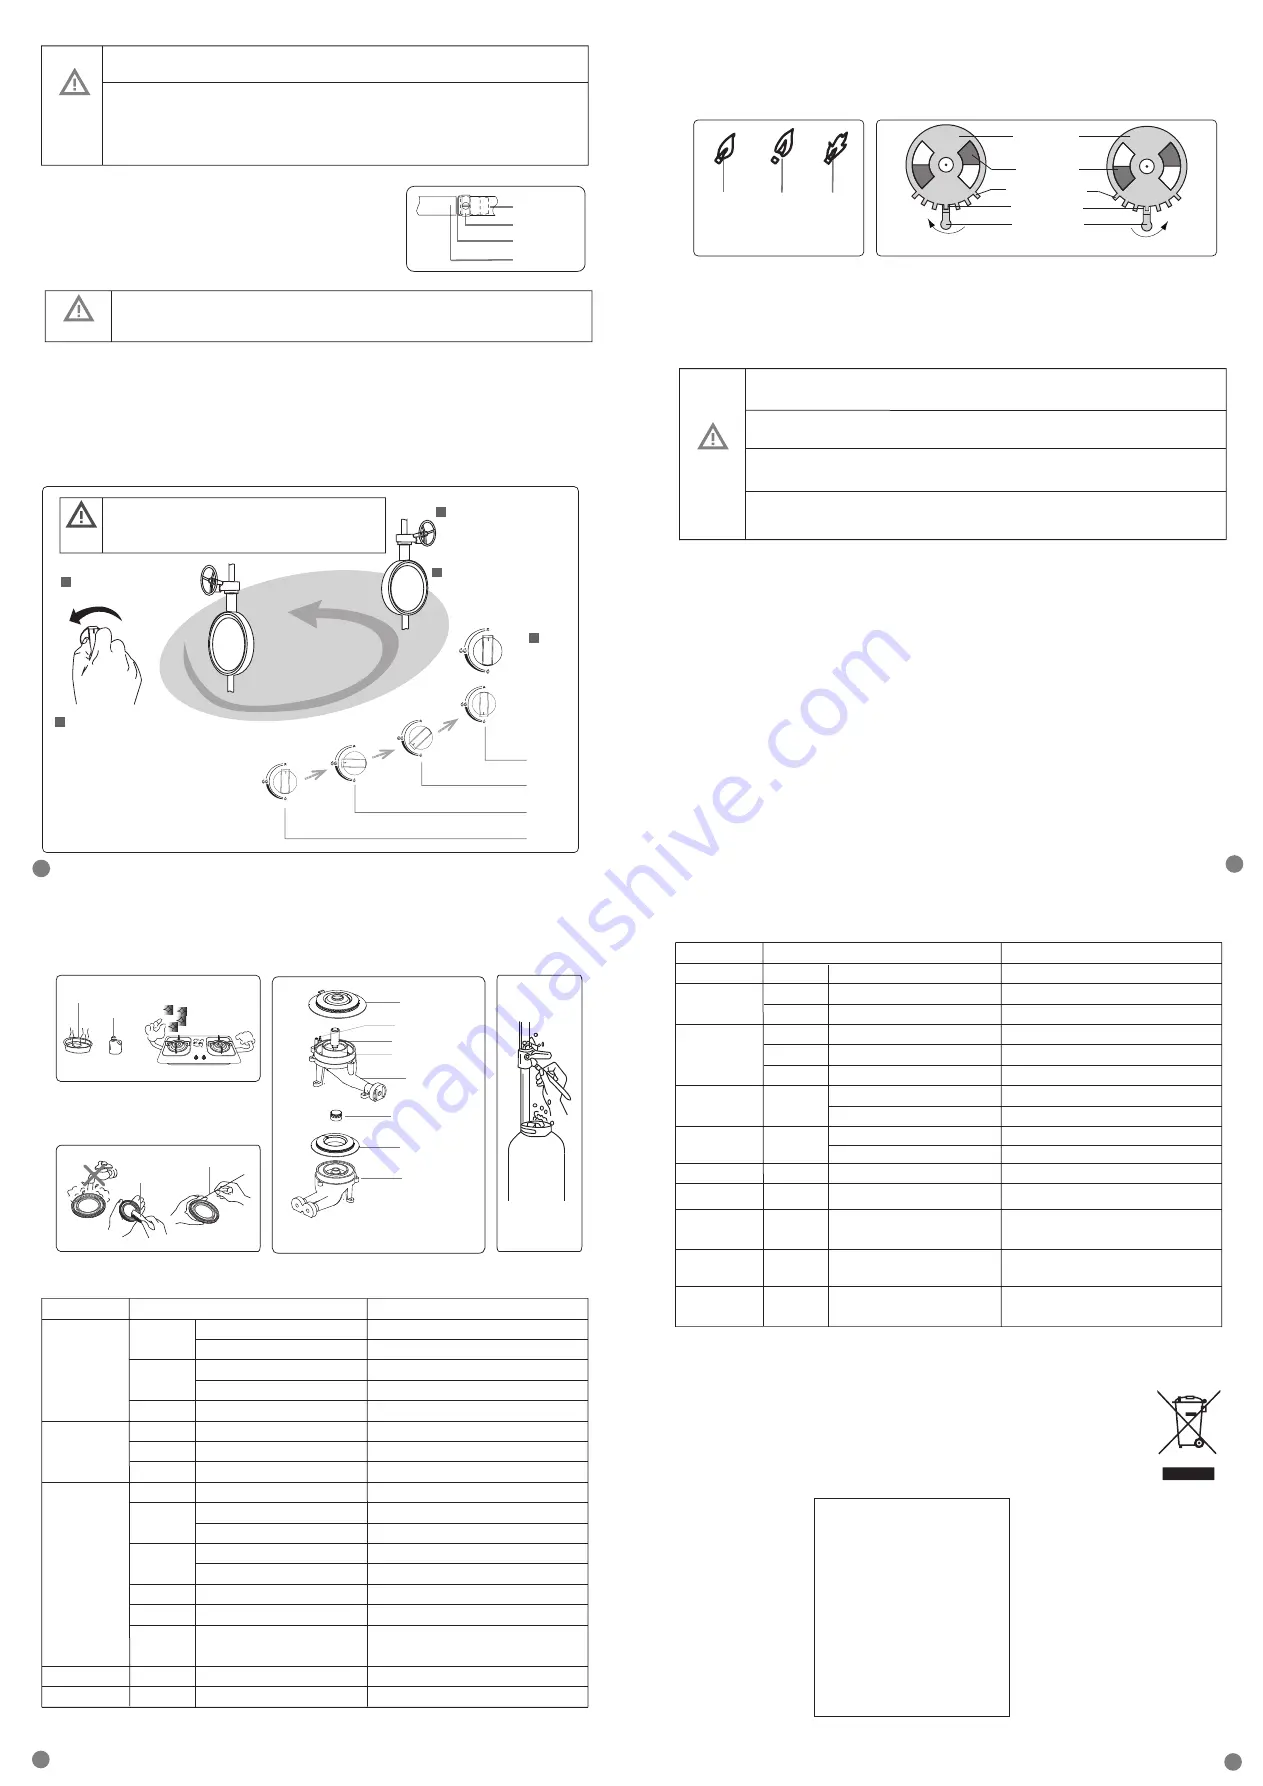
Air regulator adjustment and air volume control
◆
Change the applicable gas type
When the flame is in poor condition, adjust the air regulator at the bottom of the hob. When the flame
is long and yellow, turn the adjustable handle to the right to increase the air volume; when the flame is
away from the fire hole, turn the adjustable handle to the left to reduce the air volume. When the flame
state is normal, fasten the slot of adjustable handle with fixed throttle gear.
In case of changes in gas type due to relocation or local uniform gas reform, etc., professional trained
maintenance personnel will implement gas type changes to the gas hob. Please change the gas type
according to the gas type applicable to the models in the technical data list and the dedicated sales
area of the product. It is forbidden to disassemble the gas hob by yourself to avoid any safety accident.
Correct
combustion
state
Fixed air regulator
Adjustable air regulator
Adjustable air regulator slot
Adjustable air handle
Turn left to reduce air volume
Turn right to increase air volume
Fixed air regulator gear teeth
Note
: Normal flame color is light blue
Lifted flame
state
Yellow flame
state
Note
Before cleaning and maintaining the gas hob, please close the indoor gas main valve and
make sure the gas hob is in a cooling state. Do not dismantle the gas hob cooktop and
internal parts during the cleaning process.
As ignition porcelain needle surface is made of ceramic material, avoid crush due to hard
objects in cleaning and maintenance. Otherwise it will affect the ignition performance.
The thermocouple is a sensitive component that controls the on-off of the gas line.
Regular cleaning is required to prevent dirt from attaching. Otherwise, the accidental
flameout protection function will be affected.
The sensor is a sensitive part for sensing the temperature and the top must be cleaned
frequently to avoid dirt adhesion, otherwise it will affect the boil dry protection function.
◆
Inspection
◆
Maintenance
● Gas connecting pipe should be connected reliably without cracks. If leakage is found, please
immediately stop using and carry out timely replacement. It is advisable to check the air tightness of
the connections (as shown in the soapy water leak detection diagram, apply soap and water on the
connections to check the air tightness) and replace the connecting pipe at least once a year.
● Do not stack inflammable objects around the gas hob.
● The burner parts must be properly installed in place (as shown in the burner assembly) and the fire
holes should not be blocked by spills.
● Ignition porcelain needle and thermocouple surface can not have residual food, dirt and water.
● Cooktop, pot rack are cleaned with soft cloth dipped in neutral, non-corrosive detergent.
● In case that the gas contains impurities, after long-term use, it will form carbon deposition,
sintering, etc. within fire holes of the fire cover and block the fire holes. In the use of gas hobs, if
uneven or individual fire holes are found to be flameless, please turn off the gas hob, remove the fire
cover in time until the burner is cooled, use a fine steel needle to remove the dirt and carbon
deposition inside the fire hole and use the hob again after the treatment.
Do not apply water directly to the fire cover (as the blisters temporarily block the fire hole) and do not
rub the coated surface with a harder object, which can cause irreparable damage to the black-coated
surface. Please use a soft brush to clean the dirt on the surface of the fire cover.
● After cleaning, please refer to the illustration of the burner assembly to properly install the inner ring
fire cover, outer ring fire cover and pot rack, and confirm that the installation is in place. Otherwise,
uneven flame and lifted flame caused may affect the normal use of hob. Scratches beyond repair
caused by bump, impact and other improper installation will not be warranted.
Left fire cover
Left burner
Right inner fire cover
Right burner
Right outer fire cover
Sensor
Thermocouple
Ignition porcelain
needle
4
5
6
7


