26
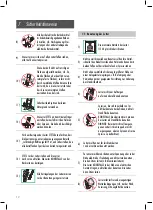
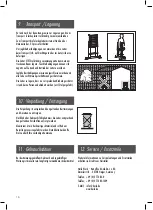
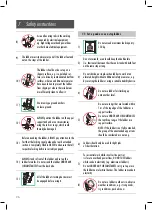
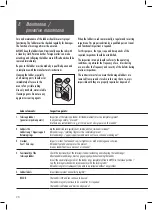
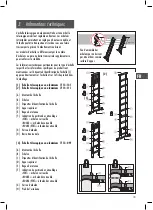
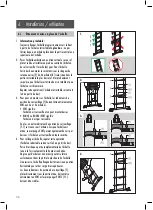
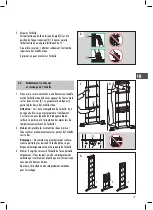
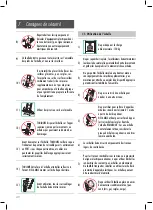
ALWAYS position the ladder on the upper
support and under no circumstances
using the rails or rungs, which could
thereby be damaged.
12)
Before ascending the ladder, ALWAYS pay attention to the
fact that the locking visual guide under each extended
section is ‘completely filled in GREEN’ and ensure that all
respective locking bolts are correctly engaged.
13)
ALWAYS stand in front of the ladder and set up the
ladder forwards. Do not ascend the ladder UNDER ANY
CIRCUMSTANCES from the back side.
14)
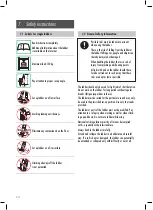
7. Safety instructions
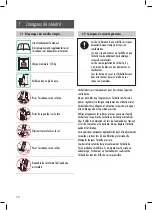
9) The ladder must stand securely on all the ladder feet and
not on the steps of the ladder.
Use screw-type ground anchors
on loose ground.
The ladder should not be set up on a
slippery surface, e.g. ice, polished sur-
faces or obviously contaminated but firm
surfaces, where no additional measures
have been taken to prevent the ladder
from slipping or where the soiled areas
are sufficiently clean to allow it.
10)
11)
8)
Assess all existing risks in the working
area posed by electrical equipment,
e.g. high voltage overhead power lines
or other bare electrical equipment.
Do not use ladder for climbing up
onto another level.
Do not use ladders outdoors in adverse
weather conditions, e.g. strong winds,
icy conditions, packed snow.
Do not exceed maximum load capacity:
150 kg
1)
2)
4)
3)
5)
6)
7)
8)
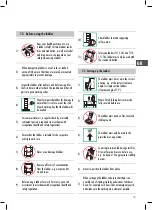
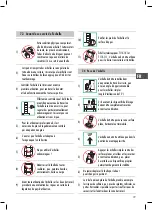
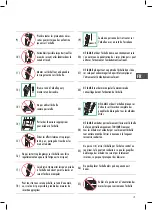
Ladders should only be used for light jobs
of short duration.
For essential work which involves live parts or
is close to overhead power lines, DO NOT USE ladders
which conduct electricity (e.g. aluminium ladders).
Do not UNDER ANY CIRCUMSTANCES carry, set up or use
the ladder near electrical devices. The ladder can conduct
electricity.
Do not overreach; users should keep their belt-buckle
(i.e. their navel) between the stiles and stand with both feet
on the same step or rung.
Do not climb up a single-section ladder to work at an
elevated height without additional safety measures, e.g.
by securing the ladder or using a suitable stability device.
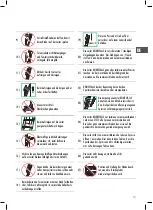
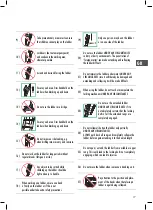
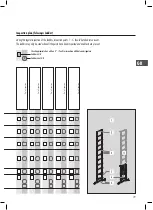
7.5 Set-up and use as a stepladder.
All of the ladder’s locking devices must
be engaged before using it.
15)
Do not use rungs that are located within
1 m of the top edge of the ladder as a
support surface.
Do not use UNDER ANY CIRCUMSTANCES
the top three rungs of the ladder as a
support surface.
NOTE: If the ladder is not fully extended,
the group of the unextended upper runs
should be considered as one rung.
Summary of Contents for FlexLine Series
Page 2: ...2...
Page 3: ...3 DE Gebrauchs und Bedienungsanleitung Hailo FlexLine Aluminium Teleskopleiter...
Page 17: ...17 GB DE Use and Operating Instructions Hailo FlexLine Aluminium Telescopic Ladder...
Page 45: ...45 ES FR Instrucciones de uso y manejo Escalera telesc pica de aluminio Hailo FlexLine...
Page 59: ...59 IT ES Istruzioni d uso Scala telescopica in alluminio Hailo FlexLine...
Page 73: ...73 LT IT Naudojimo ir prie i ros instrukcija Hailo FlexLine aliuminio teleskopin s kop ios...
Page 101: ...101 RO LV Manual de utilizare Scar telescopic din aluminiu Hailo FlexLine...
Page 115: ...115 SE RO Bruks och anv ndarinstruktioner Hailo FlexLine teleskopstege av aluminium...
Page 129: ...129 RU SE Hailo FlexLine...
Page 131: ...131 RU Hailo C 1 7113 131 2 7113 111 A B C D E F G H 3 7113 091 A B C D E F G H 1 2 3 3...
Page 133: ...133 RU C 7113 091 1 x 1 x 7113 111 7113 131 1 H 1 H 2 H A 3 7113 131 7113 111 5 C 1 2 3...
Page 134: ...134 6 6 1 1 2 1 E 3 B 4 3 F 2 3 F 1 4 5 F F 1 1 2 3 4...
Page 135: ...135 RU 5 H D 75 6 2 1 G 2 3 5 1 2 3...
Page 136: ...136 7 1 7 2 150 7 150...
Page 137: ...137 RU 7 9 7113 131 7113 111 11 1 2 6 4 7 10 8 5 7 3 1 3 2 5 75 7 4 6 4 3...
Page 138: ...138 12 13 14 9 10 11 8 150 1 2 4 3 5 6 7 8 7 5 15 1 1 7 150...
Page 139: ...139 RU 20 21 22 23 24 25 12 14 15 9 10 11 16 17 18 19 13 27 26...
Page 140: ...140 8 1 2 3 4 5...
Page 141: ...141 RU 1 5...
Page 143: ...143 CZ RU N vod k pou it a obsluze Hlin kov teleskopick eb k Hailo FlexLine...
Page 157: ...157 CZ...
Page 158: ...158...
Page 159: ...159...

