background image

136

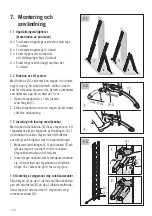
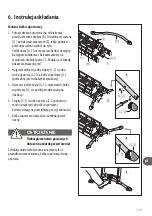
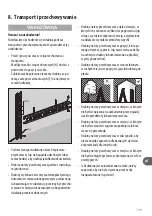
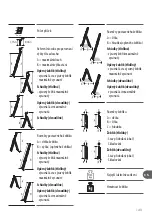
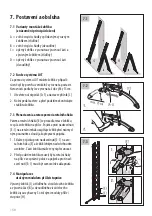
7.1  Warianty konstrukcyjne (schematy zasadnicze) 

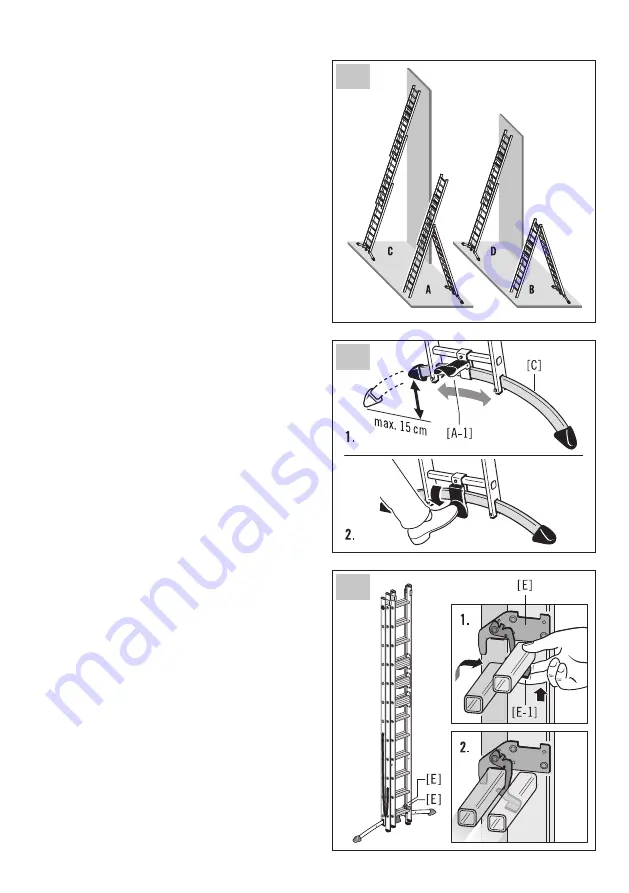
A =  Drabina składana wolnostojąca z dodatkową  
    drabiną wysuwaną (3-częściowa)  
B =  Drabina składana wolnostojąca (2-częściowa)  
C =  Drabina przystawna z wysuniętą częścią  
    wysuwną i drabiną wysuwaną (3-częściową)  
D =  Drabina przystawna z wysuniętą częścią  
    wysuwną (2-częściowa)


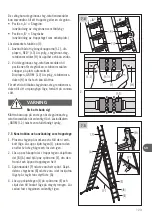
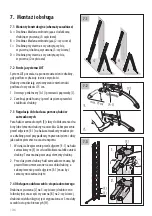
7.2  Funkcja systemu LOT

System LOT pozwala na pionowe ustawienie drabiny, 
gdy podłoże wykazuje różnice wysokości.  
Drabiny umożliwiają wyrównywanie nierówności 
podłoża do wysokości 15 cm. 
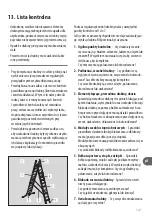
1.   Otworzyć pedał nożny [A-1] i przestawić poprzeczkę [C]. 
2.  Zamknąć pedał nożny i przed użyciem sprawdzić    
  stabilność drabiny.  

 
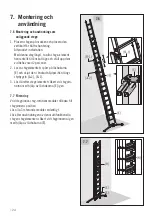
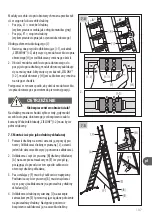
7.3   Regulacja i blokada za pomocą haków 

zatrzaskowych

Para haków zatrzaskowych [E] służy do blokowania dra-
biny lub elementu drabiny na szczeblu. Zabezpieczenie 
przed zdjęciem [E-1] na haku zatrzaskowym zabezpie-
cza drabinę przed przypadkowym przesunięciem i służy 
jako zabezpieczenie na czas transportu. 
1.  Wcisnąć zabezpieczenie przed zdjęciem [E-1] na haku 

zatrzaskowym [E] i w celu odblokowania lekko unieść 
drabinę. Teraz można przesunąć elementy drabiny.

2.   Przed użyciem drabiny haki zatrzaskowe muszą być 

prawidłowo umieszczone na szczeblu drabiny, a 
zabezpieczenie przed zdjęciem [E-1] musi być  
samoczynnie zatrzaśnięte.


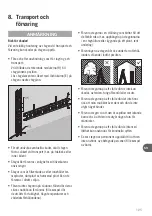
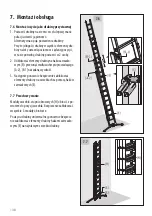
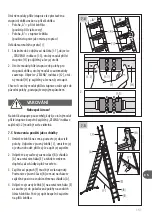
7.4  Obsługa modułu szczeblo-stopnia obrotowego 

Drabina wysuwana [J] na 3-częściowej drabinie wie-
lofunkcyjnej oraz część wysuwna [B] na 2-częściowej 
drabinie wielofunkcyjnej jest wyposażona w 3 moduły 
szczeblo-stopni obrotowych [H]. 

7.  Montaż i obsługa 

 7.1

 7.2

 7.3

Summary of Contents for S120 Pro

Page 1: ...in 3 parti Scala multiuso in alluminio in 2 parti Naudojimo instrukcija Universalios aliuminio kop ios 3 dali Universalios aliuminio kop ios 2 dali Lieto anas instrukcija Alum nija univers l s k pnes...

Page 2: ...NUNG HINWEIS Hinweis auf eine m glicherweise gef hrliche Situation die zu Sachsch den f hren kann Sicherheitszeichen werden ausschlie lich im Kapitel Sicherheitshinweise erkl rt und beschrieben Weiter...

Page 3: ...utzlast Gewicht der Leiter de Anzahl der Leitersprossen Referenzperson f r K rpergr e und Reichh he A h chstm gliche Reichh he B h chstm gliche Standh he Anlegeleiter 3 teilig Schiebeteil und Schiebel...

Page 4: ...tion aus Sprosse Stufe kann die Leiter auch als Arbeitsplatz verwendet werden Die ma geblichen technischen Informationen und produktspezifischen Angaben befinden sich auf der Leiterkennzeichnung G dir...

Page 5: ...r Hersteller oder H ndler bernimmt keine Haf tung f r Sch den die durch nicht bestimmungsge m en oder falschen Gebrauch entstanden sind Der Benutzer muss grunds tzlich sicherstellen dass die Leiter f...

Page 6: ...llen 5 Sicherheitshinweise Bei der Benutzung der Leiter besteht grunds tz lich die Gefahr eines Absturzes Alle Arbeiten mit und auf der Leiter sind deshalb so durchzuf hren dass eine Absturzgefahr so...

Page 7: ...Risiken durch elektrischen Strom bestehen Die Leiter im Fall von k rperlichen Einschr nkungen nicht benutzen Bestimmte gesundheitliche Gegeben heiten Medikamenteneinnahme Alko hol oder Drogenmissbrau...

Page 8: ...tehleiter auf eine andere Oberfl che ist unzul ssig Die Leiter vor Benutzung vollst ndig ffnen 5 Sicherheitshinweise Die Leiter nur mit eingelegter Spreizsicherung verwenden Die obersten zwei Stufen S...

Page 9: ...prosse nach hinten schieben Das Fu pedal A 1 ist jetzt frei zug nglich Anschlie end Rasthaken an den Leitersprossen verriegeln siehe Kapitel 7 3 Verstellung und Arretierung mit Rasthaken 2 Zun chst ei...

Page 10: ...Benut zung auf sicheren Stand pr fen 7 3 Verstellung und Arretierung mit Rasthaken Mit dem Rasthakenpaar E wird die Leiter bzw ein Leiterelement an einer Leitersprosse arretiert Die Abhebesicherung E...

Page 11: ...en auf gleiche Weise vorgehen A 7 5 Aufbau und Benutzung als Stehleiter 1 Leiter auf den Boden stellen und in die senk rechte Position bringen Schiebeleiter J entrie geln eine oder zwei Sprossen h her...

Page 12: ...n aufstellen 2 Leiterelemente am Rasthaken E entriegeln und entlang der F hrungsb gel A 2 B 1 in die gew nschte H henposition verschieben 3 Leiterelemente anschlie end an den Leiter sprossen mit Hilfe...

Page 13: ...befugten Personen benutzt wird z B von Kindern Vor und nach der Benutzung sowie zur Lagerung und zum Transport Die Sprossen Stufen Drehmodule H wieder in die Sprossen Stellung drehen Leiterelemente mi...

Page 14: ...Herstellers Bei Reparatur und Austausch von Teilen wie z B F en ist falls erforderlich der Hersteller oder H ndler zu kontaktieren Bei bestimmungsgem em Gebrauch und regelm iger Wartung ist die Leite...

Page 15: ...rtes pr fen Sind die Befestigungspunk te in gutem Zustand Sind Besch digungen Risse Korrosion vorhanden 7 Kennzeichnungen Sind alle Kennzeichnungen vorhanden und gut lesbar 13 Pr fliste F r den gewerb...

Page 16: ...se describe the safe use of 3 section and 2 section combination ladders both models are also referred to as ladders in the following text For safety reasons please read these instructions for use care...

Page 17: ...e ladder Number of ladder rungs Reference person for body size and reaching height A highest possible reaching height B highest possible standing height Single ladder 3 section extension section and e...

Page 18: ...combination of rung step the ladder can also be used as a workstation The relevant technical information and product specific information are on the ladder label G directly on the ladder A Stepladder...

Page 19: ...jobs can be carried out at heights at which use of other work tools is not commensurate This ladder may only be used as specified in these instructions for use Any other use is considered as non inten...

Page 20: ...d There is inherently a risk of falling when using the ladder All work with and on the ladder should therefore be carried out in such a way that a risk of falling is kept as low as possible When using...

Page 21: ...not wear unsuitable footwear when climbing a ladder Do not use the ladder if you are not fit enough Certain medical conditions or medication alcohol or drug abuse could make ladder use unsafe Do not s...

Page 22: ...Do not stand on the top three steps rungs of a leaning ladder Do not step off the side of standing ladder onto another surface Open the ladder fully before use Use the ladder with restraint devices e...

Page 23: ...ustment and locking mechanism with locking hooks 2 First unscrew a foot C 1 and a stop screw C 2 on the crossbar C Phillips screwdriver required 3 Open foot pedal A 1 and insert crossbar C as shown 4...

Page 24: ...ent and locking mechanism with locking hooks The ladder or a ladder element is locked on a lad der rung using the pair of locking hooks E The anti lift security device E 1 on the locking hock secures...

Page 25: ...e same manner 7 5 Set up and use as a stepladder 1 Place the ladder on the ground and raise it until it is vertical Unlock the extension ladder J position it one or two rungs higher and lock it again...

Page 26: ...th 2 persons if necessary 2 Unlock the ladder elements at the rest hook E and move along the guide bracket A 2 B 1 to the desired height 3 Then securely lock the ladder elements again at the ladder ru...

Page 27: ...secured against unauthorized climbing e g by children Before and after use as well as for storage and transport Turn the rotary modules H back into the rung position Securely lock the ladder elements...

Page 28: ...ry out repairs or maintenance e g by a training by the manufacturer For repair and replacement of parts e g feet if necessary contact the producer or distributor When used for its intended purpose and...

Page 29: ...t or corroded 6 Safety braces Inspect technical condition of the tensioning strap Are the attachment points in good condition Are damage cracks or corrosion present 7 Ladder labels Are all labels pres...

Page 30: ...helle transformable en 3 et en 2 parties galement nomm e chelle pour les deux mod les dans la suite du texte en toute s curit Pour des raisons de s curit et avant d utiliser l chelle veuillez lire att...

Page 31: ...l chelle Nombre d chelons Personne de r f rence pour la taille du corps et la hauteur d extension A hauteur d extension maximale possible B hauteur debout maximale possible chelle simple 3 pi ces pi c...

Page 32: ...ravail Les informations techniques d terminantes et les donn es sp cifiques au produit sont indiqu es directement sur l chelle G A chelle double B Pi ce coulissante en cas d utilisation en tant qu che...

Page 33: ...re respect es Les chelles transformables en 3 parties et les chelles transformables en 2 parties conviennent un usage professionnel pas un usage non professionnel La charge utile maximale de l chelle...

Page 34: ...r l chelle sur un sol form ou meuble viter de se pencher sur le c t Poser l escabeau sur un sol dur L utilisation de l chelle engendre un risque d une chute Pour cette raison tous les travaux avec et...

Page 35: ...s sur l chelle sans faire de pauses r guli res la fatigue compromet une utilisation s re viter les dommages pendant le transport de l chelle par exemple en l arrimant et garantir une fixation installa...

Page 36: ...Descendre du c t lat ral de l esca beau est interdit 5 Consignes de s curit Veiller ouvrir enti rement et de mani re s curis e les deux parties de l escabeau avant utilisation Les dispositifs anti car...

Page 37: ...rrouillage avec les crochets d arr t 2 D visser d abord un pied C 1 et une vis de but e C 2 sur la traverse C tournevis cruciforme n cessaire 3 Ouvrir la p dale A 1 et introduire la traverse comme ill...

Page 38: ...avant son utilisation 7 3 R glage et verrouillage avec les crochets d arr t La paire de crochets d arr t E verrouille l chelle ou l l ment de l chelle au niveau d un chelon La protection anti soul ve...

Page 39: ...nstallation et utilisation en tant qu chelle double 1 Poser l chelle sur le sol et la mettre en position verticale D verrouiller l chelle coulissante J placer un ou deux chelons plus haut et verrouil...

Page 40: ...le crochet d arr t E et les glisser le long des triers de guidage A 2 B 1 la hauteur d sir e 3 Puis verrouiller nouveau fermement les l ments de l chelle sur les chelons au moyen des crochets d arr t...

Page 41: ...es personnes non autoris es par ex des enfants Avant et apr s utilisation ainsi qu en cas de stockage et de transport Remettre le module rotatif H en position che lons en le faisant tourner Bien verro...

Page 42: ...essaires pour effectuer des r parations ou des travaux d entretien par ex en participant un cours de formation d un fabricant Lorsque vous r parez ou remplacez des pi ces telles que les pieds d appui...

Page 43: ...s s ou corrod s 6 Dispositif anti cartement V rifier dans quel tat se trouve la sangle sur le plan technique Les points de fixation sont ils en bon tat Y a t il des d g ts des fissures et ou de la cor...

Page 44: ...escalera multiusos de 3 partes y de 2 partes en el siguiente texto ambos modelos se denominan tambi n escalera Por razones de seguridad lea atentamente estas instrucciones de uso antes de la utilizaci...

Page 45: ...El peso de la escalera N mero de pelda os Persona de referencia para estatura y altura de alcance A m xima altura de alcance B m xima altura de posici n Escalera de mano 3 piezas Parte deslizante y es...

Page 46: ...ci n de pelda o escal n tambi n permite utilizar la escalera como puesto de trabajo Las informaciones t cnicas y datos espec ficos del producto determinantes se encuentran en la identificaci n de la e...

Page 47: ...piezas y la escalera multiusos de 2 piezas son aptas para su uso en uso profesional y en uso no profesional La capacidad de carga m xima de la escalera es de 150 kg Las modificaciones en la escalera q...

Page 48: ...ra verificar si existen da os y si se puede utilizar de forma segura antes de iniciar el trabajo diario con ella Durante el uso de la escalera existe en principio el peligro de una ca da Por tanto tod...

Page 49: ...do adecuado Su estado de salud le permite utilizar la escalera Algunos estados de salud determinados la toma de medicamen tos el consumo de drogas o alcohol pueden poner en peligro la seguridad al uti...

Page 50: ...No est permitido desplazarse hacia los lados de la escalera Prestar atenci n a la apertura segura y completa de las dos partes de la escalera antes de utilizarla Los seguros de separaci n dispo sitivo...

Page 51: ...retenci n 2 Desatornillar primero un pie C 1 y un tornillo de tope C 2 en el travesa o C es necesario un tornillo con ranura en cruz 3 Abrir el pedal A 1 e introducir el travesa o C tal como se muestr...

Page 52: ...posici n vertical segura 7 3 Extensi n y bloqueo con gancho de retenci n Con el par de ganchos de retenci n E la escalera o uno de sus elementos se engancha a un pelda os El seguro E 1 en el gancho de...

Page 53: ...oceda de la misma manera A 7 5 Montaje y uso como escalera de mano 1 Coloque la escalera sobre el suelo y p ngala en posici n vertical Desbloquee la escalera extensible J col quela uno o dos pelda os...

Page 54: ...elementos de la escalera en el gancho de retenci n E y desplazarlos a la posici n deseada a lo largo del estribo de gu a A 2 B 1 3 A continuaci n volver a trabar los elementos de la escalera firmement...

Page 55: ...por ni os Antes y despu s del uso y para el almacena miento y el transporte Vuelva a girar los m dulos giratorios H a la posici n de pelda o Bloquee los elementos de la escalera con los enganches E e...

Page 56: ...emplo los pies deber acudirse en caso necesario al fabricante o al distribuidor 9 Cuidados reparaci n y mantenimiento Cuidado con los da os El manejo inadecuado de la escalera durante el cuidado y el...

Page 57: ...la escalera herrajes Comprobar la funcionalidad resistencia da os y corrosi n de las gu as de la escalera y los pernos de tope El bloqueo de la escalera con los ganchos de retenci n y el seguro debe...

Page 58: ...n sicurezza la scala multiuso in 3 parti e in 2 parti Di seguito entrambi i modelli vengono denominati anche scale Per motivi di sicurezza prima dell uso leggere attentamente le presenti istruzioni e...

Page 59: ...massimo possibile Peso della scala Numero di pioli Persona di riferimento per corporatura e altezza di sbraccio A massima altezza di sbraccio possibile B massima altezza possibile Scala da appoggio i...

Page 60: ...zie a questa combinazione di pioli gradini la scala pu essere utilizzata anche come postazione di lavoro I dati specifici del prodotto e le informazioni tecniche normative si trovano sul contrassegno...

Page 61: ...la scala multiuso in 2 parti sono idonee all uso professionale e all uso non professionale EIl carico utile massimo possibile della scala di 150 kg Eventuali modifiche alla scala non autorizzate dal...

Page 62: ...itare di sporgersi lateralmente Non posizionare la scala su una superficie non pulita Durante l utilizzo della scala sussiste di norma il rischio di caduta Tutti i lavori con e sulla scala devono pert...

Page 63: ...are sempre calzature idonee Si in grado in base al proprio stato di salute di utilizzare una scala Alcune condizioni di salute l assun zione di farmaci o l abuso di alcool e droghe possono pregiudicar...

Page 64: ...aso dall alto Non stare in piedi sui tre pioli supe riori di una scala da appoggio Non consentito scendere lateral mente dalla scala Prima dell uso assicurarsi che entrambe le parti della scala siano...

Page 65: ...o con ganci a innesto 2 Svitare dapprima un piede C 1 e una vita di battuta C 2 sulla traversa C necessario cacciavite a croce 3 Aprire il pedale A 1 e inserire la traversa C come raffigurato 4 Fissar...

Page 66: ...utilizzo 7 3 Regolazione e arresto con ganci a innesto Con la coppia di ganci a innesto E possibile bloccare la scala o un elemento della scala ad un piolo Il dispositivo antisollevamento E 1 sul gan...

Page 67: ...e utilizzo come scala a libro 1 Posizionare la scala sul pavimento e portarla in posizione verticale Sbloccare la scala a sfilo J posizionarla uno o due pioli pi in alto e bloccarla nuovamente 2 Sbloc...

Page 68: ...Sbloccare gli elementi della scala mediante il gancio a innesto E e spingerli lungo la staffa di guida A 2 B 1 fino all altezza desiderata 3 Infine bloccare nuovamente in modo sicuro gli elementi del...

Page 69: ...ione alle intemperie Conservare la scala in una posizione dritta ad es sospesa a un supporto per scale su longheroni o posizionata su una superficie piana e pulita La scala deve essere immagazzinata i...

Page 70: ...nga di competenze apposite ad eseguire riparazioni o lavori di manutenzione ad es a seguito della partecipazione a un corso di formazione del produttore In caso di riparazione e sostituzione dei compo...

Page 71: ...io e sbloccaggio posizione pioli e posizione gradini I moduli girevoli devono innestarsi senza problemi in entrambe le posizioni L indicatore di bloccaggio e sbloccaggio visibile 5 Traversa piedini ca...

Page 72: ...pos ioje naudojimo instrukcijoje yra apra omas saugus 3 dali ir 2 dali daugiafunkci kop i naudojimas toliau esan iame tekste abu modeliai taip pat yra vadinami kop iomis D l saugumo prie naudodami kop...

Page 73: ...skai ius gio ir pasiekiamo auk io atskaitos asmuo A did iausias galimas pasiekiamas auk tis B did iausias galimas stov jimo auk tis Atremiamosioskop ios 3dali I traukiamoji dalis ir i traukiamosios ko...

Page 74: ...rinio i skersinio laiptelio d ka kop ias taip pat galima naudoti ir kaip darbo viet Konkre i technin informacij ir atskir modeli duomenis taip pat rasite tiesiai ant etiket s G priklijuotos ant kop i...

Page 75: ...ojimo alyje galiojan i teis s akt 3 dali daugiafunkc s kop ios ir 2 dali daugiafunkc s kop ios yra tinkamos profesionaliajam naudojimui ir neprofesionaliajam naudojimui Did iausia galima kop i nauding...

Page 76: ...s simboliai kop i naudotojui nurodo kaip saugiai naudoti kop ias ir k leid iama daryti B tini veiksmai pa ym ti varnele o draud iami veiksmai pa ym ti kry eliu Ap i r kite kop ias ar jos nepa eis tos...

Page 77: ...reikalavim Statydami kop ias steb kite kad jos neatsitrenkt mones duris automobilius ar kitas kli tis Jei manoma vietoje kurioje dirbate u darykite ir u rakinkite duris tik ne avarini i jim ir langus...

Page 78: ...tato m j kop i pakop kaip atraminio pavir iaus Lipti ant kop i per on yra drau d iama Prie lipdami ant kop i sitikinkite kad abi dalys i sk stos tinkamai ir iki galo statykite pateikiamas apsaugas ir...

Page 79: ...fiksavimas naudojant fiksatori 2 Po to reikia pritvirtinti vien koj C 1 ir atramin var t C 2 prie skersinio C reikalingas kry minis atsuktuvas 3 Atidarykite kojin pedal A 1 ir statykite skersin C kaip...

Page 80: ...ovi saugiai 7 3 Pozicijos pakeitimas ir fiksavimas naudojant fiksatori Naudojant fiksatori por E kop ios arba kop i elementas fiksuojamas ant pakopos Atitr kimo nuo em s saugiklis E 1 esantis ant fiks...

Page 81: ...u A 7 5 rengimas ir naudojimas kaip ske iam j kop i 1 Pastatykitekop iasant em sirnustatykite vertikali pad t Atrakinkitei traukiam siaskop ias J nustatyki tevienuardviemskersiniaisauk iau irv lu raki...

Page 82: ...2 Atpalaiduokite kop i elementus prie fiksa toriaus E ir pastumkite juos pageidaujam pozicij i ilgai kreipian iosios kab s A 2 B 1 3 Baig darb kop i elementus v l priver kite naudodami fiksatori E 7 7...

Page 83: ...s lyg poveikio Kop ias laikykite taip kad jos i likt tiesios pvz u kabinkite kop i sijas ant kop i laikikli arba paguldykite ant lygaus ir varaus pavir iaus Kop ias laikykite pastatytas sta iai sauso...

Page 84: ...priemones nuplaunamas vandeniu Nenaudokite agresyvi ir sdinan i priemoni Kop i remonto ir technin s prie i ros darbus turi atlikti specialistai laikydamiesi gamintojo instrukcij Pastaba specialistu l...

Page 85: ...sulanks tytos nenubrai ytos neapr dijusios Visos pakopos turi b ti savo vietose Ar pakopos n ra nusid v jusios atsipalaidavu sios apr dijusios arba pa eistos 3 Jungimo elementai kop i kreipian iosios...

Page 86: ...s aj lieto anas instrukcij ir aprakst ta dro a tr sda go un divda go k p u abi mode i turpm k tekst k p u izmanto ana L dzu pirms k p u lieto anas dro bas apsv rumu d r p gi izlasiet o lieto anas inst...

Page 87: ...ju mont a Pak pienu skaits Atsauces persona erme a garumam un aizsnieg anas augstumam A augst kais iesp jamais aizsnieg anas augstums B augst kais iesp jamais st v anas augstums Pieslienam sk pnes tr...

Page 88: ...sprai u pak pienu rot jo iem modu iem H sprai u pak pienu kombin cija noz m ka k pnes var izmantot ar k darba vietu B tisk k tehnisk inform cija un specifiskie dati atrodas k p u mar jum G tie i uz k...

Page 89: ...oteikumus Tr sda g s univers l s k pnes un divda g s univers l s k pnes ir piem rotas lieto anai gan profesion lai lieto anai gan neprofesion lai lieto anai K p u maksim l slodze ir 150 kg Ar ra ot ju...

Page 90: ...to kas ir nepiecie ams dro ai k p u lieto anai un kas ir aizliegts Nepiecie ams ir atz m ts ar eks ti un aizliegts ar krustu Br din jums k p u apg an s Iev rojiet instrukcijas Pirms katras lieto anas...

Page 91: ...eikt iesp jamo risku nov rt jumu saska ar darba dro bas un vesel bas aizsardz bas normat vajiem aktiem Uzst dot k pnes izv rt jiet iesp jamos riskus piem ram vai j s neaizskars g j ji transportl dzek...

Page 92: ...g jos tr s pak pienus k atbalsta virsmu Ir aizliegta k p ana uz s niem no k pn m Pirms lieto anas emiet v r piln gu un nodro in tu abu k p u da u atv rumu J b t nofiks t m blo anas iek rt m Neizmantot...

Page 93: ...ar fiks cijas iem 2 Vispirms rsstienim C pieskr v jiet pamatni C 1 un atdures skr vi C 2 nepiecie ams krusti a skr vgriezis 3 Atveriet k jas ped li A 1 un ievietojiet rs stieni C k nor d ts att l 4 A...

Page 94: ...s ir stabilas 7 3 Regul ana un fiks cija ar fiks cijas iem Ar fiks cijas u p ri E k pnes vai k p u elements tiek nofiks ts pie k p u pak piena Fiks cijas a pa cel anas dro bas meh nisms E 1 nodro ina...

Page 95: ...s kotn j poz cij r kojieties t pat A 7 5 St vo o k p u uzst d ana un izmanto ana 1 Novietojiet k pnes uz zemes un novietojiet t s vertik l st vokl Atblo jiet b d m s k pnes J paceliet t s vienu vai di...

Page 96: ...iet t s divat 2 Atblo jiet k p u elementu fiks cijas us E un ar vadotnes loku A 2 B 1 p rvietojiet v lamaj poz cij 3 Nosl gum ar fiks cijas iem E dro i nofiks jiet k p u elementus 7 7 Glab ana Pagriez...

Page 97: ...nepiedero as personas piem b rni Pirms un p c lieto anas k ar uzglab anai un transport anai Pagrieziet rot cijas modu us H atpaka sprai u poz cij Dro i nofiks jiet k p u elementus ar blo anas iem E pi...

Page 98: ...t ja instrukcij m Piez me Speci lists ir cilv ks kuram ir zin anas lai veiktu remontu vai apkopes darbus piem piedaloties ra ot ja apm c b s Veicot deta u piem k ju nomai u nepiecie am bas gad jum saz...

Page 99: ...iespiesti saplais ju i vai sar s ju i J b t pieejamiem visiem k p u pak pieniem Vai k p u pak pieni ir nolietoju ies va gi sar s ju i vai boj ti 3 Savienojuma elementi k p u vadones furnit ra P rbaud...

Page 100: ...rodusului 3 Con inutul livr rii 4 Utilizarea conform cu destina ia 5 Indica ii de siguran a 6 Ghid de asamblare 7 Asamblarea i folosirea 8 Transportul i depozitarea 9 ngrijire repara ie i ntre inere c...

Page 101: ...Num rul de spi e Persoan de referin pentru dimensiunea corporal i n l imea maxim de acces A n l imea maxim posibil a nivelului picioarelor B n l imea de acces maxim posibil Scar de reazem din 3 p r i...

Page 102: ...e dou sc ri multifunc ionale sunt dotate cu 3 module rotative spi ele treptele H Prin aceast combina ie de spi trepte scara poate fi utilizat i ca post de lucru Informa iile tehnice decisive i datele...

Page 103: ...ate Scara multifunc ional sin 3 p r i i scara multifunc ional din 2 p r i sunt adecvate pentru uz profesional i uz neprofesional Sarcina util maxim posibil a sc rii cu trepte este de 150 kg Efectuarea...

Page 104: ...rile efectuate cu scara cu trepte i de pe aceasta trebu ie realizate astfel nc t pericolul de pr bu ire s fie c t mai redus posibil La folosirea sc rii cu trepte apare de asemenea pericolul de r stur...

Page 105: ...a rea de medicamente abuzul de alcool sau de droguri pot periclita siguran a n timpul utiliz rii sc rii cu trepte Nu r m ne i ndelungat pe scara cu trepte f r ntreru peri regulate oboseala reprezint u...

Page 106: ...e de sus ale unei sc ri de eazem ca suprafa de sus inere Nu este permis c rarea lateral de pe scar Utilizarea ca scar dubl Ave i grij ca ambele p r i ale sc rii s fie desf cute complet i n siguran Si...

Page 107: ...carea cu c rlige de fixare 2 Mai nt i de uruba i un picior C 1 i un urub opritor C 2 de la traversa C necesar urubel ni cap cruce 3 Deschide i pedala A 1 i introduce i traversa C a a cum este reprezen...

Page 108: ...eaz stabil 7 3 Repozi ionarea i blocarea cu c rlige de fixare Cu perechea de c rlige de fixare E se blocheaz scara respectiv un element de scar la o spi de scar Siguran a antidesprindere E 1 de la c r...

Page 109: ...zi ia ini ial proceda i n acela i mod A 7 5 Asamblarea i folosirea ca scar dubl 1 A eza i scara pe sol i aduce i o n pozi ie vertical Debloca i scara culisant J pozi iona i o cu una sau dou traverse m...

Page 110: ...e de scar de la c rligul de fixare E i muta i le de a lungul jugului de ghidare A 2 B 1 n pozi ia de n l ime dorit 3 Apoi bloca i din nou n siguran spi ele sc rii cu ajutorul c rligelor de fixare E 7...

Page 111: ...atmosfe rice Depozita i scara cu trepte ntr o pozi ie care s contribuie ca ea s r m n dreapt de ex acro at la un suport de scar la barele longitudinale sau a ezat pe o suprafa plan i curat Scara cu tr...

Page 112: ...l comercial dac este necesar Dac scara cu trepte se scoate din uz ea trebuie eliminat ca de eu n conformitate cu legile actuale n vigoare i dispozi iile din ara de utilizare Eliminarea ca de eu a sc r...

Page 113: ...e trebuie s se fixeze n pozi ie n ambele pozi ii Este vizibil afi ajul de blocare i de deblocare 5 Traverse picioare c p cele de cap t Verifica i rezisten a mecanic precum i eventualele deterior ri i...

Page 114: ...versikt 3 Leveransomfattning 4 ndam lsenlig anv ndning 5 S kerhetsanvisningar 6 Monteringsanvisning 7 Montering och anv ndning 8 Transport och f rvaring 9 Sk tsel reparation och underh ll 10 Livsl ng...

Page 115: ...F rvaring Max lastkapacitet Stegens vikt Antal stegpinnar Referensperson f r kroppsl ngd och vertikal r ckvidd A max vertikal r ckvidd B max st h jd Enkel stege 3 delad Skjutbar del och skjutstege ma...

Page 116: ...r utrustade med 3 stegpinnar steg rotationsmoduler H P grund av denna kombination av stegpin nar steg kan stegen ven anv ndas som arbetsplats Relevant teknisk information och produktspe cifikationer f...

Page 117: ...ifunktionsstegen och den 2 delade multifunktionsstegen r l mpliga f r anv ndning i professionell anv ndning och i icke professionell anv ndning Stegens max lastkapacitet r 150 kg Modifieringar av steg...

Page 118: ...en finns i princip fara f r att falla Alla arbeten med och p stegen ska d rf r genomf ras s att risken f r att falla r s l g som m jligt Vid anv ndning av stegen finns i princip ocks fara f r att steg...

Page 119: ...s vid upp kl ttringen p en stege skall vara l tta och l tthanterliga Vid uppkl ttring p stegen anv nd ndam lsenliga skodon r du i ett h lsotillst nd som passar f r att anv nda stegen Best mda h lsokra...

Page 120: ...inte konsekvent t stegens ena sida Se till att du ppnar b da delarna p stegen helt s kert innan du anv nder den Befintliga spridnings l sanordning ar m ste befinna sig i l st l ge Anv ndning som frist...

Page 121: ...ring och l sning med l shakar 2 Skruva nu av ett glidskydd C 1 och en stopp skruv C 2 p stegfoten C Stj rnskruvmejsel kr vs 3 ppna fotpedalen A 1 och f r in stegfoten C som p bilden 4 Skruva tillbaka...

Page 122: ...rt s tt f re anv ndning 7 3 Justering och l sning med l shakar Med de b da l shakarna E l ses stegen resp ett stegelement vid en stegpinne Lyfts kringen E 1 p l shakarna s krar stegen mot att f rflytt...

Page 123: ...eg rotationsmo dulen till sitt ursprungliga l ge forts tt p samma s tt A 7 5 Konstruktion och anv ndning som trappstege 1 Placera stegen p marken och st ll den i verti kalt l ge L s upp skjutstegen J...

Page 124: ...d behov med 2 personer 2 Lossa stegelementets sp rr p l shakarna E och skjut den i nskad h jdposition l ngs styrbygeln A 2 B 1 3 L s d refter stegelementet s kert vid stegpin narna med hj lp av l shak...

Page 125: ...rna i en st llning som bidrar till att de f rblir raka t ex upph ngda p stegpinnarna i en stegh llare eller liggande p ett plant rent underlag F rvaringen av stegen b r ske under torra f rh l landen s...

Page 126: ...ett skolnings tillf lle som anordnats av tillverkaren har erh llit de kunskaper som kr vs f r att genomf ra repara tions eller underh llsarbeten Vid reparation eller byte av delar s som exem pelvis f...

Page 127: ...alkarna f tterna och ndpropparna sitter fast ordentligt och inte r skadade eller korroderade Alla stegf tter ndproppar m ste finnas p plats r stegf tterna l sa slitna eller korroderade 6 Spridningsl s...

Page 128: ...rzegl d produkt w 3 Zakres dostawy 4 Zastosowanie zgodne z przeznaczeniem 5 Wskaz wki dotycz ce bezpiecze stwa 6 Instrukcja sk adania 7 Monta i obs uga 8 Transport i przechowywanie 9 Piel gnacja napra...

Page 129: ...e obci enie u ytkowe Waga drabiny Liczba szczebli drabiny Wzrostu cia a i zasi g ramion osoby referencyjnej A najwy szy mo liwy zasi g ramion B najwy sza mo liwa wysoko stania Drabinaprzystawna 3 cz c...

Page 130: ...jako stanowi sko robocze Istotne informacje techniczne i dane konkretnego produktu znajduj si na oznakowaniu drabiny G bezpo rednio na drabinie A Drabina sk adana B Cz wysuwna wprzypadkuu yciajakodra...

Page 131: ...owi zuj cych w kraju u ytkowania Drabina wielofunkcyjna 3 cz ciowa i drabina wielofunkcyjna 2 cz ciowa nadaj si do zastosowa profesjonalnych i nieprofesjonalnych Maksymalneobci enieu ytkowedrabiny wyn...

Page 132: ...a ania lub rodki s oznaczone znakiem a niedozwolone krzy ykiem Niebezpiecze stwo powa nych obra e cia a Niew a ciwe u ytkowanie lub obchodzenie si z drabin stwarza ryzyko kt re mo e prowadzi do powa n...

Page 133: ...fesjonalnych nale yprzeprowadzi ocen ryzykazuwzgl dnieniem przepis wprawnych obowi zuj cychwkrajuu ytkowania Podczasustawianiadrabinynale yzwr ci uwag nary zykokolizji np zprzechodniami pojazdamilubdr...

Page 134: ...opnie szczeble drabiny przystawnej nie s przeznaczone do stawania Schodzenie w bok z drabiny sk adanej na inn powierzchni jest niedozwolone Przed u yciem drabin ca kowicie rozewrze Drabin rozwiera tyl...

Page 135: ...i zatrzaskowymi 2 Najpierw odkr ci jedn stopk C 1 i jedn rub oporow C 2 na belce suportowej C potrzebny jest rubokr t krzy akowy 3 Otworzy peda no ny A 1 i wprowadzi belk suportow C w spos b przedstaw...

Page 136: ...ak w zatrzaskowych Para hak w zatrzaskowych E s u y do blokowania dra biny lub elementu drabiny na szczeblu Zabezpieczenie przed zdj ciem E 1 na haku zatrzaskowym zabezpie cza drabin przed przypadkowy...

Page 137: ...otem do pierwotnej pozycji A 7 5 Monta i u ycie jako drabiny sk adanej 1 Postawi drabin na ziemi i ustawi j w pozycji pio nowej Odblokowa drabin wysuwan J ustawi jeden lub dwa szczeble wy ej i ponowni...

Page 138: ...lementy drabiny na haku zatrzasko wym E i przesun wzd u uchwytu prowadz cego A 2 B 1 na dan wysoko 3 Nast pnie ponownie bezpiecznie zablokowa elementy drabiny na szczeblach za pomoc hak w zatrzaskowyc...

Page 139: ...ycznych Drabin nale y przechowywa w pozycji kt ra po maga utrzyma j prosto np zawieszona za belk na uchwycie drabiny lub umieszczona na p askiej czystej powierzchni Drabin nale y przechowywa w stanie...

Page 140: ...towa si z producentem lub sprzedawc 12 Serwis i cz ci zamienne 9 Piel gnacja naprawa i konserwacja 11 Opakowanie i utylizacja Je li drabina zostanie wycofana z u ycia nale y j zutylizowa zgodnie z akt...

Page 141: ...drabina jest zanie czyszczona np brudem szlamem lakierem olejem lub smarem Wszystkie mocowania nity ruby sworznie itd musz by kompletne Czy mocowania s poluzowane lub skorodowane 2 Pod u nica szczebel...

Page 142: ...to n vod k pou it popisuje bezpe n pou v n t d ln ho a dvoud ln ho v ce elov ho eb ku v dal m textu jsou oba modely ozna ov ny tak jako eb k Pros m p ed pou it m eb ku si z d vod bezpe nosti pe liv pr...

Page 143: ...l Skladov n Nejvy u ite n zat en Hmotnost eb ku Po et p ek Referen n osoba pro porovn n v ky t la a dosahu A maxim ln dosah B maxim ln v ka st n Op rn eb k t d ln v suvn st a v suvn eb k maxim ln vysu...

Page 144: ...upnice umo uje pou vat eb k tak jako m sto k pr ci P slu n technick informace a informace o v robku naleznete na ozna en eb ku G p mo na eb ku A Sch dky B V suvn st p i pou it jako op rn eb k C P n k...

Page 145: ...n dodr ovat pr vn p edpisy p slu n zem T d ln v ce elov eb k a dvoud ln v ce elov eb k jsou vhodn pro profesio n ln pou it i pro neprofesion ln pou it Maxim ln u ite n zat en eb ku in 150 kg Zm ny eb...

Page 146: ...laha mus b t bez ne istot P i pou it eb ku hroz v z sad nebezpe p du V echny pr ce se eb kem nebo na eb ku mus b t proto prov d ny tak aby bylo nebezpe p du co mo n nejmen P i pou it eb ku hroz rovn n...

Page 147: ...zen k BOZP P i stav n eb ku d vejte pozor na kolize nap s chodci vozidly nebo dve mi Pokud je to mo n uzamkn te nebo zablokujte dve e nikoliv v ak nouzov v chody a okna v pracovn m prostoru eb ku P i...

Page 148: ...k postavte na rovn podklad P ehled p ek na n je zak z no stoupat P ed pou it m dbejte na pln zaji t n otev en obou st eb ku Existuj c rozp rn pojistky zar ky mus zapadnout Nikdy nestoupejte na nejvy d...

Page 149: ...ce pomoc areta n ho h ku 2 Nejprve od roubujte jednu patku C 1 a dorazov roub C 2 na p n ku C za pomoci k ov ho roubov ku 3 Otev ete no n ped l A 1 a zasu te p n k C dle obr zku 4 Patku C 1 a dorazov...

Page 150: ...olujte stabilitu eb ku 7 3 P enastaven a aretace pomoc areta n ho h ku P rem areta n ch h k E se prov d aretace eb ku resp sti eb ku na p ce Pojistka proti nadzvednut E 1 na areta n m h ku zaji uje eb...

Page 151: ...polohy postupujte stejn m zp sobem A 7 5 Sestaven a pou it jako sch dky 1 Um st te eb k na zem a postavte jej do svisl polohy Odjist te v suvn eb k J um st te jej o jednu nebo dv p le v e a op t jej...

Page 152: ...jej postavte ve dvou osob ch 2 Uvoln te sti eb ku na areta n m h ku E a posouvejte je po vodic m t menu A 2 B 1 do po adovan v ky 3 sti eb ku potom zase na p k ch bezpe n zablokujte s pomoc areta n ch...

Page 153: ...ou it m a po pou it a p i skladov n a p eprav Oto te oto n moduly H zp t do polohy p le Zajist te prvky eb ku pomoc areta n ch h k E na nejni p li eb ku Aby se zabr nilo jak mukoliv po kozen mus se eb...

Page 154: ...ech pohybliv ch st by m lo prob hat p i viditeln m zne i t n okam it po pou it Pou vejte pouze b n ve vod rozpustn istic prost edky Nepou vejte agresivn prost edky zp sobuj c od r n Opravy a dr bu eb...

Page 155: ...moduly p le a stupnice Zkontrolujte funk nost zaji t n a odji t n poloha p le a poloha stupnice Oto n moduly se mus spr vn zaaretovat v obou poloh ch Je viditeln indikace zaji t n a odji t n 5 Stabili...

Page 156: ...m 9002 007 2 x 12 A 1 49 m B 1 51 m A 1 49 m B 2 19 m A 4 65 m B 2 65 m A 6 61 m B 4 61 m 9001 007 3 x 12 A 4 89 ft B 6 73 ft A 4 89 ft B 7 12 ft A 20 57 ft B 14 01 ft A 28 81 ft B 22 24 ft 9002 007...

Page 157: ...81 m B 5 63 m A 3 57 m B 1 49 m C 0 16 m A 3 35 m B 0 42 m C 0 16 m max 150 kg 24 kg A 18 34 ft A 26 54 ft B 25 75 ft A 11 84 ft B 4 89 ft C 0 75 ft A 11 81 ft B 1 61 ft C 0 75 ft max 330 lbs 75 lbs...

Page 158: ...158...

Page 159: ...159...

Page 160: ...160 1224129 2022 09 NU Hailo Werk Rudolf Loh GmbH Co KG Daimlerstra e 8 35708 Haiger Germany Telefon 49 0 2773 82 0 Telefax 49 0 2773 82 1239 E Mail info hailo de www hailo de...

Reviews: