background image

Page  5 

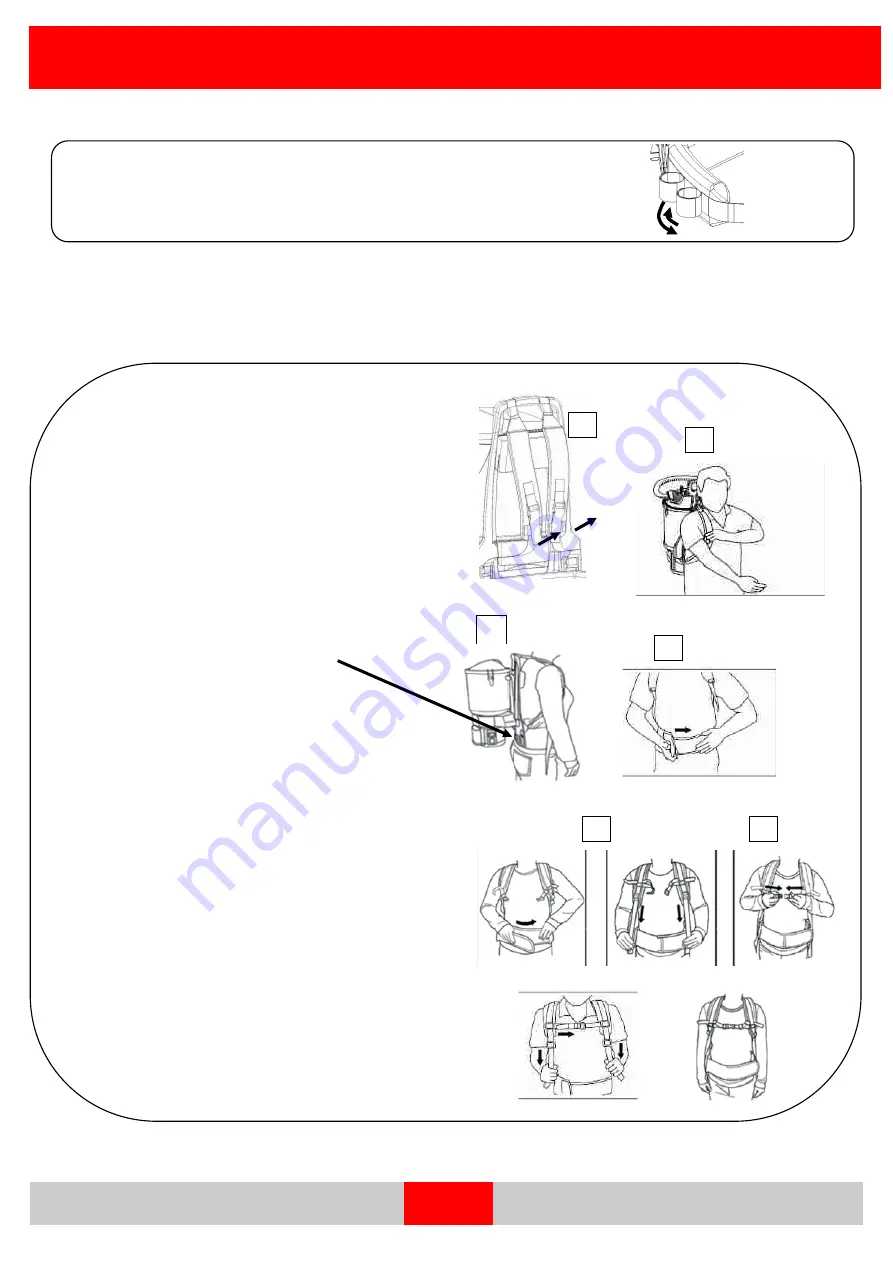
Machine Assembly 

Tool Holder –


To Adjust 

Size the adjustment loop before wearing to suit the tool to be 

inserted. 

Wearing the Back Pack Correctly for best COMFORT 

  STEP 1. 


To loosen the shoulder pad: 

1.

Pull the adjustment strap away from the Shoulder Pad,

this releases the Strap from the Buckle.

2

. Lift machine onto one shoulder by the shoulder strap.

Insert opposite arm through the shoulder strap by which

the machine is lifted. Slide other arm through the remain-

ing strap.

STEP2 

Waist Pad - Preliminary Adjustment 

3

. Position the waist-band into the 'small' of your

back just above your backside.  This will lower the

centre of gravity of the unit, and positions the weight

closer to the body onto the stronger pelvic area.   It

provides freedom of movement for the arms, and

prevents the unit from riding up the

4

. Tighten the elasticised waist belt by overlapping

the hook and loop flaps until secure and comforta-

ble.

STERP 3 

Shoulder pad and Sternum Strap Adjustment 
5.

After waist belt adjustment, pull down on shoulder

straps to just support the back pack.  DO NOT pull

down too tightly. The top back pad should just be

touching your shoulder blades.

6.

Clip sternum strap and adjust for comfort.

Rocket Vac XP +PLUS   -   Rocket Vac XP HEPA +PLUS  -   Rocket Vac XP   -   Rocket Vac XP HEPA


1

5

4

3

2

Note: For maximum comfort do not adjust shoulder straps completely until waist belt has been adjusted 

and fastened 

6

Summary of Contents for Rocket Vac XP

Page 1: ... GUIDE Rocket Vac XP PLUS Rocket Vac XP HEPA PLUS Rocket Vac XP Rocket Vac XP HEPA CAUTION Read the instruction manual before using the machine Back Pack Vacuum Cleaner with H 10 HEPA or H 14 HEPA Filter H 10 Model No 12770000 H 14 Model No 12780000 ...

Page 2: ...acuum Hose 1 x EZ2GO Floor tool 1 x Crevice Tool 1 x Pack of 5 paper bags 1 x Parts Manual and Owners Guide This manual provides the necessary operating and preventative maintenance instructions Operators must read and understand this manual before operating or servicing this machine This machine was designed to give you excellent performance and efficiency For best results and minimal cost please...

Page 3: ...entre Do not pull or carry by cord use cord as a handle close a door on cord or pull cord around sharp edg es or corners Do not run appliance over cord Keep cord away from heated surfaces If the supply cord is damaged it must be replaced by the manufacturer or its service agent or a similarly qualified person in order to avoid a hazard Do not unplug by pulling on cord To unplug grasp the plug not ...

Page 4: ...Press Hose Release Button and gently pull Inlet Elbow from Lid Hose To Fit Insert Inlet Elbow into lid opening Paper Bag Filter Removal Disposal Ease cardboard retainer off the groove on the Inlet Spout Fold card board tab over bag inlet hole to prevent spillage Dispose into garbage bin NOTE The paper bag is manufactured using bio degradable material Paper Bag To Fit Align paper bag cardboard enga...

Page 5: ...ty in reducing tripping hazards and for unplugging Fit the cord onto extension cord restraints on both sides of machine as shown Air Regulator To Adjust Slide forward to close this provides more air at the nozzle Slide back for less air this is to be used when vacuuming loose materials eg curtains Attachments To Fit or Remove Twist and pull to disassemble Attach at any point from Bent End Piece to...

Page 6: ... This will lower the centre of gravity of the unit and positions the weight closer to the body onto the stronger pelvic area It provides freedom of movement for the arms and prevents the unit from riding up the 4 Tighten the elasticised waist belt by overlapping the hook and loop flaps until secure and comforta ble STERP 3 Shoulder pad and Sternum Strap Adjustment 5 After waist belt adjustment pul...

Page 7: ...k after every use Remove HEPA filter if necessary and tap out dust Occasionally Wash in neutral cleaner solution using swirling action only then rinse in clean water Note The filter material has been treated with a soft polymer moisture repelling agent do not touch media surface by hand or any other mechanical device as this can damage the media and impair the filtration quality Ensure filter is c...

Page 8: ... off the floor bend the knees and maintain a straight back When turning do not twist at the waist Turn using your feet Page 7 Operation Working Plan the work path based on location of the power point room furniture layout and entrance and exit points Commence vacuuming using a systematic approach working one half of the area first away from the power point and then the other half of the area retur...

Page 9: ...r Class H 14 HEPA Power Supply 220 240V a c 50 Hz Power Outlet 2 Pin IEC Total Power 1500W Electrical Cord 18 m 10 A 3 core ordinary duty Thermal Protection 110 C auto reset thermostat Vacuum Motor Type Rated 1300w Eco Single Turbine Flow Through Output Performance Air flow 42 0 l s Suction 27 2kPa Air Watts 450 Carbon Brush Life 700h Warranty 2 year Body 2 year Motor Sound level 72 dB A Noise lev...

Page 10: ...ousing 1 11 13727002 Motor Vacuum Harbin 240V 1 12 13620005 Clamp Motor 1 13 13827001 Wire Thermostat Assy 4L 5L BVC 1 14 13780014 Switch Rocker 2HP 1 15 13820002 Wire N 240V Inlet Switch 4L 5L BVC 1 16 13820003 Wire N 240V Switch PO 4L 5L BVC 1 17 13657011 Fuse Link 4L 5L BVC 1 18 13780005 Foam Seal Upper Baffle 1 19 13670004 Housing Canister Lower In Out and Sw 1 20 13780003 Screw WN1412 KB50 x ...

Page 11: ...otor Housing 1 11 13727002 Motor Vacuum Harbin 240V 1 12 13620005 Clamp Motor 1 13 13827001 Wire Thermostat Assy 4L 5L BVC 1 14 13780014 Switch Rocker 2HP 1 15 13820002 Wire N 240V Inlet Switch 4L 5L BVC 1 16 13820003 Wire N 240V Switch PO 4L 5L BVC 1 17 13657011 Fuse Link 4L 5L BVC 1 18 13780005 Foam Seal Upper Baffle 1 19 13670004 Housing Canister Lower In Out and Sw 1 20 13780003 Screw WN1412 K...

Page 12: ...R DESCRIPTION QTY 1 16019005 Tool Turbo Brush 32mm 1 2 16019006 Tool Combination 32mm x 300mm Wide 1 3 16019014 Tool Mega Gulper Pro 32mm x 385mm Wide 1 4 16019007 Tool Upholstery 32mm 1 5 16019017 Tool Electric Brush 32mm x 355mm Wide 1 6 16019016 Tool Hard Floor 32mm x 360mm Wide 1 ...

Page 13: ...tes and switch ma chine back on If machine does not start up contact service agent Problem Poor or No Suction Cause Blockage Solution Turn off machine and unplug Check wand suction hose floor tool elbow inlets for ob structions and remove Cause Paper or Cloth Filter Bags are full Solution Check paper bag and if full remove and replace Check Cloth Filter Bag turn inside out and brush with a soft ba...

Page 14: ...o property or loss of income due to malfunction of the Equipment If a difficulty develops with this Equipment you should contact the dealer from whom it was originally pur chased The warranty coverage period on Equipment will commence 1 year after the date of shipment from Hako to its dealer or authorised agent unless the Equipment is sold before this time This sale date would then be the beginnin...

Page 15: ...ustralia Pty Ltd ABN 43 002 858 059 90 Wetherill St North Silverwater NSW 2128 T 61 2 8756 4700 F 61 2 8756 4799 Landline Toll Free 1800 257 221 E hksales hakoaustralia com au Website www hakoaustralia com au ...

Reviews: