CAUTION
HOT
PREPARATION: ASSEMBLY AND ELECTRICAL CONNECTION
Preparation: Assembly and Electrical Connection
A. Station Assembly
●
●
●
●
●
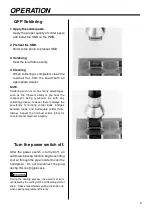
Attach the handpiece holder.
Remove the handpiece holder mounting
screw from the side of the station. Attach the
handpiece holder to the station. (Figure 1)
(The handpiece holder can be installed on
either the left or right side.)
B. Handpiece Assembly
●
●
●
●
●
Attach the nozzle.
Loosen the nozzle mounting screw. Attach
the nozzle as shown in the drawing.
(Figure 2)
C. Electrical Connection and
Power ON
1. Connect the power cord to the power
receptacle on the back panel of the
station. (Figure 4)
2. Place the handpiece on the holder.
(Figure 5)
3. Plug the power cord into a grounded wall
socket. After connection, the automatic
blowing function will start sending air
through the pipe, but the heating element
remains cool.
4. Turn the power switch ON.
NOTE:
The power switch may be turned on at
any time while the automatic blowing
function is operating. Once the power
switch is turned on, the heating element
will begin to warm up.
Tighten the nozzle
mounting screw.
(Figure 1)
(Figure 2)
(Figure 3)
Inside screw
(Figure 4)
When installing an optional
nozzle to the Hakko 850B, do
not remove this inside screw.
CAUTION
This product is ESD-protected. Be sure to use a grounded wall
socket.
Top View
(Figure 5)
CAUTION
When not in use, place the handpiece
on the holder.
4
Summary of Contents for 850B
Page 15: ......


