
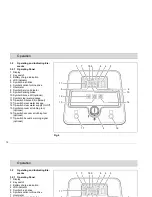
7
Safety information
the squeegee and the brush head.
Adapt driving habits to local conditi-
ons.
• The machine may be used only for
operation on plane areas with a ma-
ximum inclination of up to 10 %.
1.4
Maintenance instructions
• The daily and weekly maintenance
and repair task must be performed
by a qualified operator. For any fur-
ther maintenance and repair work
beyond please contact your local
Hako service center.
• Observe the maintenance activities
and intervals set out in the instruc-
tion manual.
• Maintenance and repair work may
be carried out only by means of ap-
propriate tools.
• Have the machine checked for safe
condition in the sense of the Acci-
dent Prevention Regulation by an
expert at regular intervals (recom-
mendation: at least once yearly) as
well as after modifications or repair.
• Spare parts have to equal the techni-
cal requirements as specified by the
manufacturer! Genuine spare parts
guarantee compliance with these re-
quirements.
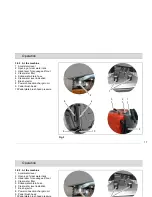
• Switch off the engine and remove the
key before inspecting the machine or
performing any maintenance work.
• To prevent the machine from being
used by unauthorized persons, the
control key must be removed.
• When performing work at the electri-
cal system, be sure to disconnect the
battery plug.
• Make sure to protect the soiled water
tank against accidental closing or til-
ting down before working in the area
of a lifted tank lid.
• Do not clean the electrical parts by
means of high-pressure cleaning
equipment.
• The use of aggressive detergents is
not admitted.
• Let the machine dry after cleaning
e.g. for weekend.
• The machine may be taken into ope-
ration after all protective devices
have been fitted and positioned.
1.5
Specific Hazards
Electric system
• Only use genuine fuses with the
specified ratings.
• In case of malfunction of the electric
system, shut the machine down im-
mediately and have it serviced.
• Only qualified personnel are authori-
zed to work on the electrical installa-
tions and only according to electro-
technical rules.
• Inspect/check the electrical equip-
ment of the machine at regular inter-
valls. Clear up any defects
immediately, such as loose connec-
tions or damaged cables.
Battery
• Respect the operating instructions of
the battery manufacturer.
• Never place metal objects or tools on
batteries - short-circuit hazard!
• Due to alteration of the centre of gra-
vity, only use batteries as released
and at the prescribed position only.
• Only charge batteries in areas with
sufficient ventilation. – Explosion ha-
zard!
• Refer to safety provisions in supple-
ment 88-60-255
- Information on
drive batteries.
7
Safety information
the squeegee and the brush head.
Adapt driving habits to local conditi-
ons.
• The machine may be used only for
operation on plane areas with a ma-
ximum inclination of up to 10 %.
1.4
Maintenance instructions
• The daily and weekly maintenance
and repair task must be performed
by a qualified operator. For any fur-
ther maintenance and repair work
beyond please contact your local
Hako service center.
• Observe the maintenance activities
and intervals set out in the instruc-
tion manual.
• Maintenance and repair work may
be carried out only by means of ap-
propriate tools.
• Have the machine checked for safe
condition in the sense of the Acci-
dent Prevention Regulation by an
expert at regular intervals (recom-
mendation: at least once yearly) as
well as after modifications or repair.
• Spare parts have to equal the techni-
cal requirements as specified by the
manufacturer! Genuine spare parts
guarantee compliance with these re-
quirements.
• Switch off the engine and remove the
key before inspecting the machine or
performing any maintenance work.
• To prevent the machine from being
used by unauthorized persons, the
control key must be removed.
• When performing work at the electri-
cal system, be sure to disconnect the
battery plug.
• Make sure to protect the soiled water
tank against accidental closing or til-
ting down before working in the area
of a lifted tank lid.
• Do not clean the electrical parts by
means of high-pressure cleaning
equipment.
• The use of aggressive detergents is
not admitted.
• Let the machine dry after cleaning
e.g. for weekend.
• The machine may be taken into ope-
ration after all protective devices
have been fitted and positioned.
1.5
Specific Hazards
Electric system
• Only use genuine fuses with the
specified ratings.
• In case of malfunction of the electric
system, shut the machine down im-
mediately and have it serviced.
• Only qualified personnel are authori-
zed to work on the electrical installa-
tions and only according to electro-
technical rules.
• Inspect/check the electrical equip-
ment of the machine at regular inter-
valls. Clear up any defects
immediately, such as loose connec-
tions or damaged cables.
Battery
• Respect the operating instructions of
the battery manufacturer.
• Never place metal objects or tools on
batteries - short-circuit hazard!
• Due to alteration of the centre of gra-
vity, only use batteries as released
and at the prescribed position only.
• Only charge batteries in areas with
sufficient ventilation. – Explosion ha-
zard!
• Refer to safety provisions in supple-
ment 88-60-255
- Information on
drive batteries.


