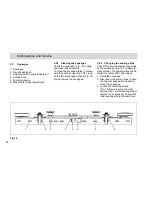
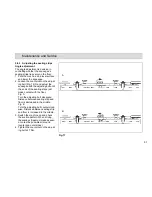
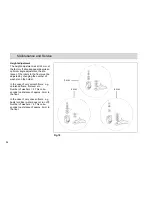
background image

46

Maintenance and Service

5.6

Soiled Water tank

1 Soiled Water Tank
2 Drain hose
3 Suction filter
4 Tank lid
5 Drain valve sealing
6 Tank lid sealing

Fig.14

Scrubmaster B30

1

1

4

3

5

2

6

Summary of Contents for Scrubmaster B30

Page 1: ...Instruction Manual Scrubmaster B30 B30 CL 7715...

Page 2: ...as to be performed make sure that only genuine spare parts are used only genuine spare parts may guarantee a dependable machine We reserve the right for technical im provement Valid as of April 2014 H...

Page 3: ...Upon arrival check machine for possi ble damages in transit Follow unpack ing instructions on shipping pallet Each unit has been tested and throughly in spected before shipment Any damage is the resp...

Page 4: ...ating and indicator ele ments 23 3 2 1 Operating panel 23 3 2 2 Operating elements on the machine 31 4 Technical Data 33 5 Maintenance and Service 35 5 1 Hako system maintenance 35 5 2 Maintenance Doc...

Page 5: ...ing warning symbols Symbol Hazardous for Description Safety Provisions persons and goods Safety Provisions in dangerous situation caused by misuse inaccurate adherence of instructions or pre scribed...

Page 6: ...children with limited physical or mental capa bilities or persons without sufficient experience and ability You are advised to thoroughly study the safety instructions since precise knowledge only hel...

Page 7: ...may only be driven on and the equipment used on those surfaces which have been approved by the contractor or person appoint ed by him When using the machine it is essen tial to pay attention to third...

Page 8: ...ts stipulated by the manufacturer This is ensured by the use of original spare parts Before cleaning and servicing the machine or replacing parts switch off the motors and main switch Scrubmaster B30...

Page 9: ...by Hako may be installed at the intend ed position Never lay any metallic objects or tools on batteries risk of short cir cuit Ensure sufficient ventilation in the charging area when charging the bat...

Page 10: ...danger to health and environment specific knowledge is required Observe the legal directives and lo cal regulations for disposal of deter gents Used batteries labelled as recyclable contain reusable e...

Page 11: ...ng safety and warning labels are attached to the machine where eas ily legible Missing or illegible labels must be replaced immediately Company logo Fig 1 1 Rating plate Fig 1 2a Explosive gases Fig 1...

Page 12: ...ater draining hose Fig 2 3 A Read and observe the operating manual Fig 2 4 B Maximum permissible gradient 2 Fig 2 4 C Do not clean the machine with a pressure washer Fig 2 4 Only maintenance free batt...

Page 13: ...harge 2 3 Before Putting into Operation Complete the following inspections be fore taking the machine into operation 1 Check the area around the machine for signs of leakage Hoses lines and tanks must...

Page 14: ...ary work so that the machine is ready to operate If necessary disconnect the power plug of the charging device from the socket and place it in the holder If the power plug is not inserted prop erly in...

Page 15: ...riving over thresholds Scrubmaster B30 CL 1 Switch the machine on using the key switch All the units are in Standby 2 Lower the squeegee using the squeegee lever The suction turbine is switched on 3 L...

Page 16: ...he floor again and after that treat it with the squeegee lowered Important information pay attention to the correct dosage of the cleaning agent The correct dosage helps to re duce costs and protect t...

Page 17: ...ako dealer Error Cause Remedy 1 2 5 2 Brush motor overload Let the brush motor cool down 1 2 6 1 Brush is blocked Remove foreign bodies 1 2 6 5 Brush semiconductor Allow the machine to cool down or in...

Page 18: ...ne with the key switch 5 The machine must be protected and secured against being started up ac cidentally and uncontrolled move ments 2 7 After completing work 1 Drive to an appropriate maintenance ar...

Page 19: ...the squeegee and brush head must be raised When the machine is to be transported on another vehicle or trailer it must be secured against rolling away Lash the machine down securely To do this it must...

Page 20: ...owered by means of the brush pedal The floor is cleaned by the rotary brush and cleaning agent The brush can be removed for maintenance pur poses by pressing a button 3 1 2 Solution tank The solution...

Page 21: ...the squeegee to the recov ery tank Fig 7 2 via a suction hose A hand held suction hose is available as an option to clean and vacuum up solu tion from inaccessible areas 3 1 5 Power flow traction driv...

Page 22: ...on driving batteries refer to supplementary sheet 88 60 2556 3 1 7 Options Hand suction tool incl cleaning tools 7036 40 Dosing system 7056 02 Floating unit 7743 Scrubmaster B30 only Onboard dosing s...

Page 23: ...e ments 3 2 1 Operating panel Scrubmaster B30 1 Indicator field for operating hour counter service indicator and charge status indicator 2 Charge mode indicator 3 Main switch 4 Bail system switch 5 Br...

Page 24: ...ing or driving process is inter rupted In addition to the service indica tor wrench a four digit service code appears in the indicator field The dots in the service code flash Clear the fault or note...

Page 25: ...are designed to work continuously i e at the end of the charge cycle the charger automatically enables charge retention to ensure that the battery is always perfectly charged To get the most from you...

Page 26: ...tor 3 Main switch 4 Bail system switch 5 Direction switch 6 Driving speed control 7 Symbol for silence kit 8 Symbol for tool connection option 9 Silence kit on off button 10 Tool connection on off but...

Page 27: ...rocess is inter rupted In addition to the service indica tor wrench a four digit service code appears in the indicator field The dots of the service code flash and an acous tic beep is issued Clear th...

Page 28: ...charger manual Hako chargers are designed to work continuously i e at the end of the charge cycle the charger automatically enables charge retention to ensure that the battery is always perfectly char...

Page 29: ...ly adjustable knob to set the ma chine speed Symbol for silence kit Fig 10 7 The LED lights up when the silence kit function is switched on Symbol for tool connection option Fig 10 8 The LED lights up...

Page 30: ...setting can be altered however with the solution dosage button Brush ejection button Fig 10 13 The brush can be removed for mainte nance purposes by pressing a button Eject brush Raise the brush head...

Page 31: ...n tank filling neck 2 Squeegee lift lever 3 Solution filter 4 Solution draining hose 5 Power supply line to charger 6 Brush head lift foot pedal 7 Waste water draining hose 8 Hand valve for water dosa...

Page 32: ...Fig 11 4 The solution tank draining hose is used to drain the solution Power supply line Fig 11 5 The power supply line feeds power to the charger Following completion of the charging process insert t...

Page 33: ...cal 17 20 m h 1720 Nominal voltage V 24 Power consumption traction drive Scrubmaster B30 CL CLH only W 180 Power consumption aspirating engine W 410 Power consumption brush motor W 720 No of brushes P...

Page 34: ...64 61 Measurement inaccuracy KpA dB A 2 2 Vibration The weighted effective value of acceleration measured in accordance with DIN EN ISO 5349 1 to which the upper parts of the body hand arm are expose...

Page 35: ...r vice life Hako system maintenance provides in dividual modules explaining the special technical work to be carried out and prescribes the intervals at which the work should be performed Parts to be...

Page 36: ...operating hours Hako System Maintenance I 625 operating hours Workshop stamp carried out on at _________________ operating hours Hako System Maintenance II 750 operating hours Workshop stamp carried...

Page 37: ...d clean if required o Empty soiled water tank clean soiled water tank and suction filter o Clean tank lid sealing of the soiled water tank o Check brush head sealing strips and replace if required o C...

Page 38: ...battery charger o Check tank lid sealing of the soiled water tank and replace if required o Check function of bailsystem and operating panel o Check drain hose of the soiled water tank and replace if...

Page 39: ...ce I o Inspect steering rollers for tread damages and bearing slackness and replace if required o Check function of water pump and replace if required o Check drain hose of the soiled water tank and r...

Page 40: ...function of suction turbine and replace if required replace at the latest after 1000 operating hours o Check brake of the travel drive motor Scrubmaster B30 CL only o Clean travel drive motor Scrubma...

Page 41: ...ield w charge status indi cator 2 Charge mode indicator 3 On board charger 4 Charger power plug 5 Power plug receptacle and vehicle immobilizer 6 Battery terminals 7 Batteries 8 Waste water tank 9 Cir...

Page 42: ...cally The charge mode indicator Fig 12 2 shows the progress Pay attention to the information in the operating manu als supplied with the charger and the battery You cannot turn on the ma chine while c...

Page 43: ...Servicing the driving batteries Never keep discharged batteries but re charge them immediately For information on servicing driving bat teries refer to operating manual 88 60 2556 5 4 5 Replacing the...

Page 44: ...44 Maintenance and Service 5 5 Solution tank 1 Solution tank 2 Marking 3 Fill level hose 4 Solution filter 5 Tank cap Fig 13 Scrubmaster B30 5 3 1 2 4...

Page 45: ...he fill level hose Fig 13 3 is above a drain in the floor Remove the fill level hose from the holder and remove the cover 5 5 3 Cleaning the fresh water filter Check the solution filter Fig 13 4 weekl...

Page 46: ...46 Maintenance and Service 5 6 Soiled Water tank 1 Soiled Water Tank 2 Drain hose 3 Suction filter 4 Tank lid 5 Drain valve sealing 6 Tank lid sealing Fig 14 Scrubmaster B30 1 1 4 3 5 2 6...

Page 47: ...en tank lid Fig 14 4 of the soiled water tank 3 Take drain hose Fig 14 2 from holder and empty soiled water tank completely 4 Remove remaining dirt by rinsing with clear water 5 Rinse drain hose as we...

Page 48: ...48 Maintenance and Service 5 7 Brush head 1 Brush 2 Brush head 3 Brush head lift lever 4 Brush ejection button 5 Deflector roller 6 Sealing strip Fig 15 Scrubmaster B30 3 2 5 6 1 4...

Page 49: ...ash alternately The machine is not ready to operate Switch the machine off using the main switch Attach brush Switch the machine on again using the main switch Position the brush cen tered under the r...

Page 50: ...en the two star shaped knobs Fig 16 2 and remove the squeegee 5 8 2 Changing the sealing strips Check the inner and outer sealing strips on the squeegee Fig 16 1 weekly for signs of wear The sealing...

Page 51: ...e adjusting bolt until the ends of the sealing strips just make contact with the floor Fig A Turn the adjusting bolt clockwise Distance between sealing strip and floor is decreased in the middle Fig B...

Page 52: ...must be adjusted by changing the number of washers on the holder In the case of very smooth floors e g varnished floors linoleum etc Number of washers 2 This corre sponds to a distance of approx 2 mm...

Page 53: ...uirements of the other relevant Directives 2004 108 EC For the relevant implementation of the safety and health requirements men tioned in the Directives the following standard s and or technical spec...

Page 54: ...Advanced Technology for a Cleaner Better Environment Hako GmbH Hamburger Str 209 239 D 23843 Bad Oldesloe 49 4531 806 0 Fax 49 4531 806 338 88 10 2996 3100 05...

Reviews: