Scrubmaster B400 R (7190)
119
Maintenance and servicing
Modifying the clamp
When changing the trough battery, the clamp may also have to be modified.
1. Remove the two screws
Fig. 37-3
to remove the battery socket on the
clamp.
2. Undo both clamp bolts
Fig. 37-5
and remove the clamp
Fig. 37-4
.
3. The clamp is installed on the battery trough to be changed as described in
steps 4 to 7 in section
Installing the clamp (initial start-up
).
5.2.5
Battery plug coding
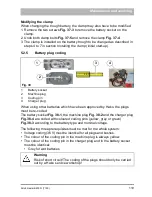
When using other batteries which have been approved by Hako, the plugs
must be re-coded.
The battery socket
Fig. 38-1
, the machine plug
Fig. 38-2
and the charger plug
Fig. 38-4
are coded with coloured coding pins (yellow, grey or green)
Fig. 38-3
according to the battery type and nominal voltage.
The following three prerequisites must be met for the whole system:
Voltage coding (36 V) must be identical for all plugs and bushes.
The colour of the coding pin in the machine plug is always yellow.
The colour of the coding pin in the charger plug and in the battery socket
must be identical:
Grey for wet batteries
1
Battery socket
2
Machine plug
3
Coding pin
4
Charger plug
Warning
Risk of short circuit! The coding of the plugs should only be carried
out by a Hako service workshop!
Fig. 38
36 V
2
3
1
4
Summary of Contents for Scrubmaster B400 R
Page 1: ...Scrubmaster B400 R RM RH 7190 Operating manual Part number 88 10 3255 Valid as from 03 2021...
Page 9: ...Scrubmaster B400 R 7190 9...
Page 26: ...26 Scrubmaster B400 R 7190 Safety instructions K J Fig 2 L J M A O N Q M K N P O 1 2 3 P Q L C...
Page 158: ...158 Scrubmaster B400 R 7190 Attachments options Fig 67 5 6 3 2 4 1 3 12 9 10 11 1 4 7 8...


