Scrubmaster B400 R (7190)
159
Attachments/options
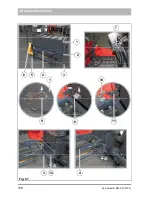
Removing the discharged battery
1. Park the vehicle on a level surface, turn it off and remove the key.
2. Unlock and open the right side door.
3. Fold up the seat console to the front.
4. Pull the machine plug out of the battery socket and hook it into the seat
console
Fig. 67-7
.
5. Open the manually operated locking device
Fig. 67-9
of the battery
Fig. 67-1
in the machine. To do this, pull up the locking device on the
handle as far as it will go and fold it over 90° to the rear of the machine
Fig. 67-11
.
6. With the lift truck fully raised (lifting height 200 mm)
Fig. 67-6
align the bat-
tery changing rack
Fig. 67-4
at right angles to the machine.
7. Thread the positioning aid
Fig. 67-3
on the left side of the battery changing
rack into the slot in the machine frame
Fig. 67-12
.
8. Push the battery changing rack to the machine frame and place it on the
ground using the lift truck. When lowering, make sure that the rack does not
move away from the machine frame.
The automatic locking device of the battery in the machine is opened.
9. Pull the battery fully onto the battery changing rack.
Make sure that the locking lever
Fig. 67-2
closes fully.
10.Raise the battery changing rack using the lift truck to the maximum height
of 200 mm.
11.Drive the discharged battery to the charging station and charge it, see
section 5.2.2
Charging the battery
on page 112.
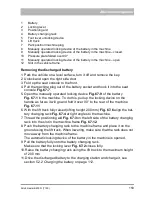
1
Battery
2
Locking lever
3
Positioning aid
4
Battery changing rack
5
Foot lever unlocking device
6
Lift truck
7
Park position machine plug
8
Manually operated locking device of the battery in the machine
9
Manually operated locking device of the battery in the machine closed
10
Pressure plate folded over 90°
11
Manually operated locking device of the battery in the machine open
12
Slot in the vehicle frame
Summary of Contents for Scrubmaster B400 R
Page 1: ...Scrubmaster B400 R RM RH 7190 Operating manual Part number 88 10 3255 Valid as from 03 2021...
Page 9: ...Scrubmaster B400 R 7190 9...
Page 26: ...26 Scrubmaster B400 R 7190 Safety instructions K J Fig 2 L J M A O N Q M K N P O 1 2 3 P Q L C...
Page 158: ...158 Scrubmaster B400 R 7190 Attachments options Fig 67 5 6 3 2 4 1 3 12 9 10 11 1 4 7 8...


