


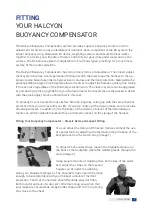


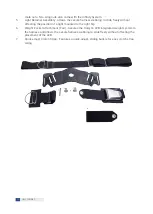


FINAL ASSEMBLY
Verify that the Cinch is
secure on the backplate
with the light, ACB
weight pockets, or D-ring
fixtures attached as
desired. Ensure the web-
bing is threaded properly
through the Cinch (see
images to the right) and
any installed fixtures.
Install the knife pocket
and waist buckle to the
desired positions. Trim excessive webbing from the ends of the waist but remember to leave
room for various suit/undergarments.
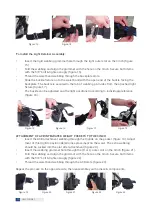
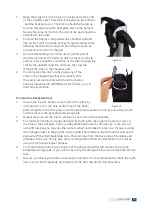
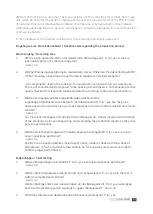
INSTALLING THE QUICK-ADJUST CROTCH STRAP
If retrofitting an existing Halcyon plate, unweave the crotch strap from the tri-glide. Remove
the tri-glide/D-ring and remove the webbing from the backplate. Run the end of the webbing
into the quick-adjust slide buckle with the buckle curve facing downward as shown. Thread the
webbing through the backplate from the front to the back of the plate as shown (figure 24). The
D-ring is placed between the tri-glide and webbing after threading it through the plate, as seen
in figure 25, so it will be secured under all the webbing. Then thread the webbing through the
quick-adjust triglide, then back through both slots of the standard triglide (figure 26-27). Ad-
just the length as needed to insure a proper fit. The recommended D-ring location is roughly a
hand’s width from the bottom of the backplate. Adjusting the triglide close to the backplate as
discussed above provides additional room to refine the quick-adjust buckle position.
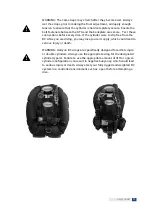
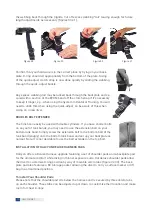
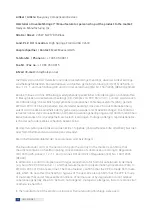
POSITIONING THE QUICK ADJUST
Once the crotch strap length is sized correctly, you may find the crotch strap quick buckle adjust
sits incorrectly, e.g. too far from the plate (figure 28). To correct this, maintain the proper length
of crotch strap and move the quick adjust buckle up toward the backplate, creating a loop of
webbing behind the triglide. Pull the webbing through the triglide until the extra webbing is all
the way through and the quick adjust buckle remains an appropriate distance from the back-
plate (figure 29). Keep the triglide/D-ring and the quick adjust fairly close together, then thread
Figure 24 Figure 25
Figure 26
Figure 27
17
HALCYON.NET
Summary of Contents for TRAVELER
Page 1: ...BUOYANCY COMPENSATOR OWNER S MANUAL 2019...
Page 34: ...NOTES 34 HALCYON NET...
Page 35: ...NOTES 35 HALCYON NET...


