background image

To upload a layout design from the Spirit

2100 to your hard drive, select the file from the

directory window and press the Save Label Design To File button.

To remove a layout design from the Spirit

2100 only, select the design from the “Layout

Designs In Printer” field and press the Delete Selected Design button.  

CAUTION:

I

f you have

not saved this file to your computer first, once removed from the printer, it will be permanently
gone.

To delete all the layout design files in the Spirit

2100 at once, press the Delete All Layouts but-

ton.

CAUTION:  

Save these files to your hard drive first or else they will be permanently delet-

ed.

MANAGING GRAPHIC IMAGES

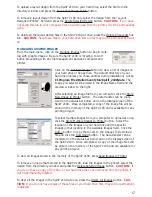
From the main menu, click on the Manage Images button to begin work-
ing with graphic images.  Be sure the Spirit

2100 is “Waiting to Link”

before proceeding with any file management between computer and
printer.

Click on the Get New Image button to view a list of images on
your hard drive or floppy disk.  The default directory on your
hard drive (unless you chose another during installation)  will be

C:\Program Files\HellermannTyton\Spirit_2100\data

. The

image you select will be listed in the Image Name field and the
preview window to the right.

After selecting an image file from you computer, click the Store
New Image In Printer button.  The data transfer can be moni-
tored on the status bar below and on the display screen of the
Spirit

2100.  Once completed, a copy of the image file will be

stored in the memory of the Spirit

2100 and is available for any

printing project.

To select multiple images from you computer to upload at once,
click the Store Multiple Images In Printer button.  Select the
location of the images on your hard drive and the specific
images in that location in the Available Images field.  Click the
Add-> button to copy them over to the  Images To Download
file and click the Download button.  The data transfer can be
monitored on the status bar below and on the display screen of
the Spirit

2100.  Once completed, a copy of the image files will

be stored in the memory of the Spirit

2100 and are available for

any printing project.

To view all images stored in the memory of the Spirit

2100, press Read Images In Printer.

To remove an image that’s stored in the Spirit

2100, read the images in the printer, select the

design from the directory window and press the Delete Selected Image button.  

CAUTION:

If

you do not have a copy of this file on your hard drive first, once removed from the printer, it
will be permanently deleted.  

To clear all the images in the Spirit

2100 at once, press the Delete All Images button. 

CAU-

TION:

If you do not have copies of these files on your hard drive first, they will be permanent-

ly deleted.

17

Summary of Contents for Spirit 2100

Page 1: ...Spirit 2100 Portable Printing System Rev E...

Page 2: ...L Li in ne es s 9 9 R Re ea ar rr ra an ng gi in ng g L Li in ne es s o on n Y Yo ou ur r L La ab be el l 9 9 C Cr re ea at ti in ng g S Se er ri ia al li iz ze ed d L La ab be el ls s 9 9 V Ve er rt...

Page 3: ...to radio and tele vision reception It has been tested and found to comply with the limits for a Class B comput ing device pursuant to Subpart J of Part 15 of the FCC rules which are designed to provid...

Page 4: ...any data entry This reduces data entry errors and greatly speeds label produc tion The Spirit also keeps a database of every different label that is printed and this database can be uploaded to any p...

Page 5: ...thermal transfer printhead Power 8 4 VDC 310mA re chargeable NiCad battery 120VAC 230VAC 100VAC wall mounting pack for re charging Display 2 0 X 1 5 viewable graphics LCD 128 X 64 pixel Processor 8 b...

Page 6: ...e the battery com pletely before attempting to recharge This will insure a longer battery life and maintain a more accurate battery memory NOTE Always dispose of batteries properly For information vis...

Page 7: ...indle back into the spindle compartment of the printer 2 Each end of the spindle shaft is a different size to prevent improper loading 3 There are also two hooks on each side of the label spindle that...

Page 8: ...our TEXT and then press ENTER when complete 4 To add another text field press the ENTER key again and type your text NOTE This can be done as many times as there is space available on your particular...

Page 9: ...ter the barcode Type with the SoftKeys 3 Type in the Data for the barcode to display and indicate whether a human Readable line of text is placed under the barcode on printout 4 Press the DONE SoftKey...

Page 10: ...ally fit on your label when printed Use the following example as a guide EXAMPLE If you have an image that s 150 x 300 pixels in size you can determine the physical print size in inches by multiplying...

Page 11: ...eature looks at this as a 4 digit alphanumeric character and would print the following 10Y6 10Y7 10Y8 10Y9 10Z0 10Z1 10Z2 etc To print multiple copies of each serialized label refer to the PREVIEWING...

Page 12: ...e Use the SoftKeys to adjust the quantity or simply enter it in using the number pad You can choose to save that Print Quantity so that every time you press the PRINT button it will always print that...

Page 13: ...twice to scroll to the third menu screen over 3 Press the FILES SoftKey 4 Press the DELETE SoftKey and the screen will prompt you to delete a specific file from the list 5 Move the indicator to the fi...

Page 14: ...bility to assure that additional production units of this model are manufactured with identical electrical and mechanical components Underwriters Laboratories Inc shall have no liability for any deduc...

Page 15: ...r file name already exists When saving a job at least 1 character must be used to save the format No more room to add more characters or lines to a label Too many characters have been selected to fit...

Page 16: ...battery may still run the LCD but may not have enough power to print 6 Clean printhead and rollers 7 Adjust the print density level PRINTING APPEARS UNEVEN IN DENSITY AND IS SPOTTY OR BLURRED 1 Clean...

Page 17: ...AGHPP 822 12845 TAGH93 250 34373 TAGH86 822 53445 TAGH9 100 34080 TAGH11 822 16437 TAGH12 822 37701 TAGH86 250 53445 TAGH3 100 34352 TAGH13 822 20677 TAGH12 250 37701 TAGH75 822 54469 TAGH8 100 34744...

Page 18: ...unit will now show a text display in which it says that the printer is Waiting To Link to the SpiritLink software on your computer Click on the SpiritLINK icon on your computer to open the software TR...

Page 19: ...ick the Store New Image In Printer button The data transfer can be moni tored on the status bar below and on the display screen of the Spirit 2100 Once completed a copy of the image file will be store...

Page 20: ...piece of text that will go on the label NOTE It is possible to enter more lines of text than will fit on the label loaded Example TAGH73 336 can fit 3 lines of text If 4 or more UPDATING THE LABEL LIS...

Page 21: ...owing message will pop up Please scroll to the desired label width and then click on it to select it Clear Flags This will clear the labels that are in red Font Size Select which font size you want on...

Page 22: ...he batch job you want to print and press DONE Then press the START softkey to print the job If the Spirit 2100 runs out of labels while running a batch job it will hold and ask if you wish to quit the...

Page 23: ...the labels To clear the Spirit s edit log press the Clear Printer Edit Log button CAUTION If you have not saved these files to your computer first once removed from the printer it cannot be restored...

Page 24: ...nu 7 7 Direction Pad 8 8 Serialization 9 9 Label Feed 10 10 Print Multiple Print 11 11 Power On Off 12 12 Enter 13 13 Print Preview 14 14 Alphabet Pad 15 15 Number Pad 16 16 Space Bar 17 17 Function S...

Page 25: ...g This will simply print one label at a time and can be pressed from anywhere in the menu Pressing FUNC PRINT will ask you to enter how many labels you want printed if that number should be remembered...

Page 26: ...s will take you to the System Functions menu view the current contrast setting for the LCD screen increase the contrast of the LCD decrease the contrast of the LCD manually enter a label code to overr...

Page 27: ...ayout files go back to the previous screen scrolls to the next series of SoftKey menus takes you to the Adjust Label Settings screen to set Auto Feed and Default Size preferences this will take you to...

Page 28: ...North America 7930 N Faulkner Road P O Box 245017 Milwaukee WI 53224 phone 414 355 1130 800 537 1512 fax 414 355 7341 800 848 9866 www hellermann tyton com corp htamericas com A TS16949 2002 ISO9001...

Reviews: