5
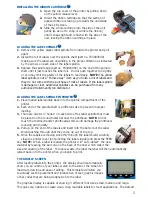
INSTALLING THE RIBBON CARTRIDGE
1.
Open the top cover of the printer by pulling down
on the yellow release lever.
2.
Orient the ribbon cartridge so that the section of
exposed ribbon is facing up towards the underside
of the LCD screen.
3.
Slide the whole cartridge into the side of the unit
gently (so as not to snag or wrinkle the ribbon)
until it snaps tight and is flush with the side of the
unit, locking the ribbon cartridge in place.
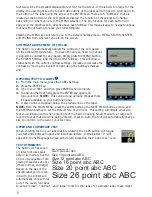
LOADING THE LABEL SPINDLE
1.
Remove the yellow plastic label spindle from inside the printer and pull
apart.
2.
Install the roll of labels over the spindle shaft (part no. TS3003039)
making sure the labels are unwinding in the proper direction as indicated
by the arrows on each side of the label spindle.
3.
Replace the spindle cap (part no. TS3003040) on the end of the spindle
shaft until it just touches the label roll. Do not push together too tightly
or you may limit the ability of the labels to feed freely.
NOTE:
The yellow
label spindle is not a “throw-away” item as you finish a roll of labels and
they do not come with the purchase of rolls of labels. If the label spindle
is damaged or lost, additional spindles can be purchased from any
authorized HellermannTyton distributor.
LOADING THE LABEL SPINDLE IN PRINTER
1.
Place loaded label spindle back into the spindle compartment of the
printer.
2.
Each end of the spindle shaft is a different size to prevent improper
loading.
3.
There are also two “hooks” on each side of the label spindle that must
be placed on the round metal bar near the printhead.
NOTE:
Do not
touch the thermal transfer printhead as this could damage the printhead,
reducing print quality.
4.
Pull up on the end of the labels and insert into the bottom of the label
shield pushing through until they come up out of the top.
5.
Once the labels are moving smoothly through the label shield, carefully
close the printer cover (not pinching the labels inside) and press the FEED
key.
NOTE:
When a label is loaded, the printer will “auto-detect” the new
material by reading the bar code on the back of the liner which tells it the
size and spacing of the label. To reduce waste, the label material will then automatically
retract back into the printer when you begin to print.
THE DISPLAY SCREEN
After loading labels into the printer, the display should automatically
show you an outline of your label, scaled to the size of the screen for
maximum viewing and ease of editing. This template will allow you
to actually see the placement and relative size of text, graphic images
or bar codes that are being designed onto the label.
The graphics display is capable of showing 3 different font sizes; small, medium and large.
This gives you options to create clean, crisp, readable labels for most applications. The default

