5
Wir gratulieren Ihnen zu Ihren neuen Gewächshaus
D
Congratulations On Your Choice Of Greenhouse
Juliana Drivhuse A/S is a privately owned Danish
company established in 1963. At Juliana Drivhuse we
design, develop and manufacture our greenhouses
based on principles of simplicity, aesthetics,
functionality and quality. Over the years, Juliana
Drivhuse has acquired several competing companies,
so that today we offer three brands: Halls, Juliana and
Gabriel Ash. Each brand contains products with unique
designs and functionalities, but where the common
feature is a correlation between quality and price.
All products are designed and manufactured to last
for many years and form the framework for people
and the good life, whether it is primarily for cultivation
or as an oasis in the garden. On www.juliana.com you
can read more about the company, the individual
brands, and the wide range of accessories available
for our greenhouses.
This Installation Manual
When assembling your new greenhouse, you need to
follow these instructions step by step. You will find all
bolts, nuts and fittings in a separate box.
NOTICE:
These instructions might be designed for
several sizes of the same greenhouse model.
All illustrations are marked with the following symbol:
Seen from the inside: Seen from the outside:
If a component from a box is to be used at a later
time in the assembly it is indicated by the following
symbol:
Safety Precautions
• Only carry out assembly in dry and calm weather.
• Make sure you have an assistant to help you.
• Always wear work gloves while glazing. Greenhouse
glass has sharp edges, especially if it breaks.
• Assistants, and especially children, must be warned
that broken glass presents a safety hazard. Pick up all
broken glass at once and remove it with care.
• Any ladders used must be placed on a level surface.
Location
The right location of the greenhouse is important
to create the best growth conditions for plants and
ensure the longevity of the greenhouse.
The greenhouse must be placed in as sunny a position
as possible and shielded from strong winds. As far as
possible, avoid positioning the greenhouse under
trees as the shade will encourage algae growth.
Likewise, fallen branches and leaves can damage the
greenhouse and clog up the gutters.
We recommend that you locate the greenhouse on
your favourite spot in your garden, especially if you
want to use the greenhouse for purposes other than
growing plants.
IMPORTANT:
Before installing the greenhouse you
must create a flat and true surface at least as big as
the external dimensions of the greenhouse - this will
ease the setup of the greenhouse.
Base
There is not a base included with this product.
However, one of our pre-fabricated bases can be
purchased separately. If you purchase our pre-
fabricated base anchor holes must be deep enough
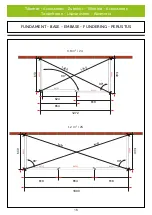
to extend below the frost line. Follow measurements
shown on the following pages. All measurements are
external measurements.
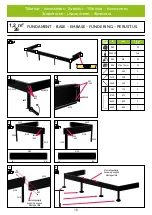
If our pre-fabricated base is used this is attached to
the greenhouse at every vertical glazing bar as shown
on drawing A/B.
The best assembly order:
1.
Ensure level ground.
2.
Assemble base and ensure measurements as show
on drawing. Make sure diagonal measurements are
identical.
3.
Mark holes and move the base.
4.
Dig holes to extend below the frost line. Follow
local recommendations.
5.
Add a bend on the end of the ground anchors as
shown on the drawing.
6.
Place base with ground anchors above holes.
7.
Make sure that the base is 100% level and at a
straight angle. Make sure diagonal measurements are
identical.
8.
Fill up the holes with concrete.
Example: a hole with dimensions ø150 mm and
900mm in depth needs approximately 16 liters of
concrete.
9.
Make sure that the base is still 100% level and at a
straight angle. Make sure diagonal measurements are
still identical.
Upon recommended time of curing you may start
assembling your greenhouse.
Locating The Greenhouse On A Solid Base
If the greenhouse is not going to be concreted down,
it must be secured using suitable brackets. Brackets/
bolts are not part of this purchase. If a pre-fabricated
base is used ground anchors should be cut off with a
hacksaw at the same height as the base.
Pre-fabricated base is designed for casting and
therefore additional drilling and purchase of materials
for this purpose is to be expected. Be aware that most
insurance companies do not cover greenhouses that
do not have a cast base.
Order of Assembly
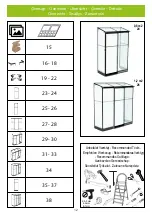
Follow the assembly order as shown on the following
pages.
Place components as shown on the drawing and
then assemble the section in the order shown in the
pictures. Do not tighten the nuts completely until the
entire section is assembled.
When all sections are complete the body of the
greenhouse can be assembled.
NOTICE:
In several places the assembly instruction
shows that extra bolts must be inserted in the profiles.
These are to be used for attaching other parts later in
the process.
Doors and Windows
Add grease on the screws for the door to ease
assembly. Doors and vents should be glazed during
the initial assembly.
IMPORTANT:
Before glazing make sure that the
gables and sides are level and straight, and that
door(s) and window(s) work perfectly.
A greenhouse should never be left partially glazed.
Glazing
1.
Clean glass and profiles with ethanol.
2.
Fit one glass at a time – add butyl tape (20-1230)
on vertical profiles.
3.
Fit the glass and finish with cappings.
Recommended order of glazing: roof – sides –
gables.
If you accidentally break a pane, carefully pull the
broken glass outwards. Clean the profile completely
before fitting a new pane of glass.
Polycarbonate Installation
The illustrations show how to fit the sheets and strips.
If adjustment is necessary use a fine-tooth saw.
NOTICE:
To avoid the growth of algae, do not allow
the polycarbonate sheets to come into contact with
the ground.
If desired, the sheets may be sealed against insects.
Seal the top using aluminium tape or silicone. The
bottom should only be sealed with air-strip tape to
allow condensation to escape.
Tools
The tools needed to assemble the greenhouse are
shown on the following pages.
Tips and Tricks
See www.juliana.com for more tips on assembly of
your greenhouse.
Maintenance
• Grease the hinges of the doors, lock and
– if included – sliders approximately every 6 months.
• Tighten bolts/nuts.
• Clean the gutters from leaves etc.
• Adjust windows if necessary.
• Replace broken glass.
• Clean the greenhouse before and after the growing
season.
Winter and Storm Protection
If you anticipate snow and/or a storm we recommend
the following:
• Support the roof section.
• Remove larger amounts of snow from the roof.
• Take precautions to prevent snow falling from e.g.
a tree or roof.
• Remove the cylinders from the automatic window
openers (accessory).
• Secure door(s) and window(s) to prevent wind
damage to the greenhouse.
Please note that not all insurance companies
automatically cover greenhouses.
12-year Guarantee
A full description of the guarantee can be found on
www.juliana.com.
Provided that the greenhouse is assembled and
maintained according to the requirements, the
greenhouse is covered by a 12-year guarantee. In
case of missing parts/defects this must be reported
immediately.
General maintenance of the greenhouse such
as cleaning, lubrication, post-tensioning of nuts/
screws must be complied with, as this may affect the
structural quality of the greenhouse and its resistance
to wind and snow load.
Please note that the guarantee does not cover;
• Damage and functional problems due to lack of
lubrication and maintenance.
• Any paintwork is covered by a 2-year guarantee.
• Nuance differences in colour may occur and there
may be small marks on the profiles due to the painting
process. This is not covered by the guarantee.
• Glass, polycarbonate, freight, assembly, possible
removal, possible consequential damage, labour
costs, etc.
• Parts damaged by external influences, such as:
other building parts, climate impacts, vandalism,
force majeure or other external conditions. E.g.
remember to remove snow from the roof to avoid
possible breakage due to excessive weight.
• Wear parts (such as handles, wheels, sliders,
cylinders and locking devices). Wear parts must be
replaced on a regular basis depending on use and
operation.
• Product defects arising from incorrect/inappropriate
use of parts.
NOTICE:
a greenhouse is a single-skin, dry-build
construction that is not 100% dense. Depending
on weather conditions, leaks may occur at roofs,
windows, doors and corners.
Complaints
All our greenhouses are built according to the
highest quality standards. However, should you
experience any problems, please contact your dealer
at once. When describing the defect, please state the
greenhouse model and component number.
Congratulations on your new greenhouse, which we
hope will bring you great joy for many years to come.
Herzlichen Glückwunsch mit Ihrer
Gewächshauswahl
Juliana Drivhuse A/S ist ein dänisches Privat-
unternehmen, das im Jahr 1963 gegründet wurde. Bei
Juliana Drivhuse entwerfen, entwickeln und stellen
wir unsere eigenen Gewächshäuser her nach den
Prinzipien – Simplizität, Ästhetik, Funktionalität und
Qualität. Durch die Jahre hat Juliana Drivhuse eine
Reiche von Konkurrenten gekauft, sodass wir heute 3
Marken anbieten: Halls, Juliana und Gabriel Ash. Jede
Marke enthält Produkte mit besonderen Designs und
Funktionalitäten, aber ein durchgehendes Merkmal ist
der Zusammenhang von Preis und Qualität.
Die Produkte sind entworfen und hergestellt, um
sehr viele Jahre zu halten und einen Rahmen für den
Menschen und das gute Leben zu bilden, ob dies in
erster Linie für das Anbauen von Pflanzen ist oder als
Oase im Garten ist. Auf www.juliana.com/de können
Sie mehr über das Unternehmen lesen, die einzelnen
Marken und die große Auswahl an Zubehör für unsere
Gewächshäuser entdecken.
Diese Anleitung
Bei der Montage Ihres Gewächshauses ist es
notwendig, dass Sie diese Anleitung Schritt für Schritt
folgen. Alle Muttern, Bolzen und Fittings sind in einer
separaten Box gelegt.
HINWEIS:
Diese Anleitung kann für mehrere Größen
des gleichen Gewächshausmodelles gelten.
Alle detaillierten Zeichnungen sind mit folgenden
Symbolen gekennzeichnet:
Von Innen gesehen: Von Außen gesehen:
An verschiedenen Stellen ist angegeben, welche
Komponente von welcher Box auf einer späteren Seite
benutzt werden. Dies wird mit diesem Symbol gezeigt:
Sicherheitshinweise
• Die Montage darf nur bei trockenem und windstillem
Wetter erfolgen.
• Zur Montage ist eine Hilfskraft notwendig.
• Tragen Sie beim Einsetzen der Glasscheiben un-
bedingt Arbeitshandschuhe. Gewächshaus Glas hat
scharfe Kanten, besonders wenn es zerbricht.
• Helfer und besonders Kinder müssen auf das
Risiko von zerbrochenem Glas hingewiesen werden.
Glasscherben müssen sofort aufgesammelt und
sorgfältig entsorgt werden.
• Tragen Sie bei der Montage der Glasfedern evtl. eine
Schutzbrille.
• Falls Sie bei der Montage eine Leiter benötigen,
stellen Sie diese unbedingt auf eine ebene Fläche.
Auswahl des Standorts
Die Wahl des richtigen Standorts ist wichtig, um die
bestmöglichen Wachstumsbedingungen für Ihre
Pflanzen zu schaffen und um sicherzustellen, dass das
Gewächshaus sicher steht und möglichst lange hält.
Das Gewächshaus sollte so platziert werden, dass es
so viel Sonnenlicht wie möglich abbekommt, aber
keinem starken Wind ausgesetzt ist. Vermeiden Sie
es, dass Gewächshaus unter Bäumen aufzustellen,
da diese Schatten werfen und somit Algenwachstum
begünstigen. Außerdem könnten herabfallende Äste
das Gewächshaus beschädigen und herabfallendes
Laub die Regenrinnen verstopfen.
Wir empfehlen das Sie das Gewächshaus dort
platzieren, wo Sie sich am meisten im Garten aufhalten,
besonders falls Sie einen Wunsch haben, dass
Gewächshaus für mehr als Gemüseanbau zu benutzen.
WICHTIG:
Vor dem Aufbau Ihres Gewächshauses
sollte ein ebener Untergrund, der den äußeren
Maßen des Gewächshauses entspricht, geschaffen
werden - dies vereinfacht den späteren Aufbau des
Gewächshauses.
Fundament
Das Fundament ist nicht ein Teil dieser Lieferung, aber
das originale Fundament kann separat dazu gekauft
werden.
Falls Sie unser originales Fundament kaufen, muss
dieses in frostfreier Erde punktbetoniert werden.
Folgen Sie den Angaben der Maße der Zeichnung, alle
Maße sind Außenmaße.
Wird das originale Fundament verwendet, wird das
Haus wie in der Zeichnung A/B abgebildet mit einer
Schrägstrebe festmontiert.
Die optimale Reihenfolge für die Betonierung des
Fundamentes:
1.
Ebener Untergrund ist gewährleistet.
2.
Fundament wird gesammelt und wie in der
Zeichnung angegeben gemessen. Kontrollieren Sie
das die Diagonalmaßen gleich sind.
3.
Die Löcher werden markiert und das Fundament
wird entfernt.
4.
Die Löcher werden zu einer frostfreien Tiefe
gebohrt/gegraben. Folgen Sie lokale Angaben.
5.
Die Anker des Fundaments werden leicht am Ende
gebogen wie in der Zeichnung angegeben.
6.
Fundament wird mit Ankern in die Löcher platziert.
7.
Kontrollieren Sie die Breitmaße, und ob das
Fundament 100% waagerecht und im rechten Winkel
liegt. Kontrollieren Sie dann ob die Diagonalmaßen
gleich sind.
8.
Befüllen Sie die Löcher mit Beton.
Beispiel: bei Ø150 mm und 900 mm Tiefe sind
geschätzt 16 L Beton per Loch notwendig.
9.
Kontrollieren Sie, ob die Maße des Fundaments
noch korrekt sind und ob es 100 % waagerecht und im
rechten Winkel liegt.
Nach der empfohlen Härtezeit des Betons können Sie
mit dem Aufbau des Gewächshauses beginnen.
Platzierung ohne Betonierung
Wird das Haus ohne Betonierung platziert muss es
mit den rechten Beschlägen abgesichert werden.
Beschläge und Schrauben/Bolzen für diese Montage
können separat im Baumarkt gekauft werden und
muss zum Untergrund passen. Wird das originale
Fundament gekauft, werden die Anker an den
Ecken und Langseiten in der gleichen Höhe wie das
Fundament abgeschnitten.
Das originale Fundament ist für die Betonierung
konstruiert und deswegen müssen extra Bohrungen
und Einkauf von Material hinzugelegt werden. Bitte
beachten Sie, dass die meisten Versicherungen nicht
das Gewächshaus versichern, wenn das Fundament
nicht in den Boden betoniert ist.
Montierungsreihenfolge des Hauses
Folgen Sie die Montagereihenfolge wie in der
Montage- anleitung angegeben.
Legen Sie die Komponenten wie in den Zeichnungen
angegeben und sammeln Sie danach die Sektionen
i der Reihenfolge, die die Bilder anzeigen. Spannen
Sie nicht die Bolzen ganz, bevor die ganze Sektion
gesammelt ist.
Wenn alle Sektionen bereit sind, wird das Skelet des
Hauses gesammelt.
HINWEIS:
An verschiedenen Stellen in der Anleitung
wird veranschaulicht, wie zwei extra Bolzen im
Profilkanal eingesetzt werden. Diese werden für die
Montage von Elementen später im Aufbau benötigt.
Fenster und Türen
Die Schrauben zur Tür schmieren Sie leicht mit Öl für
eine leichtere Montage. Glas oder Hohlkammerplatten
für Fenster und Türen werden gleichzeitig mit den
Profilen montiert.
WICHTIG:
Vor der Montage vom Glas/Hohlkammer-
platten muss kontrolliert werden, ob die Giebel und
Seiten waagerecht und im rechten Winkel stehen, und
das Fenster und Tür(en) korrekt funktionieren.
Wenn die Glas-/Hohlkammerplattenarbeit beginnt,
muss dieses im gleichen Arbeitsablauf beendet werden.
Glasmontage
1.
Reinigen Sie Glas und Profile mit Ethanol.
2.
Montieren Sie jeweils ein Glas – Butyltape (20-1230)
wird vertikal an die Profile geklebt.
3.
Platzieren Sie das Glas und beenden Sie mit der
Befestigung der Montageleisten.
Empfohlene Reihenfolge: Dach – Seiten – Giebel.
Bei z.B. zerbrochenen Glas wird das Glas vorsichtig
nach außen gekippt. Kratze vorsichtig das Profil sauber
und montieren neues Glas.
Stegdobbelplattenmontage
Die Übersichtszeichnungen zeigen, wo die Platten und
Leisten zu montieren sind. Evtl. Längenanpassungen
sollten mit einer feinen Säge/ Klinge vorgenommen
werden.
HINWEIS:
Um Algenbildung zu vermeiden, dürfen die
Platten nicht mit der Erde in Kontakt kommen.
Die Platten können gegen Insekten versiegelt werden,
oben mit Alu-Klebeband oder Silikon, unten mit
Rücksicht auf den Ablauf von Kondenswasser nur
mit diffusionsoffenem Klebeband (Materialien sind im
Baumarkt erhältlich).
Werkzeug
Zur Montage des Gewächshauses wird das in der
Anleitung gezeigte Werkzeug benötigt.
Tipps und Tricks
Weitere Tipps zum Einrichten Ihres Gewächshauses
finden Sie unter www.juliana.com/de.
Pflege
• Schmieren Sie die Türen, Scharniere, Schlösser und
Gleitschienen ca. jedes halbe Jahr.
• Säubern Sie die Dachrinnen regelmäßig von Blättern o.ä.
• Muttern und Schrauben müssen angezongen werden.
• Justieren Sie gegebenenfalls die Fenster.
• Tauschen Sie gebrochene Glasscheiben aus.
• Reinigen Sie das Gewächshaus vor und nach der
Anbausaison.
Winter- und Stormsicherung
In Gebieten, in denen mit Schneefall zu rechnen ist,
empfehlen wir folgende Maßnahmen:
• Unterstützen Sie den Dachrücken mit einer
zusätzlichen Stütze.
• Befreien Sie, bei starker Schneelast, das Dach
regelmäßig vom Schnee.
• Sichern Sie das Haus vor evtl. abstürzenden
Schneemassen von Bäumen o.ä.
• Demontieren Sie die Zylinder der automatischen
Fensteröffner (sofern vorhanden, extra Zubehör) und
lagern Sie diese an einem geschützten Ort.
• Sichern Sie Türen und Fenster, damit der Wind sie
nicht hin und her schlagen kann.
Wir weisen darauf hin, dass nicht alle Versicherungen
automatisch Gewächshäuser abdecken.
Garantieerklärung – 12 Jahre Garantie
Unter www.juliana.com/de finden Sie die volle
Garantieerklärung.
Unter der Voraussetzung, dass das Gewächshaus unter
der Übereinstimmung der Montageanleitung montiert
wurde, und nach den Vorschriften gehalten wurde,
geben wir 12 Jahre Garantie. Im Fall von Schäden oder
Mängeln müssen diese umgehend gemeldet werden.
Normale Pflege des Gewächshaues sowie die
Reinigung, die Schmierung, das Nachziehen von
Bolzen/Schrauben
muss
eingehalten
werden,
da dies einen Einfluss auf die konstruktionsmäße
Qualität und Widerstandsfähigkeit gegen Wind- und
Schneebelastung hat.
Wir machen darauf aufmerksam, dass die oben
erwähnte Garantie nicht folgendes beeinhaltet;
• Schäden und Funktionsprobleme aufgrund von
fehlender Schmierung und Pflege.
• Für lackierte Gewächshäuser gilt eine 2-jährige
Garantie für die Lackierung.
• Farbunterschiede können auftreten, und es
können kleine Markierungen in den Profilen sein,
die von der Aufhängung der Profile unter dem
Lackierungsprozess entstanden sind. Diese sind nicht
Reklamationsberechtigt.
• Glas, Hohlkammerplatten, Fracht, Montage und
eventuelle
Abmontage,
eventuelle
folgenden
Schäden, Arbeitslohn o.Ä.
• Produkte die von äußeren Einflüssen belastet werden,
wie z.B.: andere Gebäudeelemente, Umwelteinflüsse,
Vandalismus, Force Majeure oder andere äußere
Bedingungen. Entfernen Sie z.B. Schnee vom Dach,
um einen möglichen Bruch zu verhindern wegen zu
hoher Schneelast.
• Verschleißteile (wie Türgriff, Räder, Gleitschienen,
Zylinder und Schließvorrichtungen). Verschleißteile
müssen wegen täglichem Gebrauch, der Verwendung
und Bedingung ersetzt werden.
• Die Garantie fällt weg, wenn ein Produktfehler
wegen falschem/unangemessen Gebrauch der Teile
in der Konstruktion entstanden ist.
HINWEIS:
Ein Gewächshaus ist eine einlagige Konstruk-
tion und somit nicht 100 % dicht. Je nach Wetterlage
können undichten im Dach, bei den Fenstern, Türen
und Ecken entstehen. Wir empfehlen dies bei der
Inneneinrichtung des Gewächshauses zu beachten.
Reklamationen
Wir haben strenge Qualitätsanforderungen, um ein
fehlerfreies Produkt sicherzustellen. Sollte dennoch
Fehler oder Mängel entstehen, kontaktieren Sie
Ihren Händler. Bitte haben Sie den Namen des
Gewächshauses und die Artikelnummer bereit.
Wir gratulieren Ihnen zu Ihrem neuen Gewächshaus
und hoffen, dass es Ihnen viele Jahre Freude bereitet.
Summary of Contents for Qube Lean-to
Page 1: ...1 2 m 26 0 8 m 24 Qube Lean to 16022022 1 01 2...
Page 2: ...www hallsgreenhouses com Please refer to website for the most up to date instruction...
Page 11: ...www hallsgreenhouses com Please refer to website for the most up to date instruction...
Page 13: ...13 134 625 Oversigt Overview bersicht versikt D tails Overzicht Sis llys Zawarto...
Page 23: ...23 1 2m 26 34 0 8m 24...
Page 34: ...34 1 2m 26...
Page 48: ...48 88 20 1230 88 D r Door T r D rr Porte Deur Ovi Drzwi...
Page 50: ......
Page 51: ......
Page 52: ...This product is delivered by a company in the Juliana Group www juliana com...


