8
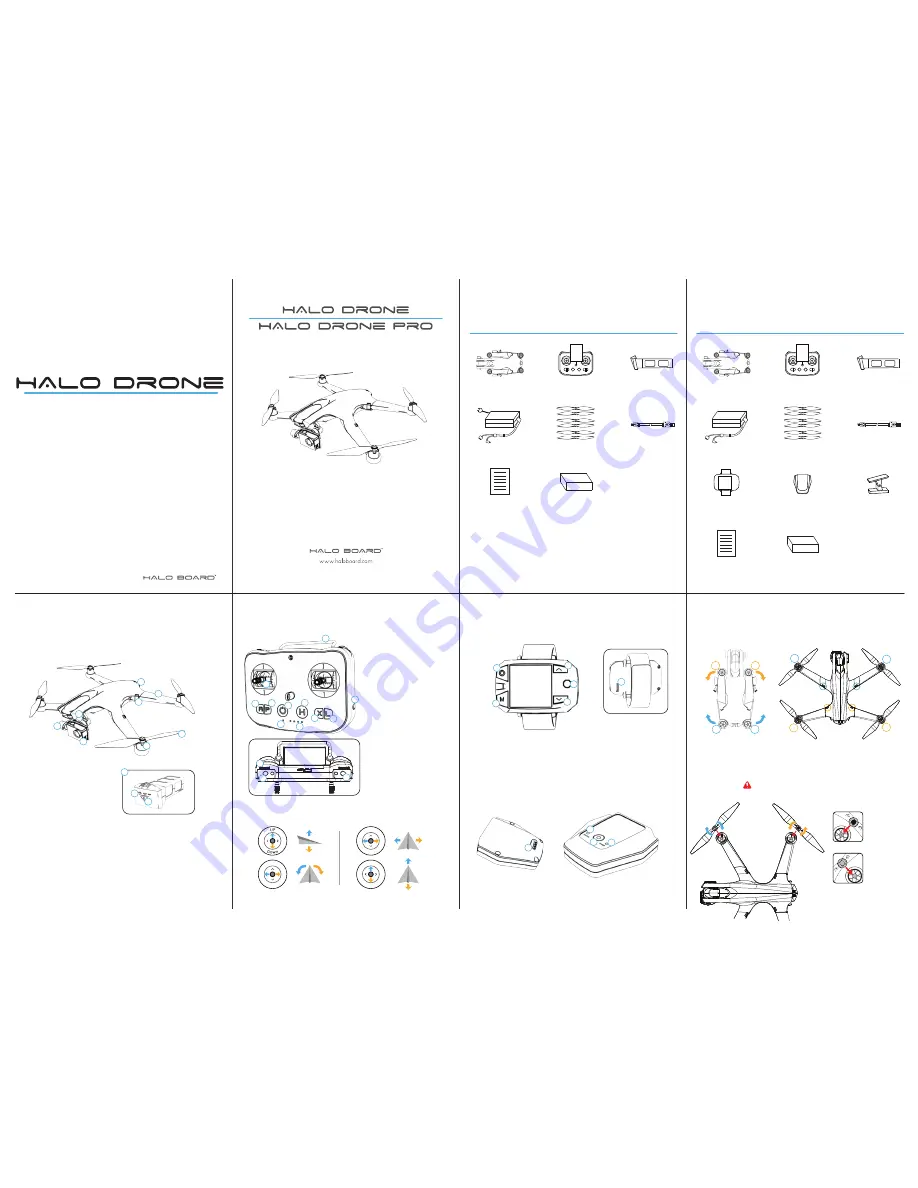
Properly secure the propellers onto the motors - Black tightens Counter-Clockwise and Silver
tightens Clockwise. Tighten the propellers with both hands before each flight.
Black propellers
go on motors with
dip in center
Silver propellers
go on motors with
smooth tops
Halo Drone Setup
|
2. Attach Propellers
A1
A2
B1
B2
C1
C3
C4
C2
A1
A2
B1
B2
Unfold the Halo Drone’s arms in the correct order: Arms
A1
and
A2
first (the front/lower arms),
then arms
B1
and
B2
(the rear/upper arms). Secure all four (
C1
,
C2
,
C3
, &
C4
) Arm Lock Clips
and make sure they are not loose or cracked.
Halo Drone Setup
|
1. Unfold Arms
7
1
2
3
4
The Halo Drone Pro includes the versatile Follow Module that gives you access to 7 exciting
Follow Modes. You can keep it with you, attach to your gear, car, etc., and get accurate tracking
shots. Can be used with both the Sports Watch or Remote Controller.
Follow Module
|
Halo Drone Pro
1. Charging Port
2. Status Indicator LED
3. Power Button
4. Power Indicator LED
4. Down Button
5. Navigation Joystick & Button
6. Charging Port
1. Power/Stop Button
2. Follow Mode Button
3. Up Button
1
2
3
4
5
6
The Halo Drone Pro comes with a simple to use Sports Watch Remote to control and fly using
the Follow Module without the need of the larger remote control. It has a range of up to
1300 ft (400 m), and is water resistant and dust proof.
Sports Watch Remote
|
Halo Drone Pro
6
*To initiate emergency shut off, you must press the Power and ‘X’ button together.
**In A-Mode with no GPS signal, ‘L’ button will initiate motors for manual take-off.
Forward
Re
ver
se
Le
ft
Rig
ht
Tu
rn
Le
ft
Tu
rn
Rig
ht
Before taking off, learn the basic controls in the default (Mode 2) setting. The left stick is for
altitude and heading while the right stick is for front, back, left, and right movement.
12
13
14
1. Power Button
2. Status Indicator LED
3. Battery Level LEDs
4. Control Sticks
5. Return to Home (RTH) Button
6. A-Mode
7. P-Mode (GPS Positioning)
8. Emergency Shut Off*
9. Auto Take-off & Land Button**
10. Charging Port
11. Handle Bar
12. Video Recording Button
13. Gimbal Dial
14. Shutter Button
1
2
3
4
5
6
7
8
9
10
11
Simplistic controls. The Halo Drone and Halo Drone Pro are equiped with a very easy to use
controller that will allow you to pilot your drone at distances of up to 3,280 ft (1000 m) away.
Remote Controller
Left Stick
Right Stick
5
6. Foldable Arms
7. Arm Lock Clips
8. High Performance Flight Battery
9. Power Button
10. Flight Battery Indicator Lights
1. Status Indicator Lights
2. 3-Axis Gimbal
3. Camera
4. Motors
5. Propellers
1
2
3
4
5
6
7
8
8
9
10
Can’t wait to fly? Let’s quickly learn all there is about your new Halo Drone.
Review the diagram below to get acquainted with the different parts of the Halo Drone and
Halo Drone Pro models.
Halo Drone
|
Halo Drone Pro
4
Accessory Box:
Extra Arm Lock Clips
Alan Wrench
Manuals:
User Manual
Quick Start Guide
Charging Clip x 1
Follow Module x 1
Remote Control
Watch x 1
USB Cable x 1
Propeller Pair x 3
Battery Charger x 1
High Performance
Flight Battery x 1
Remote Controller x 1
Halo Drone Pro x 1
(With Pro Camera)
Halo Drone Pro:
Please check and make sure all the following items are included in your package. If any item is
missing, please contact Halo Board or your local retailer.
In the Box
|
Halo Drone Pro
3
Accessory Box:
Extra Arm Lock Clips
Alan Wrench
Manuals:
User Manual
Quick Start Guide
USB Cable x 1
Propeller Pair x 3
Battery Charger x 1
High Performance
Flight Battery x 1
Remote Controller x 1
Halo Drone x 1
(With Standard Camera)
Halo Drone:
Please check and make sure all the following items are included in your package. If any item is
missing, please contact Halo Board or your local retailer.
In the Box
|
Halo Drone
V1.2
Quick Start Guide


