Page 18
Diagnostics
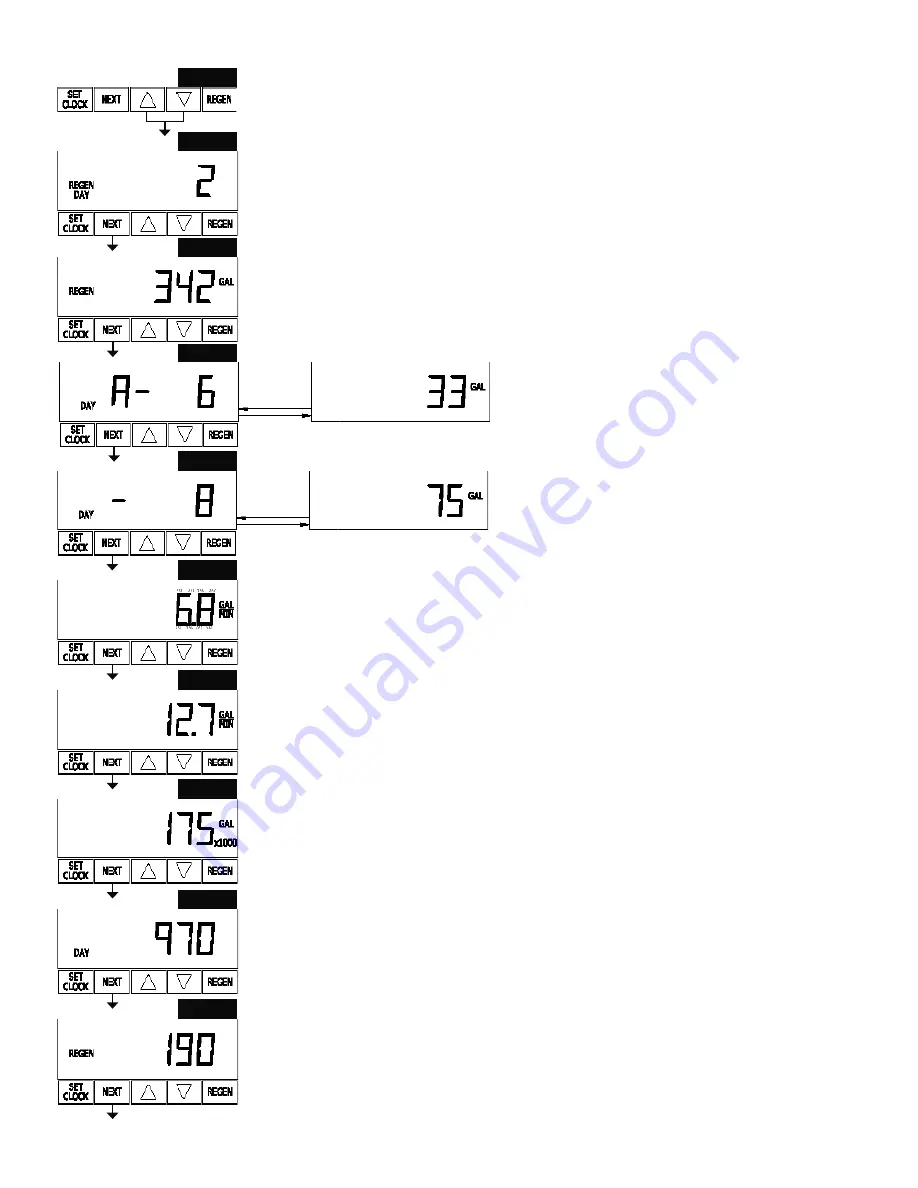
STEP 1D
– Press Down or Up simultaneously for three seconds. If screen in step 2D does not appear in
5 seconds the lock on the valve is activated. To unlock press
Down, NEXT, Up, and SET CLOCK in sequence, then press NEXT and Down simultaneously for 3
seconds.
STEP 2D
– Days, since last regeneration: This display shows the days since the last re gen er a tion
occurred. Press the NEXT button to go to Step 3D. Press REGEN to exit Diagnostics.
STEP 3D
– Gallons, since last regeneration: This display shows the number of gallons that have been
treated since the last re gen er a tion. This display will equal zero if a water meter is not installed. Press the
NEXT button to go to Step 4D. Press REGEN to return to previous step.
STEP 4D
– Gallons, reserve capacity used for last 7 days: If the valve is set up as a softener, a meter
is installed and Set Gallons Capacity is set to “Auto,” this display shows 0 day (for today) and fl ashes
the reserve capacity. Press ing the s button will show day 1 (which would be yesterday) and fl ashes the
reserve capacity used. Press ing the s button again will show day 2 (the day before yesterday) and the
reserve capacity. Keep pressing the s button to show the gallons for days 3, 4, 5 and 6. The Down button
can be pressed to move back wards in the day series. Press the NEXT button at any time to go to Step
5D. Press REGEN to return to previous step.
STEP 5D
- Gallons, 63 day usage history: This display shows
day 1 (for yesterday) and fl ashes the number of gallons treated
yesterday. Pressing the Up button will show day 2 (which would
be the day before yesterday) and fl ashes the number of gallons
treated on that day. Con tin ue to press the s button to show the
max i mum number of gallons treated for the last 63 days. This
display will show dashes if a water meter is not installed. Press
the NEXT button at any time to go to Step 6D. Press REGEN to
return to previous step.
STEP 6D
– Flow rate, current: Turn the water on at one or
more taps in the building. The fl ow rate in gallons per minute
will be displayed. If fl ow stops the value will fall to zero in a few
seconds. This display will equal zero if a water meter is not installed. Press the NEXT button to go to Step
7D. Press REGEN to return to previous step.
STEP 7D
– Flow rate, maximum last seven days: The maximum fl ow rate in gallons per minute that
occurred in the last seven days will be displayed. This display will equal zero if a water meter is not
installed. Press the NEXT button to go to Step 8D. Press REGEN to return to previous step.
STEP 8D
– Gallons, total used since last reset: The total number of gallons used since last reset will be
displayed. This display will equal zero if a water meter is not installed. Press the NEXT button to go to
Step 9D. Press REGEN to return to previous step.
STEP 9D
– Days, total number since last reset: The total number of days the control valve has been in
service since last reset will be displayed. Press the NEXT button to go to Step 10D. Press REGEN to
return to previous step.
STEP 10D
– Regenerations, total number since last reset: The total number of re gen er a tions that have
occurred since last reset will be displayed. Press the NEXT button to exit Di ag nos tics. Press REGEN to
return to previous step.
When desired, all information in Diagnostics may be reset to zero when the valve is
installed in a new location. To reset to zero, press NEXT and
t
buttons simultaneously to
go to the Service/OEM screen, and release. Press
Down
and
Up
simultaneously to reset
diagnostic values to zero. Screen will return to user display.
RETURN TO
NORMAL MODE
STEP 1D
STEP 2D
STEP 3D
STEP 4D
STEP 5D
STEP 6D
STEP 7D
STEP 8D
STEP 9D
STEP 10D


