H2 ZERO INST
ALLA
TION AND ST
AR
T UP
•
Shut off electrical power or gas valves supplying water heater(s).
Note to installer: Tank may be buried 2/3 under ground..
•
Turn off the main water supply to the home and open an inside
faucet to relieve any pressure within the plumbing system.
•
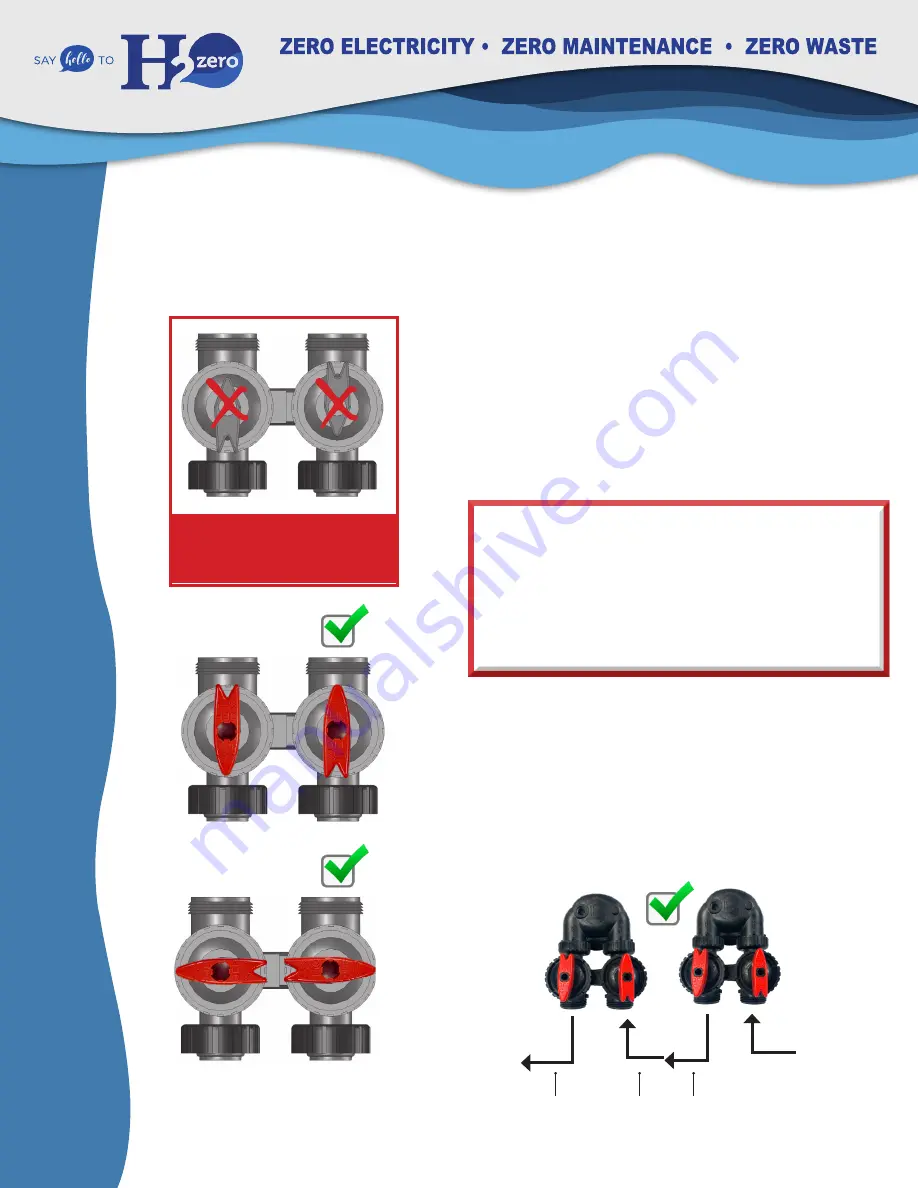
Place the bypass valve in the upflow service position.
See bypass valve modification detail pictured left.
•
Connect the cold water supply to the inlet of the
H2 ZERO
®
system. NOTE: The
H2 ZERO
®
system operates in the upflow
mode which is opposite of a traditional filtration / softener.
See Bypass Valve Modification below.
•
Connect a hose to the
outlet
for the purpose of draining excess carbon.
•
Turn the water back on to the house. Slowly open the supply
valve to the
H2 ZERO
®
system. Allow the tank to fill with water.
Repeat these steps three times*
Carbon tank must be flushed individually. Do not attempt to flush
the carbon tank while it is connected to tank 2.
•
Backwash tank 1 for 20 minutes in the upflow service position.
•
Backwash in the downflow service position for 10 minutes.
•
Close the valve to the outlet hose drain and let system stand
pressurized for 10 minutes.
*If time permits you can soak the system for 48 hrs instead of flushing.
•
Connect the outlet of the
H2 ZERO
®
system to the cold water
supply to the house.
•
Open the supply valve to the
H2 ZERO
®
system.
•
Open hot and cold faucets downstream from the
H2 ZERO
®
system to relieve any air from the plumbing system and water
heaters. Introduce the water inside the
H2 ZERO
®
to home, flush
for 5 minutes. System is now installed and ready for use.
Close the faucets.
As shipped, the bypass is set-up for downflow use. The arrow
shape of the handles points in the wrong direction for UP-flow
use. To convert it to upflow use, pull up on the red handles
until they come off. Rotate the handle 180° and put it back
on the valve stem.
Bypass Valve Modification
Installation and Start-up
1.
Turn off water heater(s).
2.
Turn off the main water supply to the home and open an
inside faucet to relieve any pressure within the plumbing sys-
tem.
3.
Place the system in the desired location. Make sure that the
location is level and sturdy enough to support the weight of
the wetted system.
4.
Place the bypass valve in the up flow service position. See
below Bypass Valve Modification Detail.
5.
Connect the cold water supply to the inlet of the
H2 ZERO
®
system. NOTE: The
H2 ZERO
®
system operates in the
UP-flow mode which is opposite of a conventional softener.
Follow the plumbing diagram in Figure 3.
6.
Install a supply valve (user supplied) in the supply line and
close it.
7.
Place a bucket under the outlet port or run a line from the
outlet port to a drain.
8.
Turn the water back on to the house. Slowly open the sup-
ply valve to the
H2 ZERO
®
system. Allow the tank to fill with
water. Close the supply valve when a steady stream of
water
comes out of the outlet port. If the outlet is flowing
into a
bucket, water could splash on nearby objects. If this
threatens the safety, value, structure, or appearance of these
objects, protect/remove them or use the outlet hose to drain
option.
9.
Close the inside faucet.
10.
Connect the outlet of the
H2 ZERO
®
system to the cold
water supply to the house.
11.
Open the supply valve to the
H2 ZERO
®
system.
12.
Open hot and cold faucets downstream from the
H2 ZERO
®
system to relieve any air from the plumbing system and
water heaters. Then close the faucets.
13.
Check for leaks. Repair as needed.
14.
The system is now ready for service.
IN
Cold Water
OUT
H2 ZERO
®
Treated Water
Figure 3.
shown with bypass as-sembly.
Service Position
down-flow tank.
As shipped, the bypass is set-up for down-
flow use. The arrow shape of the handles
points in the wrong direction for UP-flow
use. To convert it to UP-flow use, pull up on
the red handles until they come off. Rotate
the handle 180° and put it back on the valve
stem.
Service Position
UP-flow tank.
Bypass Position
UP-flow tank.
Bypass Valve Modification
INCORRECT Service Position
THIS MUST BE CHANGED TO
UPFLOW POSITION BELOW.
Installation and Start-up Tank 1
H2 ZERO
®
TANK 1 Carbon
OUTLET TO HOME
H2 ZERO
®
Filtered &
Conditioned Water
INLET/MAIN
Cold Water
INLET/OUTLET TO TANK 2
H2 ZERO
®
Carbon Filtered Water
H2 ZERO
®
TANK 2 Conditioning*
* TANK 2 Available in two options
Option 1: HALO ION in-line conditioner
Option 2: HALO Proprietary scale media
Installation and Start-up Tank 2
Set up for tank 2 is the same for both ION and Scale Media
Service Position
UPflow tank.
Installation and Start-up
1.
Turn off water heater(s).
2.
Turn off the main water supply to the home and open an
inside faucet to relieve any pressure within the plumbing sys-
tem.
3.
Place the system in the desired location. Make sure that the
location is level and sturdy enough to support the weight of
the wetted system.
4.
Place the bypass valve in the up flow service position. See
below Bypass Valve Modification Detail.
5.
Connect the cold water supply to the inlet of the
H2 ZERO
®
system. NOTE: The
H2 ZERO
®
system operates in the
UP-flow mode which is opposite of a conventional softener.
Follow the plumbing diagram in Figure 3.
6.
Install a supply valve (user supplied) in the supply line and
close it.
7.
Place a bucket under the outlet port or run a line from the
outlet port to a drain.
8.
Turn the water back on to the house. Slowly open the sup-
ply valve to the
H2 ZERO
®
system. Allow the tank to fill with
water. Close the supply valve when a steady stream of
water
comes out of the outlet port. If the outlet is flowing
into a
bucket, water could splash on nearby objects. If this
threatens the safety, value, structure, or appearance of these
objects, protect/remove them or use the outlet hose to drain
option.
9.
Close the inside faucet.
10.
Connect the outlet of the
H2 ZERO
®
system to the cold
water supply to the house.
11.
Open the supply valve to the
H2 ZERO
®
system.
12.
Open hot and cold faucets downstream from the
H2 ZERO
®
system to relieve any air from the plumbing system and
water heaters. Then close the faucets.
13.
Check for leaks. Repair as needed.
14.
The system is now ready for service.
IN
Cold Water
OUT
H2 ZERO
®
Treated Water
Figure 3.
shown with bypass as-sembly.
Service Position
down-flow tank.
As shipped, the bypass is set-up for down-
flow use. The arrow shape of the handles
points in the wrong direction for UP-flow
use. To convert it to UP-flow use, pull up on
the red handles until they come off. Rotate
the handle 180° and put it back on the valve
stem.
Service Position
UP-flow tank.
Bypass Position
UP-flow tank.
Bypass Valve Modification
Bypass Position
UPflow tank.
Installation and Start-up
1.
Turn off water heater(s).
2.
Turn off the main water supply to the home and open an
inside faucet to relieve any pressure within the plumbing sys-
tem.
3.
Place the system in the desired location. Make sure that the
location is level and sturdy enough to support the weight of
the wetted system.
4.
Place the bypass valve in the up flow service position. See
below Bypass Valve Modification Detail.
5.
Connect the cold water supply to the inlet of the
H2 ZERO
®
system. NOTE: The
H2 ZERO
®
system operates in the
UP-flow mode which is opposite of a conventional softener.
Follow the plumbing diagram in Figure 3.
6.
Install a supply valve (user supplied) in the supply line and
close it.
7.
Place a bucket under the outlet port or run a line from the
outlet port to a drain.
8.
Turn the water back on to the house. Slowly open the sup-
ply valve to the
H2 ZERO
®
system. Allow the tank to fill with
water. Close the supply valve when a steady stream of
water
comes out of the outlet port. If the outlet is flowing
into a
bucket, water could splash on nearby objects. If this
threatens the safety, value, structure, or appearance of these
objects, protect/remove them or use the outlet hose to drain
option.
9.
Close the inside faucet.
10.
Connect the outlet of the
H2 ZERO
®
system to the cold
water supply to the house.
11.
Open the supply valve to the
H2 ZERO
®
system.
12.
Open hot and cold faucets downstream from the
H2 ZERO
®
system to relieve any air from the plumbing system and
water heaters. Then close the faucets.
13.
Check for leaks. Repair as needed.
14.
The system is now ready for service.
IN
Cold Water
OUT
H2 ZERO
®
Treated Water
Figure 3.
shown with bypass as-sembly.
Service Position
down-flow tank.
As shipped, the bypass is set-up for down-
flow use. The arrow shape of the handles
points in the wrong direction for UP-flow
use. To convert it to UP-flow use, pull up on
the red handles until they come off. Rotate
the handle 180° and put it back on the valve
stem.
Service Position
UP-flow tank.
Bypass Position
UP-flow tank.
Bypass Valve Modification
Summary of Contents for H2zero
Page 1: ...OWNERS MANUAL INSTALLATION GUIDE...
Page 2: ......


