background image

Supplied By www.heating spares.co  Tel. 0161 620 6677

15

Connect the gas supply to the gas service cock using a suitable
jointing compound.This is located at the lower right hand corner
of the appliance.  See fig 29.

4.7

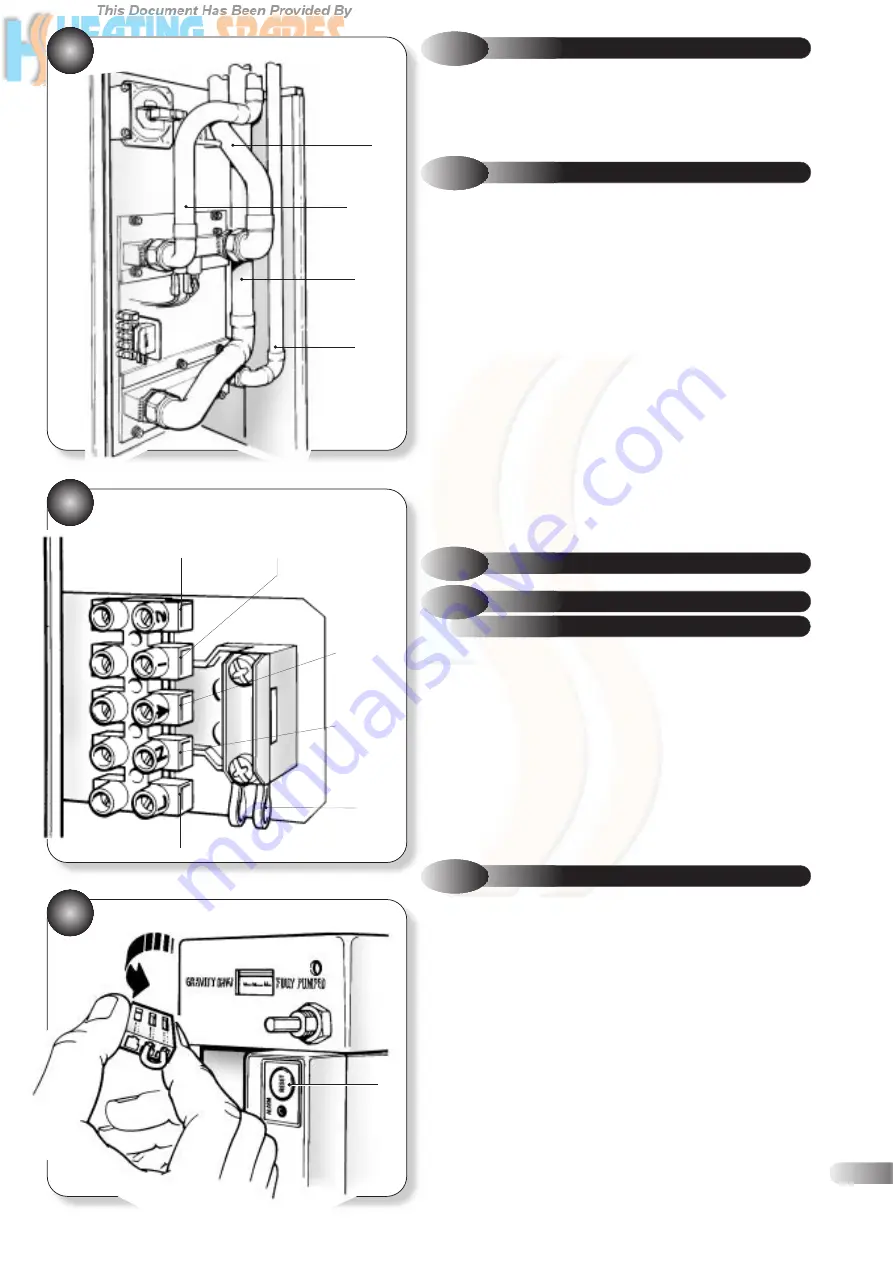
WATER CONNECTIONS

See Section 3.7 for detailed information.

The appliance has two 22mm and two 28mm compression
connections.

The upper two are flow connections and the lower two are return
connections.

FULLY PUMPED CH & DHW SYSTEMS

The flow must be connected to the upper 22mm connection.
The return must be connected to the lower 22mm connection.

PUMPED CH & GRAVITY DHW SYSTEMS

The CH flow must be connected to the upper 22mm connection.

The CH return must be connected to the lower 22mm connection.

The GRAVITY flow must be connected to the upper 28mm
connection and must continue upwards to the cylinder.

The GRAVITY return must be connected to the lower 28mm
connection.

4.8

WIRING INSTRUCTIONS

The appliance comes from the manufacturer with the Aquastat set
for a FULLY PUMPED system since these are the most popular and
give the householder the most economical heating system.
However, should the boiler be installed for use with a combined
PUMPED CH & GRAVITY DHW system, the small ‘jumper’ plug in
the front of the control box must be repositioned in the gravity
position. (fig 24)

Wiring diagrams fo fully pumped and gravity circuits are shown in
Figs 25,26 & 27.

22

PIPEWORK INSTALLATION

23

MAINS WIRING TO BOILER

24

4.8.2

BOILER CONNECTIONS

This boiler must have a permanent mains supply and be earthed.

Connect the mains supply cable, the pump live and the switched
live to the terminal block situated at the front right hand side of
the boiler.  It is essential to clamp all these wires using the cable
clamp adjacent to the terminal block.  Standard colours for the
supply are :- brown - live (L), blue neutral (N) and green/yellow -
earth (E).

The outer insulation on the cable should not be cut back beyond
the cable clamp.

Ensure the earth wire is longer than remaining wires to ensure it
will be the last to become disconnected should excessive strain be
put on the cable.

PUMPED & GRAVITY OPERATION

4.8.1

FULLY PUMPED OR COMBINED

28mm

DHW FLOW

22mm

HEATING

FLOW 

28mm

DHW

RETURN

22mm

HEATING

RETURN

PERMANENT

LIVE

PUMP LIVE
CONNECTION

SWITCHED LIVE
CONNECTION

CABLE

RESTRAINING

CLAMP

N

NEUTRAL

EARTH

RESET
BUTTON

GAS CONNECTION

4.6

Summary of Contents for Best db 30

Page 1: ...st 50 G C No 41 333 52 Best 60 G C No 41 333 53 SUPPLY PRESSURE 20 mbar 0 0 8 6 TO BE LEFT WITH THE USER FOR USE WITH NATURAL GAS ONLY G20 CAST IRON WALL MOUNTED FAN ASSISTED BOILER B R I T I S H M A...

Page 2: ...ne radiator which should be fitted with lockshield valves only Gravity It is recommended that when used on a gravity domestic hot water application a Honeywell C Plus plan or equivalent is fitted to t...

Page 3: ...kw 8 79 11 72 14 65 17 58 Btu hr 30000 40000 50000 60000 kw 5 86 8 79 11 72 Btu hr 20000 30000 40000 60000 kw 11 13 14 75 18 43 22 37 Btu hr 37975 50315 62893 76326 kw 7 71 11 42 14 84 Btu hr 26316 3...

Page 4: ...CT VERTICAL SOCKET 90 ELBOW NON FLANGED STANDARD DUCT 90 ELBOW NON FLANGED EXTENSION DUCT 2 d FLUE WITH 90 BEND TERMINAL DUCT STANDARD DUCT FLANGED ELBOW 90 ELBOW NON FLANGED EXTENSION DUCTS 2 e HORIZ...

Page 5: ...a Standard flue assembly using either side or rear outlet Flue length L measured from the boiler outlet centre line to the outside wall face max 820mm Maximum wall thickness Wr Rear outlet 620mm max M...

Page 6: ...rd flue assembly Equivalent Length Shown is 3045mm Where Lb is 919mm and Lw is 820mm Lw is measured to the outside wall face Fig 4b As 4a but with one additional extension in length Lb Equivalent Leng...

Page 7: ...t length shown is 2325mm Where Lh measured from the top of the boiler casing to the centre line of the extra elbow 551mm and length Lw measured from the centre line of the extra elbow to the outside w...

Page 8: ...LOADED DIAGRAM Drawing amended 7 05 99 79 48 17 47 59 12 4 11 7 13 8 80 5 64 63 81 37 38 39 60 43 21 62 77 19 67 68 66 76 78 26 25 56 49 19 71 75 49 65 73 46 34 35 36 61 55 28 44 15 23 18 19 22 14 30...

Page 9: ...T be installed so that the terminal is exposed to the external air 3 1 STATUTORY REQUIREMENTS 3 2 BOILER LOCATION SAFETY INSTALLATION AND USE REGULATIONS 1984 AS AMENDED It is the law that all gas app...

Page 10: ...temperature difference of 11 C between the flow and return pipes on the boiler The resistance through each model of boiler at the required flow rate may be found in Section 2 3 3 7 WATER SYSTEMS An o...

Page 11: ...MOTORISED VALVE VALVED BY PASS LOOP WATER CONTENT 7 LITRES MINIMUM Fit either two motorised valves or one 3 way motorised valve COLD WATER STORAGE OPEN VENT INDIRECT CYLINDER AUTOMATIC AIR VENT MINIM...

Page 12: ...dequate clearance for fitting the right hand inner case The central heating flow must be connected to the 22mm connection on the top manifold The central heating return must be connected to the 22mm c...

Page 13: ...ned and make the necessary hole s in the ceiling roof Proceed to k f ADDITIONAL ELBOW OR FLANGED DUCT WITH ELBOW Using the wall mounting template and the dimensional information given in section 2 4 2...

Page 14: ...se with the four screws previously removed 4 5 AIR FLUE DUCT INSTALLATION 4 5 1 PREPARING THE AIR FLUE DUCTS If the wall thickness is less than 800mm 31in the air flue duct may be fitted without acces...

Page 15: ...n 425mm L 76mm MAX 319mm 17mm 19 ASSEMBLING THE FLUE SYSTEM TOP 1 SLIDE EXTERNAL SEALING RING UPTO FLUE TERMINAL L 2 STANDARD DUCT Push ducts fully over elbow and drill two 3 3mm dia holes Secure with...

Page 16: ...SEALING RING FIBRE SEAL FITTED 4 5 3 INSTALLING THE AIR FLUE DUCT FROM OUTSIDE THE BUILDING Flue hole diameter 100mm wall liner not necessary a Secure the flue elbow with seal to the appliance using 4...

Page 17: ...conomical heating system However should the boiler be installed for use with a combined PUMPED CH GRAVITY DHW system the small jumper plug in the front of the control box must be repositioned in the g...

Page 18: ...HEATING VALVE HOT WATER VALVE 230V MAINS INPUT OR A B C 4 5 6 8 NOT USED 5 2 1 9 3 8 2 1 10 3 1 2 3 L N E BROWN BLUE GREY ORANGE GREEN YELLOW BROWN BLUE GREY ORANGE GREEN YELLOW 1 3 2 1 2 4 5 2 1 5 1...

Page 19: ...THERMOSTAT 2 1 E N L L N E 9 8 3 2 1 9 2 3 BOILER PUMP 6 3 N L 3 4 N L 6 4 3 2 1 Honeywell ST699B 1002 Link L 5 8 ST 799A ST6400 ST6300 PROGRAMMER 2 Pump Live 1 Switched Live L Permanent Live 230V 50...

Page 20: ...he boiler and system should now be allowed to reach its maximum working temperature and examined for water leaks o Turn off the heating system and drain whilst still hot p Refill and vent ensuring all...

Page 21: ...of the boiler complete with its electrodes d Inspect and if necessary clean the burner assembly If either electrode shows signs of damage or wear replace it e Inspect and if necessary clean the main i...

Page 22: ...ISOLATE the mains electrical supply remove the front painted panel by sliding up and then away from the boiler remove the right hand portion of the inner case by first pulling off the control knob the...

Page 23: ...e the valve manifold assembly from the boiler 7 9 MAIN BURNER a Remove the four screws securing the left hand inner case Remove the case by sliding it forwards and off the appliance b Remove the combu...

Page 24: ...EN YELLOW RED RED WHITE WHITE PINK BROWN BLUE GREEN WHITE GREEN YELLOW GREEN YELLOW BLUE BROWN BLACK PURPLE BLUE RED WHITE WHITE RED BLUE RED BROWN RED BLACK BLACK GREEN YELLOW 2 1 N L ORANGE BLACK OR...

Page 25: ...ignition lockout turn thermostat to maximum setting and ensure programmer is switched on before pressing reset button YES NO Replace the fan Is there 230V at the fan motor Replace the fan YES NO Chec...

Page 26: ...rode All 1 500574 5 Gas Valve Without Ignition Device All 1 500569 6 Ignition Device For Gas Valve All 1 500570 7 Aquastat PCB All 1 600513 8 Thermistor All 1 500572 9 Overheat Cut Off Device All 1 50...

Page 27: ...nd flue are to be positioned and make the necessary hole in the wall s for the air flue duct as defined in section 4 2 c Install the boiler as described in section 4 with the exception of the flue sys...

Page 28: ...ax 01787 474588 SERVICE HOTLINE 01203 351424 Halstead Boilers are continuously improving their products and therefore reserve the right to change specifications without prior notice and accept no liab...

Reviews: