16
2000225008D
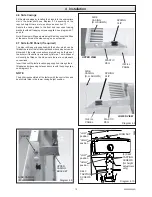
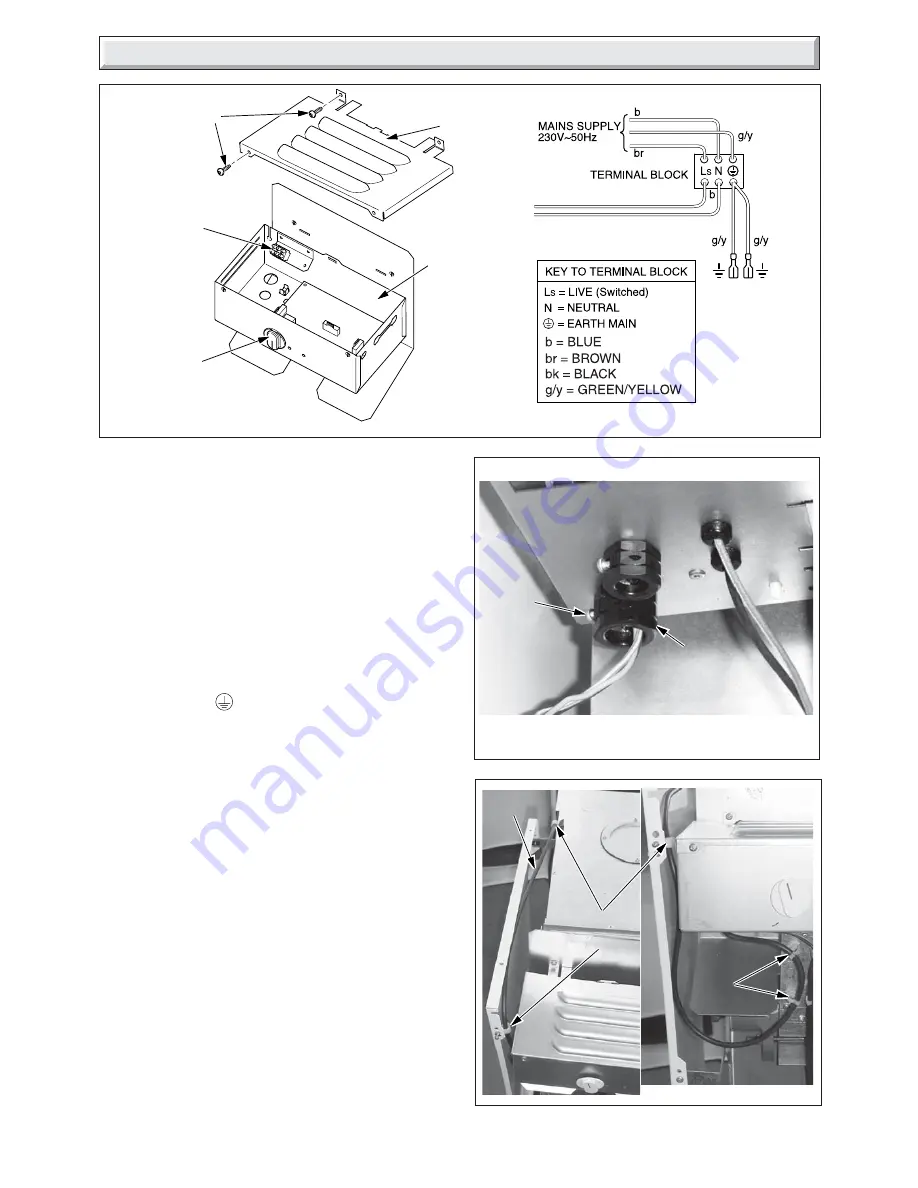
5 Electrical Wiring
MAINS INLET
CONNECTOR
Diagram 5.2
CABLE
CLAMP
SCREW
5.1 Control Box Access
Remove control box cover by undoing the four securing screws
(two on control box, two on the heat shield) and lift off, see
diagram 5.1.
5.2 Electrical Connections
WARNING. This boiler must be earthed.
Take care not to damage any internal wiring.
Using heat resistant (85
o
C) cable of at least 0.75mm
2
(24/
0.2mm) and of a suitable length, route as shown in diagram 5.3.
Thread through the grommet at the bottom rear of the control
box, through the cable clamp and connect to appropriate
terminals. Tighten cable clamp screws, see diagram 5.2.
Standard colours are, brown - live (L), blue - neutral (N) and
green/yellow - earth
.
The mains cable outer insulation must not be cut back external
to the cable clamp.
Make sure the cable is suitably secured.
When making connections make sure that the earth conductor
is made of a greater length than the current carrying conductors,
so that if the cable is strained the earth conductor would be the
last to become disconnected.
5.3 Pump Connection
The pump must be connected to the external controls.
5.4 Testing - Electrical
Checks to ensure electrical safety must be carried out by a
competent person.
After installation of the system, preliminary electrical system
checks as below should be carried out.
1. Test insulation resistance to earth.
2. Test earth continuity and short circuit of all cables.
3. Test the polarity of the mains.
The installer is requested to advise and give guidance to the
user of the controls scheme used with the boiler.
Replace the control box cover.
Diagram 5.3
CABLE
CLAMP
CABLE
CLIPS
CABLE
CLIPS
HEAT RESISTANT
CABLE
bk
CONTROL
BOX
COVER
CONTROL
BOX
SECURING
SCREWS
BOILER
TEMPERATURE
CONTROL
Diagram 5.1
9905
TERMINAL BLOCK CONNECTIONS
TERMINAL
BLOCK


