background image


Instruction Manual PSx3xxSE 


18


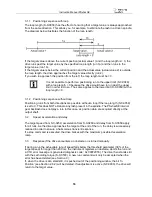
Bring the axle to be positioned all the way to the left (or bottom), run the drive without a loop to 
the smallest position (position 1200) and with the adjustable collar open, and then close the 
adjustable collar. The drive can now run 250 rotations to the right (or top) (default ±100000 
increments). 
 
Bring the axle to be positioned all the way to the right (or top), run the drive to the largest 
position (position 101200) with the adjustable collar open, then close the adjustable collar. The 
drive can now run 250 rotations to the left (or bottom) (default ±100000 increments). 
 
2. 

Mount the drive in the required position on the axle, close the adjustable collar, then 

adjust the positioning range using S-0-0278. The parameter sets the upper end of the 
positioning range. Default setting: upper end at +256 rotations (position 102400). If, after 
mounting the drive, the positioning range does not match the currently displayed position, you 
can select the positioning range b3 …+253 rotations from the current position as 
required. 
Examples: 
After mounting the drive, the position 51200 is displayed (this corresponds to the delivery 
state). The positioning range should point exclusively to the right (or top)  

 +253 rotations: 

 
Positioning range  

=  

actual po scale * number of rotations 

S-0-0278  


S-0-0051 + (400 * S-0-0079 / P-0-0079)  * number of rotations 

152400 


51200      + (400 * 400         / 400         )  * 253 

 
After mounting the drive, position 100000 is displayed. However, the positioning range should 
point exclusively to the right (or top) 

 +253 rotations: 

Positioning range  

=  

actual po scale * number of rotations 

S-0-0278  


S-0-0051 + (400 * S-0-0079 / P-0-0079)  * number of rotations 

201200 


100000    + (400 * 400         / 400         )  * 253 

 
After mounting the drive, position 2000 is displayed. However, the positioning range should 
point exclusively to the left (or bottom) 

 +3 rotations: 

Positioning range  

=  

actual po scale * number of rotations 

S-0-0278  


S-0-0051 + (400 * S-0-0079 / P-0-0079)  * number of rotations 

3200   


2000        + (400 * 400         / 400         )  * 3 

 
The numbers of increments or position values indicated relate to the following settings, which 
correspond to the delivery state: 
Referencing value (S-0-0175) = 0 
Scale for the positional data (S-0-0079 and P-0-0079) = 400 
When the positioning range (S-0-0278) is changed, the upper limit is set to the value 
(positioning range 

– 3 rotations * scale) and the lower limit to the value (positioning range – 

253 rotations * scale). This gives a total positioning range of 250 rotations. 

3.6.2  Scale for the positional data (S-0-0079 and P-0-0079) 

These parameters influence the number of increments generated per rotation. 
The scale can be calculated using the following formula: 

0079

0

0079

0

*

400

P

S

rotation

increments


The most advisable approach is to leave P-0-0079 at 400 and then set the increments/rotation 
using S-0-0079. 
 
Examples: 

Summary of Contents for PS*3**SE series

Page 1: ...l PSx3xxSE halstrup walcher GmbH Stegener Stra e 10 D 79199 Kirchzarten Phone 49 0 76 61 39 63 0 Fax 49 0 76 61 39 63 99 E Mail info halstrup walcher com Internet www halstrup walcher com Document 710...

Page 2: ...e parameters 10 2 7 3 Table of type dependent values 13 2 7 4 Commands 14 2 8 Error messages 14 2 8 1 Error C1D 14 2 8 2 Warnings C2D 15 3 Special features 15 3 1 Positioning 15 3 1 1 Positioning sequ...

Page 3: ...vailable throughout the lifecycle of the instruments It must be provided to any individuals who assume responsibility for operating the instrument at a later date It must include any supplementary mat...

Page 4: ...mbly and the electrical connections should only be handled by professionals They should be given proper training and be authorised by the operator of the facility The instrument may only be operated b...

Page 5: ...time consuming reference run Connecting to a bus system simplifies the wiring A hollow shaft with adjustable collar makes assembly quite simple The positioning system is especially suitable for autom...

Page 6: ...ng of your PSW 2 3 2 Sockets for the bus 1 TD WH GN white green 2 RD WH OG white orange 3 TD GN green 4 RD OG orange Due to the use of 4 pin sockets only four wire cables should be used 2 3 3 Electric...

Page 7: ...setting is 00 the PSE reports to the bus with the address 1 If you set the address using the switches i e switches set to 00 you cannot change this value using the bus 2 6 sercosIII cycle data The IO...

Page 8: ...I O status S 0 1500 00 02 32 47 4 5 Producer RTB word container S 0 0144 48 63 6 7 Torque feedback value S 0 0084 64 95 8 11 Velocity feedback value 1 S 0 0040 96 127 12 15 Position feedback value 1...

Page 9: ...decimal Error text S 0 0095 Error in text form Full text Diagnosis code S 0 0390 Code for errors and or warnings see Section 0 4 hexadecimal Vendor code S 0 1300 0 3 sercosIII Vendor code 10 2 unsign...

Page 10: ...hanges only possible when at a standstill 4 sd Direction of rotation S 0 0055 When looking at the output shaft 16 clockwise 23 counter clockwise Default setting 16 Changes only possible when at a stan...

Page 11: ...nge S 0 0278 Definition of the positioning range relative to the absolute value encoder Unit Min actual position 3 rotations Max actual position 253 rotations Default setting 102400 Changes only possi...

Page 12: ...d with the value 0 Min 0 Max 10 Default setting 0 Changes only possible when at a standstill 2 ud Holding torque at completion of run P 0 0822 Holding torque at completion of run Unit cNm Min 0 Max De...

Page 13: ...5 10 250 250 50 600 600 10 250 250 20 500 500 Holding torque at completion of run P 0 0822 0 180 60 0 300 100 0 600 200 0 200 70 0 400 140 Device type PSW 301 x 311 x 302 x 312 x 305 x 315 8 322 14 33...

Page 14: ...2 8 Error messages Errors C1D and warnings C2D are reported using bits 13 and 12 in the I O status The diagnosis code is stored in S 0 0390 and the diagnosis text in S 0 0095 2 8 1 Error C1D The serco...

Page 15: ...ng a run The new target position is accepted immediately If a change of direction is required the drive brakes using the set deceleration ramp and then approaches the new target value Stop command To...

Page 16: ...sible without a loop if the loop length S 0 0058 is set to 0 This does NOT eliminate any lash present in the spindle The PSx3xxSE internal gear backlash does not play a role in this case as position d...

Page 17: ...ring system capable of covering a range of 256 rotations In order to prevent an overrun if the drive is rotated by an external force when it is switched off the drive can be positioned in a range of 2...

Page 18: ...ons S 0 0278 S 0 0051 400 S 0 0079 P 0 0079 number of rotations 152400 51200 400 400 400 253 After mounting the drive position 100000 is displayed However the positioning range should point exclusivel...

Page 19: ...f rotation S 0 0055 the referencing value S 0 0175 the positioning range S 0 0278 and the upper and lower limits S 0 0049 and S 0 0050 are set to the delivery state 3 6 4 Referencing S 0 0175 and or S...

Page 20: ...n IP 68 at standstill duty cycle Device model Duty cycle in Base time in sec PSE34xx PSE30xx to 33xx PSS PSW 20 30 20 20 300 300 600 600 4 2 Electrical data Nominal power output PSx30xSE PSx31xSE PSE3...

Page 21: ...ollow shaft with adjustable collar PSE31xxSE PSE34xxSE 14H7 hollow shaft with clamp and feather key PSS3xxSE 8 PSW3xxSE 8 8H9 hollow shaft with adj collar or 8h8 solid shaft PSS3xxSE 14 PSW3xxSE 14 14...

Page 22: ...Instruction Manual PSx3xxSE 22...

Reviews: