11
EcoloAir Operation, Maintenance & Service Manual
EA
OMSI/0
1
2
0
09/re
v1/EN
FAN WHEEL REPLACEMENT
It is unlikely the fan wheel will require replacement. However, if the wheel requires balancing, it can
normally be done in the fi eld by a certifi ed fan technician. Should the fan wheel require replacement,
the work should only be performed by a Halton certifi ed fan technician.
BEARING REPLACEMENT
1. Remove belts and the fan sheave. To remove fan sheave, remove the cap bolts and screw
them into the threaded holes in the bushing. Snug up all bolts then continue to tighten each
cap bolt in half turn increments until the sheave comes loose from the bushing. The bushing
and sheave should now slide off the fan shaft.
2. Loosen the set screws on the locking collars of bearing.
3. Remove the fan wheel and fan shaft by sliding the fan shaft out through the bearing collars.
Polishing the fan shaft with emery cloth and some light lubrication on the fan shaft will
make removal much easier.
4. Remove bolts, fastening the bearing to the top and bottom bearing base plates.
5. Re-install equipment in reverse order of removal. Care should be taken to properly tighten
the set screws in the bearing locking collar’ see chart for recommended tightening torque
of set screws.
6. When replacing the fan sheaves, slide sheave and bushing onto the fan shaft and insert the
cap bolts into the non-threaded holes of the bushing and screw into threaded holes in
sheave. Tighten each cap bolt a half turn in rotation until tight.
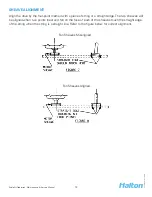
7. Ensure proper belt tension and sheave alignment. The use of straight edge is recommended
to ensure proper alignment and maximum effi ciency.
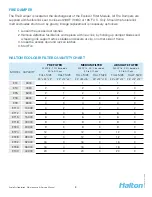
Tightening Torque Recommended for Bearing Set Screws
Fan Shaft Diameter
Set Screw Tightening
Inches
mm
(in.lb.)
(kgm.)
1
25
30
0.04
1 - 3/16
30
40
0.05
1 - 7/16
37
50
0.06
1 - 11/16
43
65
0.08
1 - 15/16
49
65
0.08
2 - 3/16
56
80
0.10
2 - 7/16
62
135
0.16


