background image

15

Instrucciones de uso 

Rx Only: Venta sólo por receta facultativa. Las leyes federales de los Estados 

Unidos restringen la venta de este dispositivo a médicos o por receta facultativa. 

Descripción

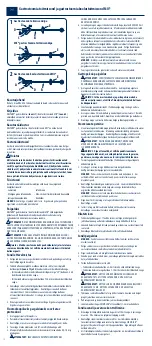
La Sonda para alimentación en bolo (

Fig. 2

) por gastrostomía (

Fig. 1

) MIC* 

de HALYARD* permite el suministro enteral de nutrición y medicamentos 

directamente en el estómago, así como la descompresión gástrica.

Indicaciones de uso

La Sonda para alimentación en bolo por gastrostomía MIC* de HALYARD* está 

indicada para pacientes que requieren alimentación de largo plazo, no toleran la 

alimentación por vía oral, tienen un riesgo bajo de broncoaspiración, requieren 

descompresión gástrica o la administración de medicamentos directamente en 

el estómago.

Contraindicaciones

Entre las contraindicaciones de la colocación de una sonda para alimentación 

por gastrostomía se encuentran las siguientes, sin limitarse a ellas: ascitis, 

interposición colónica, hipertensión portal, peritonitis y obesidad mórbida.


Advertencia

No intente reutilizar, reprocesar ni volver a esterilizar este dispositivo 

médico. La reutilización, el reprocesamiento o la reesterilización 

podría (1) afectar adversamente las propiedades conocidas de 

biocompatibilidad del dispositivo, (2) comprometer la integridad 

estructural del dispositivo, (3) conducir a que el dispositivo no se 

desempeñe como está previsto o, (4) crear riesgo de contaminación 

y causar la transmisión de enfermedades infecciosas que resulten en 

lesiones, patología o la muerte del paciente.

Complicaciones

Las siguientes complicaciones se pueden presentar con el uso de cualquier sonda 

de perfil plano para alimentación por gastrostomía:
•  Lesión en la piel 

•  Infección

•  Tejido de hipergranulación 

•  Úlceras gástricas o duodenales

•  Fuga intraperitoneal 

•  Necrosis por presión

NOTA:


Verifique la integridad del paquete. No lo utilice si el paquete ha sufrido 

algún daño o el aislamiento estéril está comprometido.

Colocación

La Sonda de perfil plano para alimentación en bolo por gastrostomía MIC* de 

HALYARD* se puede colocar quirúrgicamente, de forma percutánea con guía 

fluoroscópica o endoscópica, o como reemplazo de un dispositivo existente 

usando el estoma establecido.

 PRECAUCIÓN: 

PARA GARANTIZAR LA SEGURIDAD Y LA COMODIDAD 

DEL PACIENTE, ANTES DE INSERTAR LA SONDA ES PRECISO REALIZAR UNA 

GASTROPEXIA PARA FIJAR EL ESTÓMAGO A LA PARED ABDOMINAL ANTERIOR, 

IDENTIFICAR EL SITIO DE INSERCIÓN DE LA SONDA, Y DILATAR Y MEDIR EL 

TRACTO DEL ESTOMA.

 PRECAUCIÓN: 

EL BALÓN DE RETENCIÓN DE LA SONDA DE ALIMENTACIÓN 

NO SE DEBE USAR COMO DISPOSITIVO DE GASTROPEXIA. EL BALÓN PODRÍA 

ESTALLAR Y NO FIJAR EL ESTÓMAGO A LA PARED ABDOMINAL ANTERIOR.

 ADVERTENCIA:


El sitio de inserción para lactantes y niños debe ser 

en una parte alta de la curvatura mayor del estómago para evitar que 

el balón inflado ocluya el píloro.

Preparación de la sonda

1.  Seleccione el tamaño adecuado de la sonda para alimentación por 

gastrostomía, saque la sonda del paquete y examínela para ver si está 

dañada.

2.  Use una jeringa Luer Slip para inflar el balón con agua estéril o destilada a 

través del puerto del balón (

Fig. 1C y 2C

).

  •   Para sondas de volumen bajo identificadas con LV después del número de 

REF infle el balón con 3-5 mL de agua estéril o destilada 

  •   Para sondas estándar infle el balón con 7-10 mL de agua estéril o destilada 
3.  Quite la jeringa y apriete ligeramente el balón entre los dedos para ver si hay 

fugas. Examine el balón visualmente para verificar su simetría. Para hacer 

que el balón quede simétrico, hágalo rodar suavemente entre los dedos. 

Vuelva a insertar la jeringa y saque toda el agua del balón.

4.  Lubrique la punta de la sonda con un lubricante hidrosoluble. No use aceite 

mineral. No use vaselina.

Procedimiento recomendado de colocación 

radiológica

1.  Coloque al paciente en decúbito supino.
2.  Prepare y sede al paciente según el protocolo clínico.
3.  Cerciórese de que el lóbulo izquierdo del hígado no se encuentre sobre el 

fondo o el cuerpo gástrico.

4.  Identifique el borde medial del hígado mediante una tomografía 

computarizada o un ultrasonido.

5.  Para reducir la peristalsis gástrica se puede administrar glucagón  

0,5 a 1,0 mg IV.


 PRECAUCIÓN: 

CONSULTE LAS INSTRUCCIONES DEL GLUCAGÓN 

PARA DETERMINAR LA VELOCIDAD DE LA INYECCIÓN IV Y LAS 

RECOMENDACIONES PARA USAR EN DIABÉTICOS DEPENDIENTES DE 

INSULINA.

6.  A través de una sonda nasogástrica insufle el estómago, usualmente con 500 

a 1000 mL de aire o hasta obtener una distensión adecuada. A menudo es 

necesario continuar la insuflación durante el procedimiento, especialmente 

durante la punción con la aguja y la dilatación del tracto, para mantener el 

estómago distendido de forma que la pared gástrica quede contra la pared 

abdominal anterior.

7.  Elija un sitio para insertar el catéter en la región subcostal izquierda, 

preferiblemente sobre el aspecto lateral, o lateral al músculo recto 

abdominal (N.B. la arteria epigástrica superior cursa a lo largo del aspecto 

medial del músculo recto) y directamente sobre el cuerpo del estómago, 

hacia la curvatura mayor. Con la ayuda de fluoroscopia, elija un sitio que 

permita la trayectoria más vertical posible para la aguja. Si sospecha 

interposición del colon o que la posición del intestino delgado sea anterior 

al estómago, obtenga una radiografía lateral con rayo horizontal antes de 

colocar la gastrostomía.


NOTA:

 Para opacar el colon transverso se puede administrar medio de 

contraste PO/NG la noche anterior, o administrar un enema antes de la 

colocación.

8.  Prepare y coloque los campos estériles según el protocolo institucional.

Colocación de la gastropexia


 PRECAUCIÓN: 

SE RECOMIENDA REALIZAR UNA GASTROPEXIA DE 

TRES PUNTOS EN CONFIGURACIÓN TRIANGULAR PARA ASEGURAR QUE LA 

PARED GÁSTRICA QUEDE FIJADA A LA PARED ABDOMINAL ANTERIOR.

1.  Haga una marca en la piel en el sitio donde insertará la sonda. Defina la 

forma de la gastropexia colocando tres marcas cutáneas equidistantes del 

sitio de inserción de la sonda, en una configuración triangular.

  ADVERTENCIA: Para evitar interferencia del T-Fastener y el balón inflado, deje 

suficiente espacio entre el sitio de inserción y la gastropexia.

2.  Localice los sitios de punción con lidocaína al 1% y administre anestesia local 

a la piel y el peritoneo.

3.  Coloque el primer T-Fastener y confirme su posición dentro del estómago. 

Repita el procedimiento hasta que los tres T-Fasteners estén insertados en 

las esquinas del triángulo.

4.  Fije el estómago a la pared abdominal anterior y termine el procedimiento.

Cree el tracto del estoma

1.  Haga el tracto del estoma con el estómago aún insuflado y en aposición con 

la pared abdominal. Identifique el sitio de la punción en el centro del patrón 

de la gastropexia. Con ayuda de fluoroscopia, confirme que el sitio recubre 

el cuerpo distal del estómago debajo del reborde costal y sobre el colon 

transverso.


 PRECAUCIÓN: 

EVITE LA ARTERIA EPIGÁSTRICA QUE CURSA EN LA 

UNIÓN ENTRE LOS DOS TERCIOS MEDIALES Y EL TERCIO LATERAL DEL 

MÚSCULO RECTO.


 ADVERTENCIA:


Para evitar perforar la pared gástrica posterior, 

el páncreas, el riñón izquierdo, la aorta o el bazo, no inserte la 

aguja de punción demasiado profundamente.

2.  Anestesie el sitio de la punción con una inyección local de lidocaína al 1% en 

la superficie peritoneal.

3.  Inserte una aguja introductora compatible de 0,038 pulg. en el centro del 

patrón de gastropexia dentro de la luz del estómago.

  NOTA: El mejor ángulo de inserción para colocar una sonda de gastrostomía 

es de 90 grados respecto a la superficie cutánea. Si se espera realizar una 

gastroyeyunostomía  endoscópica percutánea, la aguja se debe dirigir hacia 

el píloro.

4.  Verifique la colocación correcta de la aguja mediante fluoroscopia. Para 

mayor verificación, puede acoplar una jeringa llena de agua al cubo de la 

aguja y aspirar aire de la luz del estómago.


NOTA:

 Al devolver el aire, se puede inyectar medio de contraste para visualizar 

los pliegues gástricos y confirmar la posición.

5.  Haga avanzar un alambre guía de punta en J de hasta 0,038 pulg. al 

estómago a través de la aguja. Confirme la posición.

6.  Retire la aguja introductora dejando el alambre guía de punta en J en su 

lugar, y deséchela según el protocolo institucional.

Dilatación

1.  Con una hoja de bisturí #11 haga una pequeña incisión cutánea a lo largo del 

alambre guía, a través del tejido subcutáneo y de la fascia de los músculos 

abdominales. 

2.  Haga avanzar un dilatador sobre el alambre guía y dilate el tracto del estoma 

hasta obtener el tamaño deseado.

3.  Retire el dilatador dejando el alambre guía en su lugar.

Colocación de la sonda


NOTA:


Se puede utilizar una vaina despegable para ayudar a hacer avanzar la 

sonda a través del tracto del estoma.

1.  Seleccione la sonda de alimentación por gastrostomía adecuada y prepárela 

según las instrucciones de la sección “Preparación de la sonda” que figuran 

arriba.

2.  Haga avanzar el extremo distal de la sonda hasta el estómago sobre el 

alambre guía a través del tracto del estoma.

3.  Verifique que la sonda se encuentre en el estómago, retire el alambre guía o 

la vaina despegable que se haya utilizado, e infle el balón.

4.  Infle el balón con una jeringa Luer Slip.
  •  Infle el balón LV con 3-5 mL de agua estéril o destilada.
  •  Infle el balón estándar con 7-10 mL de agua estéril o destilada.
 

 PRECAUCIÓN:

 NO EXCEDA UN VOLUMEN TOTAL DE 7 ML DENTRO DEL 

BALÓN LV. NO USE AIRE. NO INYECTE MEDIO DE CONTRASTE EN EL BALÓN.


 PRECAUCIÓN: 

NO EXCEDA UN VOLUMEN TOTAL DE 15 ML DENTRO DE 

EL BALÓN ESTÁNDAR. NO USE AIRE. NO INYECTE MEDIO DE CONTRASTE EN 

EL BALÓN.

5.  Tire de la sonda hacia arriba muy suavemente hasta que el balón entre en 

contacto con el interior de la pared gástrica.

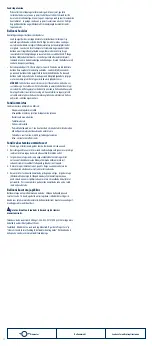
Sonda MIC* para alimentar por gastrostomía y Sonda MIC* para alimentar en bolo por 

gastrostomía 

 s

Sonda de alimentación por gastrostomía 

Sonda MIC* de alimentación por gastrostomía 

Sonda MIC* para alimentar en 

bolo por gastrostomía 

D

C

B

E

A

D

C

B

E

1

2

A

D

C

E

A

B

Summary of Contents for MIC

Page 1: ...MIC GASTROSTOMY FEEDING TUBE AND BOLUS GASTROSTOMY FEEDING TUBE Instructions for Use...

Page 2: ...us Gastrostomy FeedingTube A A D D C C B B E E A D C B E 1 2 Do not use if package is damaged Caution Rx Only Sterilized by Gamma Irradiation Do not resterilize Diameter BalloonVolume Consult instruct...

Page 3: ...exy pattern by placing three skin marks equidistant from the tube insertion site and in a triangle configuration Warning Allow adequate distance between the insertion site and gastropexy placement to...

Page 4: ...ove 3 Lubricate the distal end of the tube with water soluble lubricant and gently insert the Gastrostomy through the stoma into the stomach 4 Using the Luer slip syringe inflate the balloon Inflate t...

Page 5: ...ormulas such as concentrated or enriched formulas that are generally thicker and more likely to obstruct tubes Formula contamination that leads to coagulation Reflux of gastric or intestinal contents...

Page 6: ...a paroi abdominale ant rieure 7 Choisir un site d insertion du cath ter dans la r gion sous costale gauche de pr f rence au dessus de la face lat rale ou lat ralement au muscle grand droit de l abdome...

Page 7: ...etractusdelastomie 1 S lectionner la sonde d alimentation gastrostomique appropri e et la pr parer selon les instructions de la section sur la pr paration de la sonde figurant ci dessus 2 Faire progre...

Page 8: ...ts acides du type jus de canneberges et boissons au cola pour rincer les sondes d alimentation Entretien du ballonnet V rifier le volume d eau dans le ballonnet une fois par semaine Ins rer une sering...

Page 9: ...ne Kathetereinf hrstelle im linken subkostalen Bereich ausw hlen vorzugsweise ber dem seitlichen Aspekt oder seitlich vom Musculus rectus abdominis Bemerkung die superiore epigastrische Arterie l uft...

Page 10: ...ls verwendet entfernen und den Ballon auff llen 4 Den Ballon mit der Luer Slip Spritze auff llen Einen Niedrigvolumen Ballon LV Ballon mit 3 5 ml sterilem oder destilliertemWasser f llen Einen Standar...

Page 11: ...neten Menge vergleichen und in der Patientenakte dokumentieren Wenn die Menge geringer als die empfohlene oder verordnete Menge ist den Ballon neuerlich mit dem vorher abgesaugten Wasser f llen und an...

Page 12: ...2 3 4 Bolus HALYARD MIC 1 2 Luer 1 2 LV REF code number 3 5 7 10 3 4 1 2 3 4 5 0 5 1 0 Glucagon 6 500 1000 7 rectus abdominis N B PO NG 8 1 2 1 3 4 1 RECTUS ABDOMINIS 2 1 3 0 038 PEGJ 4 5 J 0 038 6 1...

Page 13: ...1 8 1 10 2 SECUR LOK 1 2 3 1 EGD 2 1 3 3 4 1 2 1 3 4 1 RECTUS ABDOMINIS 2 1 3 0 038 PEGJ 4 5 J 0 038 6 1 11 2 3 1 2 3 4 luer 3 5 7 10 7 15 5 6 7 SECUR LOK 1 2 1 8 1 10 2 SECUR LOK 1 2 3 1 2 3 360 4 5...

Page 14: ...14 formula 4 6 8 formula 30 60 10 50 3 10 360 2 3 4 6 8 Luer 10 20 1 2 3 4 3 5 1 8 1 844 425 9273 halyardhealth com...

Page 15: ...el aspecto lateral o lateral al m sculo recto abdominal N B la arteria epig strica superior cursa a lo largo del aspecto medial del m sculo recto y directamente sobre el cuerpo del est mago hacia la c...

Page 16: ...pared g strica 6 Limpie el l quido o lubricante residual de la sonda y el estoma 7 Deslice suavemente el anillo SECUR LOK hasta que est aproximadamente 1 2 mm por encima de la piel Compruebe la posic...

Page 17: ...para llenar el bal n hasta el volumen de agua recomendado o prescrito Mientras desinfla el bal n tenga en cuenta que podr a haber fugas de contenido g strico alrededor de la sonda Anote el volumen de...

Page 18: ...ln k musculus rectus abdominis nota bene horn epigastrick art rie b pod l st edn ho aspektu kone n ku a p mo nad t lesem aludku k velk mu zak iven S pou it m fluoroskopie zvolte m sto kter umo n co m...

Page 19: ...zduch nebo obsah aludku vypl chn te trubici 2 Zkontrolujte zda je kolem stomy p tomn vlhkost Pokud existuj zn mky niku tekutiny ze aludku zkontrolujte polohu trubice a um st n krou ku SECUR LOK P idej...

Page 20: ...e trubici v jej poloze s pou it m p sky pot postupujte podle protokolu zdravotnick ho za zen a nebo zavolejte l ka i aby v m dal dal pokyny POZN MKA Bal neknapl teznovuspou it msteriln nebodestilovan...

Page 21: ...tur V lg ved hj lp af fluoroskopi et sted der muligg r s direkte en lodret kanylebane som muligt F en lateralt billede p tv rs af bordet forud for anl ggelse af gastrostomi n r der er mistanke om inte...

Page 22: ...p 1 2 ml Ballonkapaciteten som angivet ovenfor m ikke overskrides 3 Ern ring m f rst p begyndes n r fri passage og korrekt anl ggelse er bekr ftet og i henhold til l gens anvisninger Sondefjernelse 1...

Page 23: ...ets protokol og eller ring til l gen for at f anvisning i hvad der skal g res BEM RK Fyldballonenigenmedsteriltellerdestilleretvand ikkemedluft ellerfysiologisksaltvand Saltvandkankrystallisereogtilst...

Page 24: ...ipaistmatuksmuutmiseksv ib enne paigaldustoraalseltv inasogastraalseltmanustadakontrastainetv iteha paigalduseeelklistiiri 8 Teostage ettevalmistus ja katmine vastavalt asutuse eeskirjadele Gastropeks...

Page 25: ...ballooniporti ja t hjendage balloon t ielikult vedelikust 5 K hule vajutades t mmake sond ettevaatliku kuid kindla liigutusega v lja M RKUS Vastupanukorralniisutagesondijastoomiveeslahustava m rdeaine...

Page 26: ...dieba igekinnituse Sondi ummistus Sondi ummistuse p hjuseks on ldiselt Ebapiisavad loputusmeetodid Maoj kide m tmise j rel sondi loputamata j tmine Ravimi vale manustamine Tabletiosakesed Viskoossed r...

Page 27: ...ALYARD 1 2 3 4 MIC HALYARD E 1 2 luer 1C 2C LV REF 3 5 ml 7 10 ml 3 4 1 2 3 4 o o o 5 0 5 1 0 mg IV 6 500 1 000 ml 7 8 1 T 2 1 3 T 4 1 2 1 3 0 038 PEGJ 4 5 J 0 038 6 J 1 11 2 3 1 bolus MIC G MIC MIC D...

Page 28: ...CUR LOK 1 2 ml 3 1 EGD 2 3 4 1 T 2 1 3 T 4 1 2 1 3 0 038 PEGJ 4 5 J 0 038 6 J 1 11 2 3 1 2 3 4 luer LV 3 5 ml 7 10 ml 7 ML LV 15 ML KANONIKO 5 6 7 SECUR LOK 1 2 mm 1 8 1 10 ml 2 SECUR LOK 1 2 ml 3 1 2...

Page 29: ...29 4 6 8 30 60 cc 10 50 ml 3 10 ml 360 90 2 3mm 4 6 8 luer 10 20 1 2 3 4 3 5 1 8 pH 1 844 425 9273 halyardhealth com A guide to Proper Care Stoma Site and Enteral FeedingTubeTroubleshooting Guide...

Page 30: ...ere nella regione sottocostale sinistra preferibilmente sopra l aspetto laterale o lateralmente al muscolo retto dell addome N B l arteria epigastrica superiore passa lungo l aspetto mediale del musco...

Page 31: ...e il palloncino con la siringa Luer slip Insufflare il palloncino LV con 3 5 ml di acqua distillata o sterile Insufflare il palloncino standard con 7 10 ml di acqua distillata o sterile ATTENZIONE NON...

Page 32: ...itta ri riempire il palloncino con l acqua inizialmente rimossa quindi prelevare ed aggiungere la quantit necessaria a portare il volume nel palloncino fino al valore consigliato e prescritto Tenere p...

Page 33: ...rnas sagrie anos vai tiev s zarnas sagrie anos ku a priek pus PIEZ ME PO NGkontrastvieluvarievad tiepriek j vakar pirms proced ras iesp jamsar veiktklizmutie ipirmsproced ras laivizualiz tu colontrans...

Page 34: ...aro anu tikai p c tam kad esat p rliecin ju ies par zondes novietojuma pareiz bu un caurlaid bu un veiciet to saska ar rsta nor d jumiem Zondes iz em ana 1 Pirmk rt p rliecinieties vai tipa zondi dr k...

Page 35: ...ri un sekojiet iest des protokolam un vai vaic jiet padomu rstam PIEZ ME Piepildietbalonunojauna izmantojotsteriluvaidestil tu deni nevisgaisuvais u dumu S u dumsvarkristaliz tiesunaizsprostot balonav...

Page 36: ...mens pavir i ir tiesiai vir skrand io k no link did iosios skrand io kreiv s Fluoroskopi kai kontroliuodami pasirinkite viet kur vertikalus adatos kelias b t kaip galima tiesesnis tariant kad gaubtin...

Page 37: ...iedo nustatym Reikalui esant 1 2 ml padalomis papildykite skys io Nevir ykite bendros anks iau nurodytos balion lio talpos 3 Maitinti pagal gydytojo nurodymus prad kite tik tuomet kai sitikinsite rei...

Page 38: ...balion l sterilausardistiliuotovandens betne oroarfiziologiniotirpalo Fiziologinistirpalasgalikristalizuotisiru kim ti balion liovo tuv arbaspind ooruinutek jusbalion lisgalisubli k ti B tinainaudokit...

Page 39: ...ectus k z ps tengelye ment n halad s k zvetlen l a gyomor f l tt a nagyobb g rb let fel Fluoroszk pia seg ts g vel v lasszon olyan helyet ahol a t f gg legesen bevezethet A gastrostomia behelyez se el...

Page 40: ...hoz Sz vjon fel gastricus tartalmat Leveg vagy gastricus tartalom jelenl te eset n bl tse ki a cs vet 2 Ellen rizze p r t a szt ma k r l Ha gastricus sziv rg s jelei l that k ellen rizze a cs hely t s...

Page 41: ...je meg az elj r st A ballon sziv rog ha folyad kot vesztett s ki kell cser lni a cs vet A leeresztett vagy kirepedt ballon miatt kilazulhat vagy elmozdulhat a cs Ha a ballon kirepedt ki kell cser lni...

Page 42: ...ie en de dilatatie van de tractus om de maag opgezet te houden zodat de maagwand tegen de voorste buikwand wordt gedrukt 7 Kies een katheterinbrengplaats in het linker subcostale gebied bij voorkeur b...

Page 43: ...ngssonde voor gastrostomie en bereid deze voor volgens de aanwijzingen in het bovenstaande gedeelte Voorbereiding van de sonde 2 Voer het distale uiteinde van de sonde over de voerdraad via de stomatr...

Page 44: ...ulpoort in en verwijder de vloeistof terwijl u de sonde op zijn plaats houdt Vergelijk de hoeveelheid water in de injectiespuit met de aanbevolen hoeveelheid of de hoeveelheid die aanvankelijk is voor...

Page 45: ...cross table sidebilde f r gastrostomianleggelsen ved mistanke om en interponert kolon eller tynntarm som ligger anterior til magesekken MERK PO NG kontrastmiddelkanadministrereskveldenf rellerdetkan a...

Page 46: ...e deg at denne typen sonde kan utskiftes ved sengekanten 2 Samle sammen alt utstyr og tilbeh r rengj r hendene med aseptisk teknikk og sett p deg rene pulverfrie hansker 3 Drei sonden 360 grader for s...

Page 47: ...luft kan sive ut og for rsake at ballongen kollapser S rg for bruke anbefalt mengde vann da overfylling kan blokkere lumen eller minske ballongens levetid og underfylling vil ikke holde ballongen fes...

Page 48: ...onieczne utrzymanie wdmuchiwania powietrza w czasie procedury zw aszcza podczas przek uwania ig i rozszerzania przewodu do utrzymania rozd tego o dka tak aby ciana o dka przylega a do przedniej ciany...

Page 49: ...ci 3 Wyj rozszerzacz po prowadniku pozostawiaj c prowadnik na miejscu Umieszczenie zg bnika UWAGA Oddzielanaos onkamo eby u ytadou atwieniaprzesuwaniazg bnika przezotw rstomijny 1 Wybra odpowiedni zg...

Page 50: ...p ukiwa zg bnik ywieniowy przed i po ka dym podaniu lek w Unika u ywania kwa nych rodk w przep ukuj cych takich jak sok urawinowy i napoje gazowane do przep ukiwania zg bnik w Konserwacja balonika Nal...

Page 51: ...tendido de forma que a parede g strica fique contra a parede abdominal anterior 7 Escolha um local para inserir o cateter na regi o subcostal esquerda de prefer ncia sobre o aspecto lateral do m sculo...

Page 52: ...a no est mago retire o fio guia ou a bainha descol vel que se tenha utilizado e encha o bal o 4 Encha o bal o utilizando uma seringa Luer Slip Encha o bal o de LV baixo volume com 3 a 5 ml de gua est...

Page 53: ...quantidade de gua na seringa com a quantidade recomendada ou a quantidade prescrita inicialmente e anotada no registo do doente Se a quantidade for menor que a recomendada ou prescrita volte a encher...

Page 54: ...e alege un loc de introducere a cateterului n regiunea sub costal st ng de preferat deasupra aspectului lateral sau lateral fa de mu chiul rectus abdominal N B artera superioar epigastric se desf oar...

Page 55: ...i Verificarea pozi iei i func ionalit ii tubului 1 A se ata a o sering cu v rf de cateter con in nd 10 ml de ap la orificiul de alimentare A se aspira con inutul gastric Dup ce s a inspectat con inutu...

Page 56: ...rge dac a pierdut lichid i tubul va trebui nlocuit Un balon dezumflat sau rupt poate provoca deplasarea din loc sau ie irea tubului Dac balonul este rupt va trebui s fie nlocuit A se fixa tubul n loc...

Page 57: ...Only 1 2 HALYARD MIC HALYARD MIC 1 2 3 4 HALYARD MIC 1 2 1C 2C LV 3 5 7 10 3 4 1 2 3 4 5 0 5 1 IV IV 6 500 1000 7 8 1 2 1 3 4 1 2 1 3 038 90 4 5 038 6 1 11 2 MIC R MIC MIC D C B E A D C B E 1 2 A D C...

Page 58: ...5 5 6 7 SECUR LOK 1 2 1 10 2 SECUR LOK 1 2 3 1 2 3 4 1 2 1 3 4 1 2 1 3 038 90 4 5 038 6 1 11 2 3 1 2 3 4 LV 3 5 7 10 LV 7 15 5 6 7 SECUR LOK 1 2 1 10 2 SECUR LOK 1 2 3 1 2 3 360 4 5 1 2 3 4 LV 3 5 7 1...

Page 59: ...59 4 6 8 30 60 10 50 3 10 360 2 3 4 6 8 10 20 1 2 3 4 3 5 1 8 pH 1 844 425 9273 halyardhealth com...

Page 60: ...n ka a priamo nad telesom al dka k ve k mu zakriveniu S pou it m flu roskopie zvo te miesto ktor umo n o mo no najpriamej iu zvisl cestu ihly Ak m te podozrenie na presah hrub ho alebo tenk ho reva p...

Page 61: ...kat terovou pi kou naplnen 10 ml vody k vy ivovaciemu otvoru Aspirujte obsah al dka Ke spozorujete vzduch alebo al do n obsah vypl chnite trubicu 2 Skontrolujte i je kolem st my pr tomn vlhkos Ak exi...

Page 62: ...menu jej polohy Ak je bal nik pretrhnut bude sa musie vymeni Zaistite trubicu v jej polohe s pou it m p sky potom postupujte pod a protokolu zdravotn ckeho zariadenia a alebo zavolajte lek rovi aby v...

Page 63: ...sto ki omogo a tako neposredno navpi no pot igle kot je le mogo e Poglejte si lateralni predel e z druge strani e preden opravite gastrostomijo e sumite da je kolon ali tanko revo pred elodcem OPOMBA...

Page 64: ...jte teko ino v korakih od 1 2 ml Ne prekora ite kapacitete balona kot e prej omenjeno 3 S hranjenjem za nite ele ko ste potrdili prepustnost in polo aj cevke in v skladu z navodili zdravnika Odstranit...

Page 65: ...rilnoalidistiliranovodo nezzrakom alisolnoraztopino Solnaraztopinalahkokristalizirainzama iventilalilumen balona zraklahkouhajaveninpovzro i dasebalonsesede Zagotovite priporo enokoli inovode kerpreve...

Page 66: ...n mediaaliosaa pitkin suoraan mahanrungon p lt mahan suurta kaarrosta kohti Valitse l pivalaisulla kohta jossa neula voidaan vied sis n mahdollisimman pystysuorassa Tarkista ennen maha avanteen tekemi...

Page 67: ...n sijainnin ja avoimuuden varmistaminen 1 Kiinnit 10 ml vett sis lt v katetrik rkinen ruisku ruokintaporttiin Aspiroi mahansis lt Huuhtele letku kun ruiskuun tulee ilmaa tai mahansis lt 2 Tarkista onk...

Page 68: ...heuttaa letkun siirtymisen paikaltaan Jos pallo repe letku on vaihdettava uuteen Kiinnit letku paikalleen teipill ja noudata sen j lkeen laitoksen k yt nt ja tai ota yhteys l k riin ohjeita varten HUO...

Page 69: ...tura major V lj under r ntgengenomlysning ut en plats som till ter en s rakt vertikal n lbana som m jligt Erh ll en lateral korstabellvy innan gastrostomin l ggs n r det kan misst nkas att en del av k...

Page 70: ...a efter behov i portioner om 1 2 mL verskrid inte den ovan angivna totala ballongvolymen 3 P b rja matning endast efter att det bekr ftats att sonden r ppen och i korrekt l ge enligt l karens f reskri...

Page 71: ...karen f r anvisningar OBS Fyllp ballongenmedsteriltellerdestilleratvatten intemedlufteller fysiologiskkoksaltl sning Koksaltl sningkanbildakristallerocht ppaigen ballongventilenellerlumen ochluftkansi...

Page 72: ...undan phelenildi inde gastronomi yerle tirilmeden nce apraz tablo yandan g r n m elde edin NOT Transverskolonuopakla t rmaki inbir ncekigecePO NGkontrast veya birenemauygulanabilir 8 Tesis protokol ne...

Page 73: ...nizi temizleyin ve temiz pudras z eldiven tak n 3 Borunun kolayca hareket etti inden emin olmak i in 360 derece d nd r n 4 Kateter u l r ngay balon giri ine s k ca sokun ve balondan s v n n tamam n ek...

Page 74: ...r veya balon mr n k saltabilir bunun yan s ra az su kullan m borunun tam oturmamas na yol a abilir Boru Okl zyonu Boru okl zyonu genelde u sebeplerden t r meydana gelir K t temizleme teknikleri Gastri...

Page 75: ...3 4 HALYARD MIC X 1 2 1 C 2 C REF LV 3 5 ml 7 10 ml 3 4 1 2 3 4 CT 5 0 5 1 0 mg IV IV 6 500 1 000 ml 7 NG 8 1 T 2 1 3 T 3 T 4 1 2 3 1 3 2 1 3 038 90 PEGJ 4 5 038 6 J 1 11 2 3 1 2 3 4 3 5 ml LV MIC j...

Page 76: ...1 2 ml 3 1 EGD 2 1 3 3 4 1 T 2 1 3 T 3 T 4 1 2 3 1 3 2 1 3 038 90 PEGJ 4 5 038 6 1 11 2 3 1 2 3 4 3 5 ml LV 7 10 ml LV 7 ML 15 ML 5 6 7 SECUR LOK 1 3 mm 1 10 ml 2 SECUR LOK 1 2 ml 3 1 2 3 360 4 5 1 2...

Page 77: ...R 2 STERILIZE 30 60 cc 10 50 ml 3 10 ml 1 1 4 360 90 2 3 mm 4 6 8 1 10 20 1 2 3 4 3 5 1 8 pH 1 844 425 9273 www halyardhealth com A Guide to Proper Care Stoma Site and Enteral Feeding Tube Troublesho...

Page 78: ...C 1 2 3 4 HALYARD MIC 1 2 Luer 1C 2C REF LV 3 5ml 7 10ml 3 4 1 2 3 4 CT 5 0 5 1 0mg IV IV 6 500 1000ml 7 N B PO NG 8 3 1 3 T 2 1 3 T T 4 1 2 3 1 3 2 1 3 0 038 PEGJ 4 5 J 0 038 6 J 1 11 2 3 MIC K MIC M...

Page 79: ...8 1 10ml 2 SECUR LOK 1 2ml 3 1 EGD 2 1 3 3 4 3 1 3 T 2 1 3 T T 4 1 2 3 1 3 2 1 3 0 038 PEGJ 4 5 J 0 038 6 J 1 11 2 3 peel away sheath 1 2 3 peel away sheath 4 Luer 3 5ml LV 7 10ml LV 7ML 15ML 5 6 7 S...

Page 80: ...80 5 6 7 SECUR LOK 1 2mm 1 8 8 4 6 8 30 60cc 10 50ml 3 10ml 360 1 4 2 3mm 4 6 8 1 Luer 10 20 1 2 3 4 3 5 30 pH 1 844 425 9273 halyardhealth com 2 STERILE R 2 STERILIZE...

Page 81: ...2 3 4 HALYARD MIC 1 2 1C 2C REF LV 3 5 ml 7 10 ml 3 4 1 2 3 4 CT 5 0 5 1 0mg 6 500 1000 ml 7 PO NG 8 1 T 2 1 3 T T 4 1 2 1 3 038 90 PEGJ 4 5 J 038 6 J 1 11 2 3 1 2 3 4 3 5 ml LV MIC C 0112 MIC 0100 MI...

Page 82: ...2 ml 3 1 EGD 2 3 4 1 T 2 1 3 T T 4 1 2 1 3 038 90 PEGJ 4 5 J 038 6 J 1 11 2 3 1 2 3 4 3 5 ml LV 7 10 ml LV 7 ML 15 ML 5 6 7 SECUR LOK 1 2 mm 1 8 in 1 10 ml 2 SECUR LOK 1 2 ml 3 1 2 3 360 4 5 1 2 3 4 3...

Page 83: ...83 10 50 ml 3 10 ml 360 1 4 2 3mm 4 6 8 10 20 1 2 3 4 3 5 1 8 pH 1 844 425 9273 halyardhealth com 2 STERILE R 2 STERILIZE...

Page 84: ...84...

Page 85: ...85...

Page 86: ...86...

Page 87: ...87...

Page 88: ...rkway Alpharetta GA 30004 USA Halyard Belgium BVBA Leonardo Da Vincilaan 1 1930 Zaventem Belgium Sponsored in Australia by Halyard Australia Pty Limited 52 Alfred Street Milsons Point NSW 2061 2 1 Reg...

Reviews: