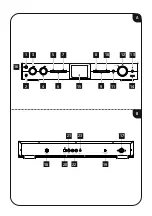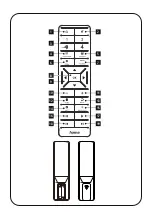
5
5.2 Switching ON
Warning
•
Only operate the product from a socket that has been
approved for the device. The socket must be installed
close to the product and must be easily accessible.
•
Disconnect the product from the power supply using
the On/Off switch – if this is not available, unplug the
power cord from the socket.
•
If using a multi-socket power strip, make sure that the
total power consumption of all connected devices does
not exceed the power strip's maximum throughput
rating.
•
If you will not be using the product for a prolonged
period, disconnect it from mains power.
•
Connect the power supply to the mains connection (1)
on the back of the radio.
•
Connect the network cable to a properly installed and
easily accessible network socket.
•
Wait until the radio has initialised fully.
•
Press [
POWER
] (1) to switch on the radio.
Note – switching on for the first time
•
The Setup Wizard starts up automatically when the
radio is turned on for the first time.
•
The language can be set during commissioning. To
do this, use the rotary control to select the required
language and confirm your choice by pressing
[
NAVIGATION
] (12).
•
You can skip the wizard.
5.3 Language
To change radio's menu language, proceed as follows:
•
Press [
MENU
] (8) to access the Settings menu.
•
Use [
NAVIGATION
] (12) to navigate to the "Settings"
menu item.
•
Confirm the selection by pressing [
NAVIGATION
] (12).
•
Use [
NAVIGATION
] (12) to navigate to the "Language"
menu item. Confirm the selection by pressing
[
NAVIGATION
] (12).
•
Use [
NAVIGATION
] (12) to select your preferred system
language.
•
The language setting currently selected is marked with
an asterisk (*).
Note
•
The following languages are available:
English, German, Danish, Dutch, Finnish, French,
Italian, Norwegian, Polish, Portuguese, Spanish,
Swedish,Turkish, Czech and Slovak.
6. Care and Maintenance
•
Only clean this product with a slightly damp, lint-free
cloth and do not use aggressive cleaning agents.
•
If you do not plan to use the product for a prolonged
period, turn off the device and disconnect it from the
power supply. Store it in a clean, dry place away from
direct sunlight.
7. Warranty Disclaimer
Hama GmbH & Co KG assumes no liability and provides no
warranty for damage resulting from improper installation/
mounting, improper use of the product or from failure to
observe the operating instructions and/or safety notes.
8. Service and Support
Please contact Hama Product Consulting if you have any
questions about this product.
Hotline: +49 9091 502-115 (German/English)
Further support information can be found here:
www.hama.com
The full text of the manual is available at the following
internet address:
www.hama.com -> 00054249 -> Downloads
www.hama.com -> 00054238 -> Downloads
Summary of Contents for 00054249
Page 3: ...A B 1 3 12 13 2 4 6 9 11 15 14 16 5 7 8 10 17 21 23 20 18 19 22...
Page 4: ...1 3 4 6 10 9 12 14 16 18 2 5 7 11 13 15 17 19 8...
Page 5: ......
Page 31: ...25 1 2 Digital HiFi Tuner DIT2006BT 1x Wifi 2 3...
Page 46: ...40 1 2 Digital HiFi Tuner DIT2006BT 1x Wifi RCA RCA L R 2x AAA QSG 3 AC...
Page 50: ...44 Power FM www hama com 00054249 Downloads www hama com 00054238 Downloads...
Page 107: ...101...


