background image

10

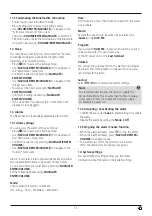
10. Playback from external storage media (USB)

Insert the storage device (such as a USB stick) into the

USB port (16) on the radio.

The storage medium should be formatted as a FAT16 or

FAT32 volume.

Via the main menu or by repeatedly

pressing [

MODE

], activate USB mode on the radio.

The files and folders saved on the storage medium are

displayed. Use [

NAVIGATE/ENTER/VOLUME

] to choose

the desired file and begin playback

11. Bluetooth

You can pair your terminal device with the radio using

Bluetooth and use it as a playback device. You can control

playback directly on the terminal device. You can adjust the

volume on the radio, as well.

Note

Bluetooth

®

Check whether your mobile device (smartphone, tablet

PC. etc.) is Bluetooth capable.

Note that the maximum range for Bluetooth® is 10

metres without obstacles such as walls, people, etc.

The connection may be disrupted by other Bluetooth®

devices/connections in the vicinity.

It is only possible to connect the radio to one terminal

device.

Note that compatibility depends on the supported

Bluetooth® profiles as well as the Bluetooth® versions

being used. (see: Technical data, operating manual of

the device being used)

By repeatedly pressing [

MODE

], activate Bluetooth®

mode on the radio.

11.1 Bluetooth® pairing

Make sure that your Bluetooth® capable terminal device

is switched on and that Bluetooth® is activated.

By repeatedly pressing [

MODE

], activate Bluetooth®

mode on the radio.

Open the Bluetooth® settings on your device and

wait until the list of found Bluetooth® devices shows

DR1550CBT

.

If necessary, start searching for Bluetooth® devices on

your device.

Select

DR1150CBT

and wait until radio is listed as

connected in the Bluetooth® settings of your device.

Your device is also shown as connected on the radio

display.

Start and control audio playback using the controls of

the device.

Note

Bluetooth

®

Password

Some devices require a password in order to connect

to another Bluetooth® device.

If your device requests a password to connect to the

radio, enter

0000

.

11.2 Automatic Bluetooth® connection (after

successful pairing)

Devices already paired with the radio are automatically

saved on the radio.

Note Connection impaired

After a successful first connection between the radio and

device, the connection is established automatically. If

the Bluetooth® connection is not restored automatically,

check the following:

In your device's Bluetooth® settings, check that

DR1550CBT

is connected.

If not, repeat the steps listed under Bluetooth®

pairing.

Check that your device and the radio are less than 10

metres apart. If not, move them closer together.

Check whether obstacles are impairing the range. If

so, move the devices closer together.

Summary of Contents for 54874

Page 1: ...ioni per l uso Gebruiksaanwijzing Οδηγίες χρήσης Instrukcja obsługi Használati útmutató Návod k použití Návod na použitie Manual de instruções Kullanma kılavuzu Manual de utilizare Bruksanvisning Käyttöohje Работна инструкция Betjeningsvejledning Manuelt stasjonssøk Digital Radio 00054874 DR1550CBT Digital Radio ...

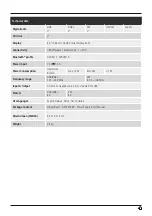
Page 2: ...1 2 AVRCPv1 0 Power input 12 V 1 0 A Power Consumption Operation Betrieb max 12 W Standby 1 W Frequency range DAB DAB 174 240 MHz FM 87 5 108 MHz Input Output DC Socket Headphone 3 5 mm Update Port USB Presets DAB DAB 30 FM 30 UI Languages English German Dutch French Italian Package Content Digital Radio DR1550CBT Power Supply Short Manual Dimensionen WxHxD 33 x 15 x 15 cm Weight 2 3 kg ...

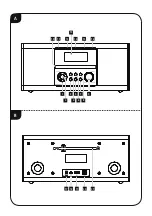
Page 3: ...25 A B 9 11 12 14 13 15 16 1 3 5 7 2 10 4 6 8 17 18 19 20 21 ...

Page 4: ...MENU SETTINGS button 5 MUTE button 6 INFO button 7 BACK button 8 MODE button 9 NAVIGATE ENTER VOLUME button 10 CD drawer 11 Stop 12 Back Rewind 13 Display 14 Play Pause 15 Next FF 16 Eject Insert B Reverse 17 DC IN Mains power supply 18 Headphone socket 19 USB interface 20 Update port 21 Telescopic aerial ...

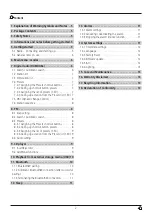
Page 5: ... 8 3 1 Assigning the Presets shortcut buttons 8 8 3 2 Calling up shortcut button presets 8 8 3 3 Assigning the list of presets 1 30 9 8 3 4 Calling up a station from the Presets list 1 30 9 8 4 Audio setting 9 9 CD player 9 9 1 Insert Eject disc 9 9 2 Additional functions 9 10 Playback from external storage media USB 10 11 Bluetooth 10 11 1 Bluetooth pairing 10 11 2 Automatic Bluetooth connection ...

Page 6: ... Prune System setting FM Scan setting Strong stations only All stations Audio setting Forced mono Stereo allowed System setting CD Random Repeat Off One All Directory System setting USB Random Repeat Off One All Directory System setting Bluetooth DisConnect Clear Pair System setting ...

Page 7: ...t alarm Alarm 1 Alarm 2 Snooze adjust Set Time Date Time Set Auto update DAB FM from Any No update Time mode Date format Brightness Dim level Low High Medium Standby Low High Language Medium Facorty Reset Software Upgrade SW version ...

Page 8: ...n the technical data Keep the packaging material out of the reach of children due to the risk of suffocation Dispose of packaging material immediately according to locally applicable regulations Do not modify the device in any way Doing so voids the warranty Risk of electric shock Do not open the device or continue to operate it if it becomes damaged Do not use the product if the AC adapter adapte...

Page 9: ...tyle of the station is shown Bit rate The currently received digital bit rate of the received station is displayed Channel information Current time Today s date Switch On Off Standby Press 2 to switch the device on or off Standby To completely switch off the device disconnect it from the power supply 6 Main menu modes This devices supports radio reception via the Internet DAB DAB and FM The main m...

Page 10: ... If you answer YES then all currently unavailable stations will be removed from the station list Note To keep the list of stations up to date we recommend updating the list regularly with a full station search see 7 1 Search Automatic search 7 4 Presets You can save up to 30 of your favourite stations for quick and direct access 7 4 1 Assigning the Presets shortcut buttons Set the station that you...

Page 11: ... This additional information is displayed by pressing 8 1 Scan setting The search run setting allows you to determine whether stations with low signal strength are ignored during the automatic search run Proceed as follows Press 4 to access the Settings menu Use NAVIGATE ENTER VOLUME 9 to navigate to the Scan setting menu item Confirm the selection by pressing NAVIGATE ENTER VOLUME To have the sea...

Page 12: ... drive that can be used to play normal discs audio CDs CD Rs CD RWs MP3 CDs etc 9 1 Insert Eject disc Note Make sure that the disc CD CD R CD RW MP3 CD etc is free of dust dirt fingerprints and scratches Otherwise a malfunction may occur during playback or playback cannot be started Never use force to insert or eject a disc This can cause damage to the disc or drive Note Please be aware that at ve...

Page 13: ...ooth pairing Make sure that your Bluetooth capable terminal device is switched on and that Bluetooth is activated By repeatedly pressing MODE activate Bluetooth mode on the radio Open the Bluetooth settings on your device and wait until the list of found Bluetooth devices shows DR1550CBT If necessary start searching for Bluetooth devices on your device Select DR1150CBT and wait until radio is list...

Page 14: ...onfigured identically and allow two separate alarm times to be saved Choose Alarm 1 or 2 and confirm your selection by pressing NAVIGATE ENTER VOLUME Set the following details using NAVIGATE ENTER VOLUME Mode Choose when the alarm is to activate Off Daily Once Weekdays Weekends Time First choose the hour then the minute at which the alarm is to activate Mode Set whether you wish to be woken by an ...

Page 15: ... is marked with an asterisk Note The following languages are available English Danish German French Italian 14 3 Factory Reset To reset the radio to the factory default settings proceed as follows Press 4 to access the Settings menu Use NAVIGATE ENTER VOLUME 9 to navigate to the System settings menu item Confirm the selection by pressing NAVIGATE ENTER VOLUME Use NAVIGATE ENTER VOLUME 9 to navigat...

Page 16: ...nt free cloth and do not use aggressive cleaning agents If you do not use the product for a long time turn off the device and disconnect it from the power supply Store it in a clean dry place out of direct sunlight 16 Warranty Disclaimer Hama GmbH Co KG assumes no liability and provides no warranty for damage resulting from improper installation mounting improper use of the product or from failure...

Page 17: ...t to technical changes Our general terms of delivery and payment are applied The Bluetooth word mark and logos are registered trademarks owned by Bluetooth SIG Inc and any use of such marks by Hama GmbH Co KG is under license Other trademarks and trade names are those of their respective owners The Spotify software is subject to third party licenses found here www spotify com connect third party l...

Reviews: