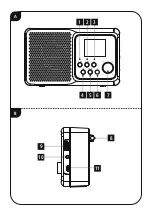
9
9. Bluetooth
When Bluetooth mode is enabled for the first time, the
radio is immediately in "Pairing mode" and visible to
other devices. You can therefore pair the radio with your
smartphone, for example, and begin transmitting from the
relevant source device. If the radio has already been paired
to a smartphone, the next time Bluetooth mode is enabled,
the connection is automatically established.
10. More settings
10.1 Sleep
The radio has a timer function which switches
the radio to standby mode after a pre-defined
length of time.
Proceed as follows:
•
Press [
SETTINGS
] (4) to access the Settings menu.
•
Turn [
VOLUME/SELECT/NAVIGATE
] (7) to navigate to
the “Sleep” menu item.
•
Confirm your selection by pressing [
VOLUME/SELECT/
NAVIGATE
] (7).
•
Select your desired setting by turning and pressing
[
VOLUME/SELECT/NAVIGATE
] (7).
10.2 Time/date system settings
The time and date can be set either manually or obtained
from various sources
(DAB/FM). The time and date format can also be set.
10.3 Audio equaliser
Here you can select from pre-defined equaliser settings for
the device or make your own settings.
10.4 Lighting
You can adjust the display brightness in On mode (Low/
Medium/High).
A timer can be set for standby. After which time (10 sec
/ 20 sec / 30 sec / 40 sec, etc.), the brightness should be
dimmed slightly as soon as the device is in standby mode.
Alternatively, the brightness in Standby mode can be set
so that the display is equally bright in On mode and in
Standby mode.
•
Press [
SETTINGS
] (4) to access the Settings menu.
•
Turn [
VOLUME/SELECT/NAVIGATE
] (7) to navigate
to the “Lighting” menu item. Confirm your selection by
pressing [
VOLUME/SELECT/NAVIGATE
] (7).
•
Now select the desired setting and confirm your selection
by pressing [
VOLUME/SELECT/NAVIGATE
] (7).
10.5 Factory reset
•
Press [
SETTINGS
] (4) to access the Settings menu.
•
Turn [
VOLUME/SELECT/NAVIGATE
] (7) to navigate to
the “Factory settings” menu item.
•
Confirm your selection by pressing [
VOLUME/SELECT/
NAVIGATE
] (7).
Confirm the following prompt with
Yes
to reset the radio to
the factory default settings.
All settings made previously are deleted.
Note
•
Resetting to the factory default settings can remedy
some problems and malfunctions.
•
However, all settings made previously, such as
favourites and the station lists, are permanently
deleted.
10.6 Info / software version
To have the radio display information about its software,
proceed as follows:
•
Press [
SETTINGS
] (4) to access the Settings menu.
•
Turn [
VOLUME/SELECT/NAVIGATE
] (7) to navigate to
the “System version” menu item.
•
Confirm your selection by pressing [
VOLUME/SELECT/
NAVIGATE
] (7).
11. Care and maintenance
Note
Disconnect the device from the mains before cleaning
and during prolonged periods of non-use.
•
Only clean this product using a lint-free, slightly damp
cloth and do not use any harsh cleaners.
•
If you do not plan to use the product for a prolonged
period, turn off the device and disconnect it from the
power supply. Store it in a clean, dry place away from
direct sunlight.
12. Warranty disclaimer
Hama GmbH & Co KG assumes no liability and provides no
warranty for damage resulting from improper installation/
mounting, improper use of the product or from failure to
observe the operating instructions and/or safety notes.


