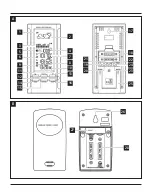
5
•
Repeatedly press the
MODE
button (14) until the time zone
symbol is displayed.
•
Press and hold the
MODE
button (14) for approx. 3 seconds to
set the required time zone difference.
•
To select individual values, press the
▲
button (11) or the
▼
button (13) and confirm each selection by pressing the
MODE
button (14).
•
If you do not make an entry for 2 minutes, you automatically exit
the setup mode.
Alarm clock
•
Repeatedly press the Alarm button (16) to display the different
alarms.
•
The respective alarm symbols and the corresponding alarm time/
time interval and/or OFF are displayed.
•
Press and hold the Alarm button (16) for approximately 3
seconds to set the time of the displayed alarm. The hours display
begins to flash.
•
Press the
▲
button (11) or the
▼
button (13) to select the hour
for the alarm time and confirm your selection by pressing the
Alarm button (16). The minutes display begins to flash.
•
Repeat the process to set the minutes for the alarm time.
•
Press the Alarm button (16) again to set the other alarm mode
as well or to return to the time display (10).
•
If you do not make an entry for 2 minutes, you automatically exit
the setup mode.
Note – Alarm
•
When activated, the weekday alarm only triggers an alarm on
weekdays (Monday to Friday). The alarm symbol is displayed if
this alarm is activated.
•
When activated, the once-only alarm only triggers an alarm
once. The alarm symbol is displayed if this alarm is activated.
This alarm is automatically deactivated after the alarm has
sounded.
•
Frost warning with an early alarm signal – this activates if
the outdoor temperature falls below 2° C. The alarm signal
(PRE/AL) begins to blink. You can set this function to activate
15, 30, 45, 60 or 90 minutes before the weekdays or one-off
alarm signal.
•
In the corresponding display, press the button (11) or
button (13) to activate/deactivate the corresponding alarm. The
alarm symbol appears or disappears accordingly.
•
When the alarm is triggered, the alarm symbol begins to flash
and an alarm sounds.
•
Press the
ALARM
button (16) to stop the alarm. Otherwise, it
will stop automatically after 2 minutes.
•
To return to the time display, press the
MODE
button (14) again.
6.4. Weather
Weather forecast
•
Based on changes in the atmospheric pressure and the data
saved, the base station is able to make weather forecasts for the
next 12 to 24 hours.
Note – Weather forecast
•
The weather forecast function is not available during the
first few hours of operation because it requires data that is
collected during operation.
•
The probability of an accurate weather forecast is around
70%. This forecast quality applies within around 20 to 30 km
of the location.
•
If you take the weather station with you when travelling, a
reliable weather forecast will only be available after 24 hours
because the weather station initially has to determine the local
weather conditions.
•
The weather forecast and the current weather are indicated by
various symbols (2):
Symbol (2)
Weather
Sun
Slightly cloudy
Cloudy
Rain
Snow
Note
•
At night, the sun forecast means a cloudless sky. The weather
station does not detect fog because fog can occur under
various weather conditions.
•
The weather station indicates a trend for how the values for air
pressure (1) are likely to develop over the next few hours.
•
The weather station also provides a forecast value for the
trend in relation to temperature and humidity calculated on
the relevant outdoor device. These three available trends are
displayed as foll
ows:
Display
Trend
TREND
Increasing
TREND
Constant


