4
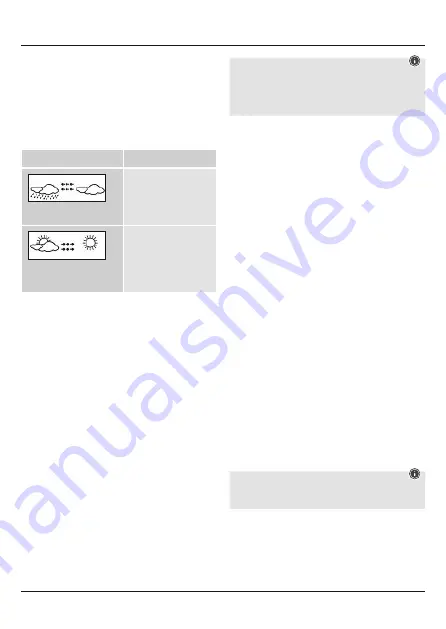
• The weather symbols change depending on the current
relative atmospheric pressure and atmospheric pressure
changes within the past six hours. If the weather is
changing, the atmospheric pressure trend arrows (3) flash
for three hours to indicate the change in weather. The
arrows (3) stop flashing when the weather conditions have
subsequently stabilised and the station has not detected
any further changes in weather.
Examples:
Display
Meaning
Weather forecast: Rain
Atmospheric pressure
trend: Decreasing /
Weather is getting worse
Current weather: Cloudy
Current weather: Slightly
cloudy
Atmospheric pressure
trend: Increasing /
Weather is improving
Weather forecast: Sun
• The bar graph (8) shows the history of the relative
atmospheric pressure within the last 24 hours.
6.4. Temperature / atmospheric pressure display
mode
• Press the
SET
button (28) repeatedly to change between
the following displays:
•
Outdoor temperature (18:
TEMP
)/ Dew point
temperature (18:
DEWPOINT
)
•
Absolute atmospheric pressure (7:
abs
)/Relative
atmospheric pressure (7:
rel
)
The applicable display begins to flash.
• While the display is flashing, press the
MIN/MAX
button
(30) or the + button (31) to switch between the outdoor
temperature and the dew point or between the absolute
and relative atmospheric pressure.
• Confirm your display selection by pressing the
SET
button
(28).
Note – Dew point
• The dew point temperature indicates a value to which,
with the current humidity level, the outside temperature
would have to increase/decrease in order to reach
100% relative humidity.
6.5 Alarm mode
• Repeatedly press the
ALM
button (29) to access
HI AL
(4/11/16/21) or
LO AL
(4/11/16/21) alarm mode.
• In alarm mode
HI AL
(4/11/16/21), repeatedly press the
SET
button (28) to switch between the following alarm
functions:
•
Alarm (hour/minute) (24)
•
High room humidity alarm (14)
•
High room temperature alarm (12)
•
High outside humidity alarm (20)
•
High outdoor temperature alarm (18)
•
High absolute atmospheric pressure alarm (5)
The applicable display begins to flash.
• In alarm mode
LO AL
(4/11/16/21), repeatedly press the
SET
button (28) to switch between the following alarm
functions:
•
Alarm (hour/minute) (24)
•
Low room humidity alarm (14)
•
Low room temperature alarm (12)
•
Low outside humidity alarm (20)
•
Low outdoor temperature alarm (18)
•
Low absolute atmospheric pressure alarm (5)
The applicable display begins to flash.
• In the corresponding display, press the
MIN/MAX
button
(30) or the
+
button (31) to change the alarm value, and
confirm your selection by pressing the
SET
button (28).
• In the corresponding display, press the
ALM
button (29) to
activate/deactivate the corresponding alarm function.
• If the alarm is activated, the corresponding symbol
(6/10/15/26),
HI AL
(4/11/16) and/or
LO AL
(4/11/16) is
displayed.
• If you do not make an entry for 20 seconds, you
automatically exit setup mode. Alternatively, press the
SNOOZE / LIGHT
button (32) to exit setup mode before
selecting all the values.
Note
• The set value is displayed for alarms that are already
set, deactivated alarms are indicated by --- or --.
Summary of Contents for EWS-800
Page 2: ...A B 25 43 5 1 REMOTE SENSOR RF WIRELESS C Ch 36 37...
Page 34: ...31 4 4 1 38 38 4 2 34 5 6 100 1 25 4...
Page 35: ...32 5 1 35 33 5 2 33 39 6 MIN MAX 30 31 SNOOZE LIGHT 32 10 6 1 3 12 14 18 20 DCF 27 DCF 2 DCF...
Page 58: ...55 4 4 1 38 38 4 2 34 AA 5 6 100m 1 25 m 4...
Page 63: ...60 SNOOZE LIGHT 32 20 WLAN 7 8 Hama GmbH Co KG...
Page 125: ...122 4 4 1 38 AAA 38 4 2 34 AA 5 Montage 6 100 1 25 4...
Page 126: ...123 5 1 5 2 33 39 6 MIN MAX 30 31 SNOOZE LIGHT 32 10 6 1 LCD 3 12 14 18 20 DCF 27 DCF DCF DCF...
Page 128: ...125 2 hPa 4 hPa 3 hPA 3 hPa 9 hPa 6 hPa 6 3 12 24 1 1 3 3 3...


