7
4.2 Suction cup holder
•
Remove the protective film from the suction cup.
•
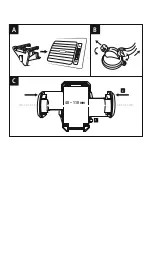
Open the locking lever on the suction cup (
B
).
•
Position the holder with the suction cup on a clean, even mounting surface (e.g. windscreen)
•
Lightly press the holder onto the required installation surface and close the locking lever to secure the
holder in place.
•
After installation, always check that the suction cup is secure.
•
To release the suction cup from the installation surface again, open the locking lever. If necessary, pull
gently on the tab to completely release the suction cup.
4.3 Mounting the universal bracket
•
Attach the universal bracket using the locking lug on the holder (suction cup holder, grating clamp).
•
Press the button on the side of the universal bracket to open the holding jaws. (
C – 1
)
•
Insert your desired device and fix it in place by gently pressing the holding jaws together. (
C – 2
)
•
To be able to remove the device easily, press the button on the side of the universal bracket. (
C – 1
)
Note
•
Always remove your device from the bracket before you attach it to or remove it from the holder (suction
cup holder, grating clamp).
5. Care and maintenance
Only clean this product using a lint-free, slightly damp cloth and do not use any harsh cleaners.
6. Warranty disclaimer
Hama GmbH & Co KG assumes no liability and provides no warranty for damage resulting from improper
installation/mounting, improper use of the product or from failure to observe the operating instructions and/
or safety notes.
Summary of Contents for Multi
Page 2: ......
Page 3: ...A B C 40 110mm 2 1...
Page 30: ...32 R Hama 1 2 1 1 1 3 4 300...
Page 31: ...33 4 1 A 4 2 B 4 3 C 1 C 2 C 1 5 6 Hama GmbH Co KG...
Page 32: ...34 B Hama 1 2 1 1 1 3 4 300 4 1 A...
Page 33: ...35 4 2 B 4 3 C 1 C 2 C 1 5 6 Hama GmbH Co KG...
Page 34: ...36 J Hama 1 2 1 1 1 3 4 300 g 4 1 A...


