background image

6

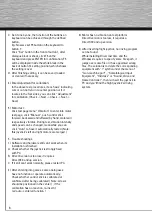
C. Set it one by one, the function of the buttons on

keyboard can be achieved through the defined

button.

Eg.: Now we set F5 button on the keyboard to

button 7:

Click “Set” button in the front of button 7, after

dialogue block is shoot, click F5 on the

keyboard and press ENTER for confirmation, F5

will be displayed inside the white block in the

back of button 7’s setting position, which shows

the setting is over.

D. After finishing editing, it can be saved, loaded

or cleared if necessary.

4) Enter Adjustment for calibration:

In the above test procedures, if each axis’ indicating

cursor can not return to center position or if it

locates in the four sides, you can click “Adjustment”

for calibration. (Check -> Next -> Check -> Next ->

Save)

5) Motor test:

Click test page menu “Vibration” to enter into motor

test page, click “Manual”, push control stick

forward, backward and leftward by hand, motor will

respectively vibrates. During test, vibration intensity

and speed can be changed; meanwhile you can

click “Auto” to have it automatically tested ( Note:

this joystick’s left and right motors are merged )

5. Trouble shootings:

1) Software and hardware still can’t work when its

installation is finished.

A Check whether the joystick is strongly fixed

with PC.

B DirectX version is too low, it requires

DirectX7.0 and up version.

C If it still can’t work normally, please restart PC.

2) After entering into games, some analog axes

have no function or operate automatically.

Check whether control stick is calibrated or

confirmed after being calibrated ( Note: all axis

should be positioned in the center ) , if the

calibration has no reaction, re-insert it

( w/ auto- centered function )

3) Motor has no vibration on test platform

DirectX version is too low, it requires a

DirectX7.0 and up version.

4) After inserting flight joystick, no driving program

can be found:

While installing Driver last time and the

Windows requires to specify some file’s path, it

jumps over some file or it has appointed wrong

files. The solution is to delete the corresponding

equipment with “!” symbol under the menu of

“man-machine port”, ,“Somatological Input

Equipment”, “Hidclass” or “Sound, Video and

Game Controller”, then re-insert the joystick to

PC and you’ll find the flight joystick’s driving

system.

Summary of Contents for Outlandish

Page 1: ...PC Joystick Outlandish P C G a m e 00062866...

Page 2: ...r Testseite angezeigt B W hrend des Tests auf Turbo klicken der entsprechende Buchstabe wird hervorgehoben angezeigt und auf die Taste klicken die belegt werden soll Wenn der digitale Videorahmen in w...

Page 3: ...it der Motor entsprechend vibriert Intensit t und Geschwindigkeit der Vibration k nnen beim Testen ge ndert werden Auf Auto klicken um den Test automatisch durchzuf hren Hinweis Die Joystick Motoren f...

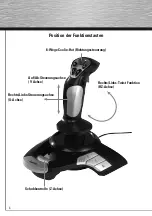
Page 4: ...4 Position der Funktionstasten 8 Wege Coolie Hat Richtungssteuerung Schubkontrolle Z Achse Auf Ab Steuerungsachse Y Achse Rechts Links Steuerungsachse X Achse Rechts Links Twist Funktion RZ Achse...

Page 5: ...white video press the corresponding digital button in the joystick the button to be defined will flash fast shows The setting has been finished Click clear to eliminate its defined function click Turb...

Page 6: ...tested Note this joystick s left and right motors are merged 5 Trouble shootings 1 Software and hardware still can t work when its installation is finished A Check whether the joystick is strongly fi...

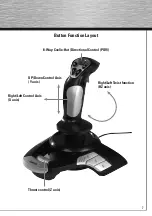
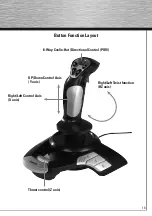
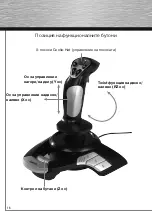
Page 7: ...7 Button Function Layout 8 Way Coolie Hat Directional Control POV Thrust control Z axis UP Down Control Axis Y axis Right Left Control Axis X axis Right Left Twist function RZ axis...

Page 8: ...leur de jeu puis ouvrez la page test A Testez successivement les boutons 1 12 de la manette l interface de la page de test affichera des indications contrast es concernant les boutons 1 12 B Cliquez...

Page 9: ...t moteur Cliquez sur le menu Vibration de la page de test afin d ouvrir la page de test du moteur Cliquez ensuite sur Manual et poussez manuellement la manette vers l avant l arri re et la gauche afin...

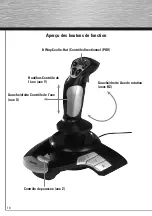
Page 10: ...r u des boutons de fonction 8 Way Coolie Hat Contr le directionnel POV Contr le de pouss e axe Z Haut bas Contr le de l axe axe Y Gauche droite Contr le de l axe axe X Gauche droite Axe de rotation ax...

Page 11: ...Vista 1 Windows START Run Browse CD au torun exe USB USB port 2 Start Control Panel Game Controller 3 Hama PC Vibra Joystick Outlandish Attribute 4 1 Attribute A 1 12 B Turbo Clear Turbo C UP DOWN LEF...

Page 12: ...B Set C F5 7 Set 7 F5 F5 7 D 4 Adjustment Check Next Check Next Save 5 Vibration Manual Auto 5 1 A B DirectX 7 0 C 2 w auto 3 DirectX 7 0 4 Windows man machine port Somatological Input Equip ment Hidc...

Page 13: ...13 Button Function Layout 8 Way Coolie Hat Directional Control POV Thrust control Z axis UP Down Control Axis Y axis Right Left Control Axis X axis Right Left Twist function RZ axis...

Page 14: ...s 10 8 1 8 7 Vista 3 DirectX 7 0 3 Windows 10 8 1 8 7 Vista 1 Windows START CD autorun exe USB 2 3 Hama PC Vibra Joystick Outlandish 4 1 A 1 12 B Turbo Clear Turbo C X Y axis UP DOWN LEFT RIGHT D RZ Z...

Page 15: ...yboard Map A Keyboard map B Set C F5 7 Set 7 Windows F5 Enter F5 7 D 4 Adjust ment 5 Manual Auto 5 1 A B DirectX DirectX 7 0 C 2 3 DirectX DirectX 7 0 4 Windows Windows man machine port Somatological...

Page 16: ...16 d Bedienungsanleitung 8 Coolie Hat Z Y X Twist RZ...

Page 17: ...ed brands are trademarks of the corresponding companies Errors and omissions excepted and subject to technical changes Our general terms of delivery and payment are applied Hama GmbH Co KG 86651 Monhe...

Reviews: