background image

13

ランプの交換

●  本製品には高圧のキセノンガス (0.1  MPa  〜 1  MPa  程度 ) と水銀

が封入されています。本製品を廃棄する場合は廃棄物処理法に則り、
自ら適正に処理して頂くか、もしくはランプの内圧が高いため割らず
にそのまま許認可を受けた適正な産業廃棄物処理業者へ委託して処
理してくださるようにお願いします。国外で使用し、その国で廃棄す
る場合は、それぞれの国、州の廃棄物処理に関する法令に従って適正
に処理をしてくださるようにお願いします。

お願い

ランプ点灯積算時間のリセット

ご注意

電源の ON・OFF

■  電源の ON・OFF

ご注意

電源スイッチの上側を押すと電源が入ります。
電源投入直後、約 10 秒 間は装置の初期設定を行ないます。
この間、全表示灯が点灯し、一切の操作ボタンおよび外部
制御を受け付けません。
初期設定が完了すると、


・ランプは消灯状態


・シャッターは閉状態

になっています。(パワーオンリセット機能)
この状態を

スタンバイ状態

と呼びます。

電源スイッチの下側を押すと、電源が切れます。

■  ランプの交換手順

q

  ランプを消灯し、15 分 以上冷却ファンを回します。

w

  装置内部の温度が十分下がってから、電源スイッチを

OFF にします。

e

  ランプ交換扉固定ねじをゆるめ、ランプ交換扉を手前に

開きます。

r

  ランプ固定キャップを回して外します。

t

  ランプフランジを持ち、静かにまっすぐにランプを引き

出します。

y

  新しいランプを 11 ページの

r

u

の手順で取り付けます。

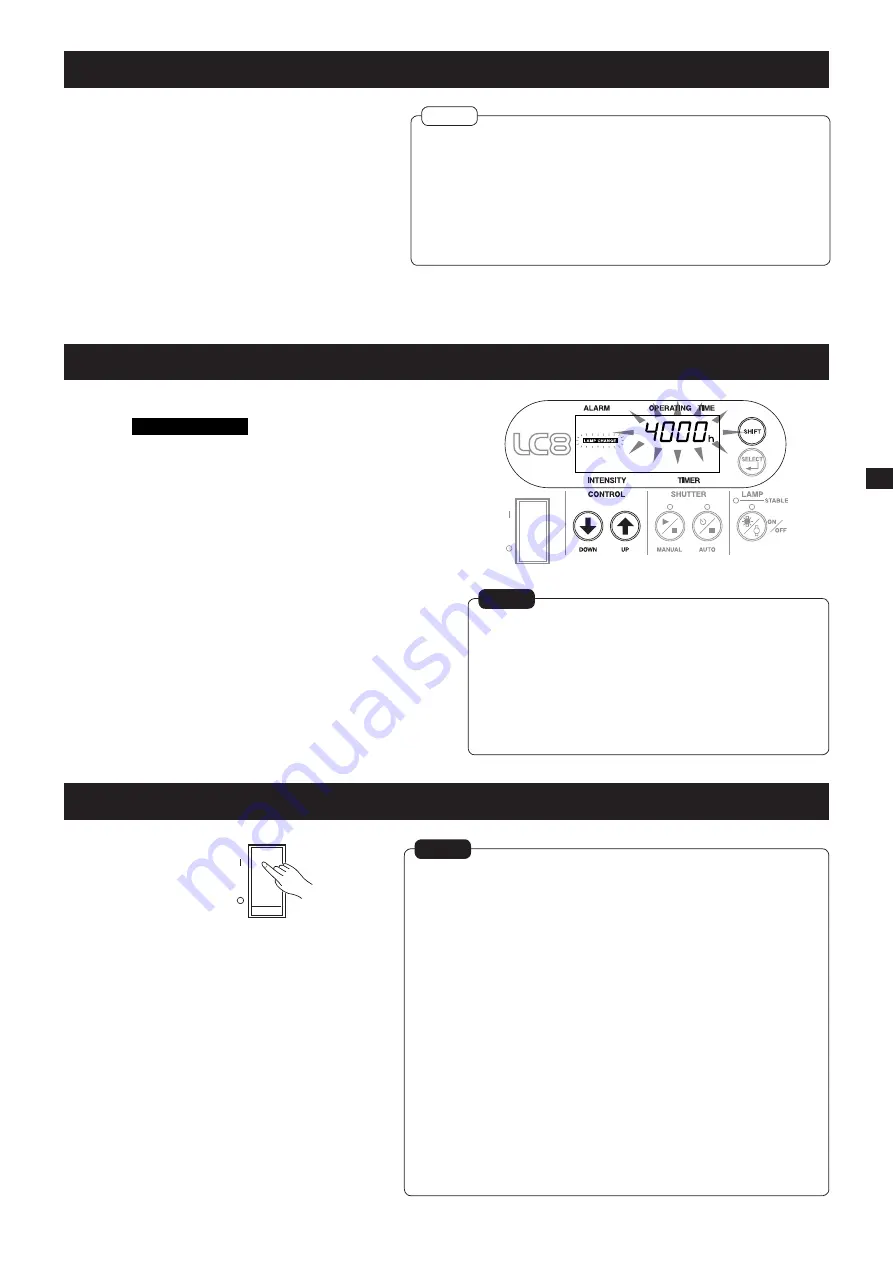
ランプ点灯積算時間が 4000 時間(L8253 は 3000 時間) に
達すると、

LAMP CHANGE

  が表示され、ランプ交換時期を

お知らせします。同時に外部制御端子から「ランプ交換信号」、

「ア

ラーム信号」も出力されます。なるべく早く新しいランプと交換
してください。なお、ランプ点灯積算時間が 5000 時間に達し
た場合、安全のためランプは強制的に消灯されます。

(ランプ点

灯積算時間がリセットされない限り、再点灯できません。)

■  ランプ積算時間のリセット

ランプを交換したら、積算時間をリセットしてください。

ノーマル表示モードから SHIFT ボタンを押しながら UP ボタンと
DOWN ボタンを同時に押すと、ランプ積算時間のリセットモードに切
り替わり、

「OPERATING TIME」表示が点滅します。

この状態で、UP ボタンと DOWN ボタンを同時に押すと、ランプ積算
時間が「0」にリセットされ、ノーマル表示モードに戻ります。
なお、ランプ積算時間のリセットモードに切り替わった後、ランプ積
算時間のリセットをせずにノーマル表示モードに戻りたい場合は、そ
のまま1分間以上、すべてのボタン操作を中止して待機してください。

●  使用途中で積算時間をリセットしないでください。ランプ

寿命をお知らせするアラームが正確に出なくなります。

●  積算時間リセットモードのまま1  分  間以上リセット操作

を行なわないと、ノーマル表示モードに戻ります。

●  ランプ点灯積算時間が 5000  時間  に達した場合、安全の

ためランプは強制的に消灯されます。

(ランプ点灯積算時間

がリセットされない限り、再点灯できません。)

●  使用を終了する場合は、ランプを消灯した後 10  分  以上冷却ファンを回

し、装置内を冷却してから電源を OFF にしてください。

●  瞬時停電に対する機能
 

瞬時停電などで一時的に電源の供給が途絶えた場合、停電時間により
復帰状態が異なります。

  ・停電時間が 30 ms 以下の場合

ランプは消灯しません。全て正常に機能します。

  ・停電時間が約 1 秒 の場合

ランプは一時的に消灯します。ランプ点灯信号、ランプ安定信号も一時
的に OFF します。電源復帰後、自動的に点灯操作が行なわれ、ランプ
が再点灯します。この際、停電前にシャッターが開いていた場合は、安
全のためシャッターは強制的に閉じられます。また、タイマー照射、プ
ログラム照射していたものは、停電復帰後はリセットされた状態になり
ます。ランプ再点灯後、ランプ点灯信号が出力され、約 10 秒 後に正常
機能まで回復し、使用可能となります。

  ・停電時間が 2 秒 以上の場合

ランプは消灯します。電源復帰後、パワーオンリセット機能が働き、ランプ
は消灯、シャッターは閉の状態となります。復旧には、外部からランプ点灯
信号を入力してランプを再点灯する必要があります。ランプ点灯後、5  分 
でランプ安定信号が出力され、使用可能となります。(通常使用時と同様)

Summary of Contents for LIGHTINGCURE LC8

Page 1: ...e unless this manual has been fully understood The person responsible for the equipment must not let anyone operate the equipment who does not have full understanding of the equipment Keep this manual...

Page 2: ...2...

Page 3: ...29 Adjustment of Optical Feedback Unit Option 32 Command Control 32 Contents of this manual are subject to change without prior notice Copying or quoting of this manual whether partially or as a whol...

Page 4: ...APAN INPUT 100 V 240 V 300 VA 50 HZ 60 Hz IOIOI S N DB0000 MODEL L9588 01 SPOT LIGHT SOURCE MADE IN JAPAN INPUT 100 V 240 V 300 VA 50 HZ 60 Hz CN1 AC IOIOI Component Names L9566 L9566 series L9566 Fro...

Page 5: ...connector page 32 oCooling fan 0Name plate position 1AC inlet 2Air inlets 3Light output adjusting screw page 32 zAlarm indicator page 24 xLamp ON indicator page 29 cLamp Operation time page 27 vRelati...

Page 6: ...6 1 1 1 2 JIS C 7550 3 JIS T 8141 30 kV 15 1 MPa 10 4 MPa 40...

Page 7: ...7 56 1 3 L9566 L9588 03 04 06A L9566 L9588 01A 02A 4000 L8253 3000 4000 L8253 3000 4000 L8253 3000 0 1 MPa 1 MPa IEC I ON OFF...

Page 8: ...8 25 80 10 cm 10 cm L9566 L9588 10 cm 10 cm 10 cm 10 cm...

Page 9: ...V 1 k GND 15 D sub w i GND ON o 4 GND ON 0 5 ON D sub 15P XM3A 1521 XM2S 1511 GND ON 50 V 30 mA GND ON ON 30 V 50 mA 100 1 k 50 V No 1 12 V 12 V dc 100 mA max 2 4000 L8253 3000 3 4 5 5 6 7 8 9 10 0 5...

Page 10: ...10 SHUTTER ERR LAMP ERR LAMP ERR UP DOWN LAMP ERR OVER HEAT 2 4000 L8253 3000 LAMP CHANGE 5000 q w 10 cm OFF OFF 10 cm...

Page 11: ...11 q OFF w e 1 MPa 10 r t y u...

Page 12: ...12 Save Normal POWER SAVING Save Normal POWER SAVING Normal Save 10 q w M4 8 e r LIGHTNING CURE LC8 A9616 10 q w e r q r M3 2 w e L9588 L9566 M3...

Page 13: ...13 0 1 MPa 1 MPa ON OFF ON OFF 10 q 15 w OFF e r t y 11 r u 4000 L8253 3000 LAMP CHANGE 5000 SHIFT UP DOWN OPERATING TIME UP DOWN 0 5000 10 OFF 30 ms 1 OFF 10 2 5...

Page 14: ...14 LAMP ON OFF 1 1 5 0 5 ON e ON 3 19 5 STABLE 5 r ON LAMP ON OFF 1 5 2 0 5 0 5 ON e r OFF 2 9 SHUTTER MANUAL 1 SHUTTER MANUAL 1 3 5 ON t ON 3 5 OFF t OFF...

Page 15: ...SELECT SHIFT SELECT SHIFT SELECT 3 w SHUTTER AUTO 7 7STEP 1 1STEP SHIFT SELECT W SHIFT 1STEP 1 W 3 1 7 STEP 7STEP 7 W 1 STEP 1 7 STEP 7 1 STEP 7STEP 1STEP 1STEP UP DOWN 0 100 1 SHUTTER MANUAL 0 00 W...

Page 16: ...16 1 2 7STEP SELECT 1 9 SELECT 1 2 1 P1 P2 P3 P4 P5 P7 P6 1 P1 P2 P3 P4 P5 P7 P6 1 2 1 UP DOWN 0 100 1 SHUTTER MAN UAL 0 00 W 4 50 W 0 02 W UP DOWN 0 1 999 9 0 1 2 1 2 0 0 3 6 7 3 1...

Page 17: ...SHIFT SELECT SHUTTER MANUAL r UP 3 LCD t SHIFT SELECT 3 SHUTTER MANUAL y SHUTTER MANUAL u i e t RS232C PC RS232C 1 9600 1 8 CR 0DH PC PC 1 INP 2 500 ms 50 ms 25 ms 20 ERR 1 PC ERR05 INP 2 ERR05 INP PC...

Page 18: ...xx L0OK L0NGxx S1OK S1NGxx S0OK ATOK ATNG03 AT ATSOK ATSNGxx ATT INT OK INT NG INT INT INTSETOK INTSETNGxx CURE OK CURE NG CURE nnn mmm m CURE n nn mmm m START OK START NGxx STP STOPOK INP LIFOK LAMPC...

Page 19: ...19 4000 L8253 3000 4000 L8253 3000 56 LAMP ERR UV 5000 PC 5 typ 11 11 13 13 11 17 18 13 15 16 10 11 11 15 14 14 17 17 17 10 17 PC 5...

Page 20: ...operation of the equipment Never look directly into the light guide connection aper ture or at the light emanating from the light guide Strong ultraviolet light can cause visual disorder DO NOT allow...

Page 21: ...orized When it is used and disposed of in any place outside of Japan it should be treated properly according to the statutory regulations of the state and local governments applicable to that place La...

Page 22: ...ended environment for use About 25 C ambient temperature 80 or less humidity Allow for adequate ventilation of fan exhaust Some lamps depending on types produce ozone which smells for some time after...

Page 23: ...g as it is inputted When no signal is inputted the shutter closes 14 Output intensity DOWN When this signal is inputted while the shutter is open using the manual mode the output intensity reduces as...

Page 24: ...ndicator flashes The unit can be used for some time after this indi cator starts flashing replace the lamp with a new one as soon as possible After replacing the lamp be sure to reset the accu mulated...

Page 25: ...he lamp flange so that the slit faces up as shown in the figure and push in the lamp as it is y After inserting the lamp fully align the groove in the lamp fixing cap and the pin of the lamp holder an...

Page 26: ...to install a specified filter A9616 series to a unit of LIGHTING CURE LC8 series Filter Installation Be sure to disconnect the power cord when installing the filter Do not install the filter while the...

Page 27: ...amp with a new one as soon as possible Also when the accumulated lamp operation time reach es 5000 hours the lamp is forced to turn off for the sake of safety Unless the accumulated lamp operation tim...

Page 28: ...the power failure time is 30 ms or less The lamp remains on Everything functions normally When the power failure time is about 1 second The lamp goes off and both of the lamp ON signal and lamp stable...

Page 29: ...flash for ap proximately 5 seconds If a panel button is pressed while the indicator lamp is flashing both the lamp and the indicator lamp go out The lamp does not go out unless the button is pressed t...

Page 30: ...and select the mode using the SELECT button As the program mode once set is stored in the memory of the main unit the program starts in the previously set mode when the power is turned on next time U...

Page 31: ...ty changes in steps Step 1 Output intensity setting display Adjust the output intensity diaphragm opening using UP and DOWN but tons 0 to 100 by every 1 When the optical feedback func tion is at work...

Page 32: ...seconds or longer to exit the PROGRAM mode and press the SHUTTER MANUAL button to close the shutter y Press the MANUAL button of the shutter to open the shutter u Using a precision screwdriver turn th...

Page 33: ...mory cure operation at work 02 If memory cure operation is at work it is terminated closed If auto cure operation is at work it is terminated closed NG auto function being executed 03 NG auto function...

Page 34: ...ce the lamp with a new one Adjust the intensity Wipe the end faces of the light guide clean with a gauze soaked with alcohol Tighten the lamp fixing cap securely Lower output intensity setting value o...

Page 35: ...35 1 1 1 2 IEC 2006 IEC 62471 EMI 30kV 15 1MPa 10 4MPa 40...

Page 36: ...36 56 1 3 4000 L8253 3000 4000 L8253 3000 4000 L8253 3000 0 1MPa 1MPa IEC I ON OFF L9566 L9588 03 04 06A L9566 L9588 01A 02A...

Page 37: ...37 L9566 L9588 10cm 10cm 10cm 10cm 25 80 10cm 10cm...

Page 38: ...GND D sub 15P XM3A 1521 XM2S 1511 50V 100 GND 1k GND ON 50V 30mA GND 30V 50mA 100 1k No 1 12 V 12V dc 100 mA max 2 4000 L8253 3000 3 4 5 5 6 7 8 9 UP 10 0 5 11 0 5 12 0 5 13 14 DOWN 15 GND COM w i GN...

Page 39: ...39 SHUTTER ERR LAMP ERR LAMP ERR UP DOWN LAMP ERR OVER HEAT 2 4000 L8253 3000 LAMP CHANGE 5000 q w 10cm OFF OFF 10cm...

Page 40: ...40 q OFF w e r t y 1MPa 10 u...

Page 41: ...41 Save Normal POWER SAVING Save Normal POWER SAVING Normal Save 10 q w M4 8 e r LIGHTNING CURE LC8 A9616 10 q w e r L9566 L9588 q r w e M3 2 M3 e...

Page 42: ...42 0 1MPa 1MPa ON OFF ON OFF 10 q 15 w OFF e r t y 40 r u 4000 L8253 3000 LAMP CHANGE 5000 SHIFT UP DOWN OPERATING TIME UP DOWN 0 1 1 5000 30ms 1 OFF 10 2 5...

Page 43: ...43 1 5 0 5 e ON 1 LAMP ON OFF 3 48 5 STABLE 5 r ON 1 LAMP ON OFF 5 2 0 5 0 5 e r OFF 2 9 2 1 SHUTTER MANUAL 1 SHUTTER MANUAL 3 5 t ON 3 5 t OFF...

Page 44: ...SELECT SHIFT SELECT SHIFT SELECT 3 w SHUTTER AUTO 7 7STEP 1 1STEP SHIFT SELECT W 1STEP 1 W 7 STEP 7STEP 7 W 1 STEP 1 7 STEP 7 1 STEP 7STEP 1STEP 1STEP SHIFT 7STEP 3 1 UP DOWN 0 100 1 SHUTTER MANUAL 0...

Page 45: ...45 1 2 SELECT 1 9 SELECT 1 2 1 P1 P2 P3 P4 P5 P7 P6 1 1 P1 P2 P3 P4 P5 P7 P6 2 1 2 1 2 0 0 3 6 7 3 1 1 UP DOWN 0 100 1 SHUTTER MANUAL 0 00W 4 50W 0 02W UP DOWN 0 1 999 9 0 1...

Page 46: ...00ms 50ms 25ms 20 ERR 1 PC ERR05 INP Fig 2 ERR05 INP PC PC PC ERR05 INP q w UV e SHIFT SELECT SHUT TER MANUAL r UP 3 LCD t SHIFT SELECT 3 SHUTTER MANUAL y SHUTTER MANUAL u UV i 3 5 00 UV UV 00 15mm 44...

Page 47: ...NTSETNGxx NG 03 CURE nnn mmm m CUREE nn n mmm m 1 2 W 1 9 1 or 2 1 2 W nnn n nn W mmm m s 7 CURE OK CURE NG NG 02 CURE CURE nnn mmm m CUREE n nn mmm m 1 9 1 or 2 1 2 W nnn n nn W mmm m s 7 START START...

Page 48: ...48 56 4000 L8253 3000 4000 L8253 3000 40 5000 40 42 42 40 PC PC 46 47 42 44 45 39 40 LAMP ERR 40 46 5 43 43 UV 5 46 46 46 39 46...

Page 49: ...10 seconds later more than 1 sec The initial state is resumed Ultravi olet leakage Not above 0 001 mW cm2 at 365 nm Paint Standard paint color used at HAMAMATSU PHOTON ICS Displays Back side printed f...

Page 50: ...V 240 V 300 VA 50 HZ 60 Hz IOIOI 142 110 16 16 227 5 311 232 39 5 39 5 36 12 7 49 49 158 49 49 311 232 39 5 39 5 36 12 7 142 110 16 16 227 5 158 S N DB0000 MODEL L9588 01 SPOT LIGHT SOURCE MADE IN JAP...

Page 51: ...9616 11 2 230 250 60 248nm Accessories Option Specifications of filters 50 5 123 118 3 mm UNIT mm mm A9616 A9616 series A9616 mm UNIT mm mm 8 7 55 53 7 27 5 68 2 46 Filter Type Number of Transmittance...

Page 52: ...1 50 million times of shutter operation Shutter Unit Optical Feedback 365 nm E9793 02 50 million times of shutter operation or 20 000 h Shutter Unit Optical Feedback 436 nm E9793 03 50 million times o...

Page 53: ...service life such as lamp shutter and relay specified by each manu facturer has expired The extent of the warranty shall be limited to delivery of a sub stitute unit The warranty period of the substit...

Page 54: ...54...

Page 55: ...55...

Page 56: ...gerstr 10 D 82211 Herrsching am Ammersee Germany Telephone 49 8152 375 0 Fax 49 8152 2658 E mail info hamamatsu de Denmark Office Lautruphoj 1 3 DK 2750 Ballerup Denmark Telephone 45 70 20 93 69 Fax 4...

Reviews: