34
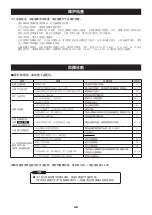
Before requesting repair, check the following points to determine whether you can correct the problem yourself.
If the symptom remains unsolved even after checking each of the above items, describe the trouble specifically and
send the unit to the nearby sales office. (Refer to page 56 for the address.)
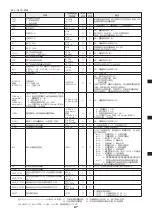
Troubleshooting
Power cannot be
turned on.
Lamp fails to light.
Shutter doesn’t
open.
Light output is
poor.
Lamp error is indi-
cated (
LAMP ERR.
)
(when Optical Feed-
back Unit is used)
Setting for output
intensity cannot be
made.
Output intensity in-
dicated by UV me-
ter differs from that
on light source.
(when Optical Feed-
back Unit is used)
The interlock has been activated.
Accumulated lamp operation time has ex-
ceeded 5000 hours.
Lamp life has ended. (When used for longer than the
assured lamp life, the lamp becomes hard to turn on.)
The lamp is not installed properly.
Communication with PC is effective.
Solenoid is defective.
Lamp life has ended.
The output intensity has been adjusted (re-
duced more than necessary).
The input/output ends of the light guide are
dirty.
The lamp is not installed properly.
Lamp output has reduced and the set output
intensity is not available.
No lamp stable signal is output.
Shutter is not open.
There is an error of ±5% (typ.) attributable to
the performance.
Output intensity adjustment was not made
after unpacking.
Light guide has been replaced.
Lamp has been replaced.
Light in/out end of light guide has become
dirty and output intensity has been reduced.
Sensitivity of optical sensor has been deterio-
rated due to consumed service life, etc.
Symptom
Cause
25
25, 27
27
25
32, 33
–
27
30, 31
24
25
25, 30
29
29
–
32
32
32
24, 32
–
Page for
reference
Firmly close the lamp cover.
Replace the lamp with a new one and re-
set the accumulated lamp operation time.
Replace the lamp with a new one.
Tighten the lamp fixing cap securely.
Cancel communication with PC
Replace the shutter unit.
Replace the lamp with a new one.
Adjust the intensity.
Wipe the end faces of the light guide
clean with a gauze soaked with alcohol.
Tighten the lamp fixing cap securely.
Lower output intensity setting value or
replace lamp with a new one.
Wait until lamp stable signal is output (for
about 5 minutes).
Open shutter.
Adjust output intensity.
Adjust output intensity.
Adjust output intensity.
Using gauze dampened in alcohol, re-
move dirt from end face of light guide
and adjust output intensity.
Replace Optical Feedback Unit.
Correction
When sending the unit, pack it carefully and securely to prevent any possible damage during transpor-
tation. (Use the box in which the unit was delivered or a larger size box and fill it with cushion material.)
Caution
Maintenance and Inspection
Perform maintenance and inspection as described below periodically to ensure safe use of this unit.
• Read Instruction Manual supplied with the unit carefully to ensure correct use of the light source unit.
• If something wrong is suspected with operation of the unit, refer to the section of trouble diagnosis.
• When the unit is exposed to water or oil gets into it, insulation may be deteriorated, causing an electric shock or a fire. Also, de-
teriorated insulation will lead to malfunction of the lamp (e.g, lamp failure to turn on). If the unit gets wet or dirty with oil or dust
excessively, stop using the unit and contact Hamamatsu Photonics.
• When cleaning this unit, wipe it lightly with a dry cloth.
• Dirty tip of the light guide hinders proper light output. Check the light guide periodically for contamination. When the input/output
end of the light guide gets dirty, clean the dirt off from the light guide end face with gauze damped with alcohol.
• The lamp is a consumable. As it is used for a long time, its output intensity will be deteriorated. It is recommended to replace it
early. Also, when the accumulated lamp operation time exceeds 4000 hours (L8253:3000 hours), replace the lamp with a new
one regardless of the output intensity condition. If the lamp is used for longer than 4000 hours (L8253:3000 hours), there is a
risk of its bursting.
Summary of Contents for LIGHTINGCURE LC8
Page 2: ...2...
Page 6: ...6 1 1 1 2 JIS C 7550 3 JIS T 8141 30 kV 15 1 MPa 10 4 MPa 40...
Page 8: ...8 25 80 10 cm 10 cm L9566 L9588 10 cm 10 cm 10 cm 10 cm...
Page 11: ...11 q OFF w e 1 MPa 10 r t y u...
Page 35: ...35 1 1 1 2 IEC 2006 IEC 62471 EMI 30kV 15 1MPa 10 4MPa 40...
Page 37: ...37 L9566 L9588 10cm 10cm 10cm 10cm 25 80 10cm 10cm...
Page 40: ...40 q OFF w e r t y 1MPa 10 u...
Page 54: ...54...
Page 55: ...55...


