Subject to change without notice
39
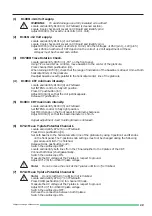
(31) RV2234: X-Magnification x10.
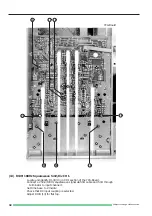
Locate and identify RV2234 (31) on XY-Board.
Press pushbutton X-Mag. x10.
Set time base to 50µs/div.
Set time mark generator to f= 20kHz and connect signal to CH I input.
Set X-POS control to mechanical center.
Using X-POS control, move the visible time mark to the first left graticule line.
Adjust RV2234 (31) so that the next time mark coincides with the last (right) graticule line.
Release X-MAG. x10 pushbutton (out!).
(32) R624: XY-Gain
Connect a 1kHz squarewave signal of 25mVpp amplitude (HZ60-2) to input CH II.
Check that the CH II input sensitivity is 5mV/div.
Check that DC input coupling is selected.
Locate and identify R624 (32) on YPA-Board.
Press XY pushbutton.
Set X-POS control that the left dot coincides with the graticule center.
Adjust R624 (32) for a distance of 5 division between left and right dot.
(33) RV3293: Trigger-Symmetry
Locate and identify RV3293 (33) on TB-Board.
Connect a 50kHz sinewave signal of 40mVpp amplitude to input CH I.
Set input coupling CH I to AC.
Check that trigger coupling is in AC position.
Set attenuator switch CH I to 0.1V/div (calibrated position).
Press AT/NORM. pushbutton (in!).
Turn LEVEL control for triggering (center position).
Reduce signal height and correct LEVEL setting for just triggering with a minimum signal height.
Press and release the trigger SLOPE ± pushbutton and adjust RV3293 (33) for stable triggering
in both SLOPE conditions.
(34) R612: DC-Triggering CH I.
Locate and identify R612 (34) on YPA-Board.
Connect a 50kHz sinwave signal to input CH I.
Set generator amplitude to 8cm.
Set time base to 10µs/div.
Press AT/NORM. pushbutton (in!).
Turn LEVEL control to the center position.
Release AC/DC input coupling pushbutton CH I (out!).
Constantly switch between AC and DC trigger coupling and watch the trace start position.
Adjust R612 (34) so that there is no difference regarding the signal start position on the signal
slope between DC and AC trigger coupling.
(35) R603: DC-Triggering CH II.
Locate and identify R603 (35) on YPA-Board.
Connect a 50kHz sinwave signal to input CH II.
Press CH I/II-TRIG I/II pushbutton (in!).
Set generator amplitude to 8cm.
Set time base to 10µs/div.
Press AT/NORM. pushbutton (in!).
Turn LEVEL control to the center position.
Release AC/DC input coupling pushbutton CH II (out!).
Constantly switch between AC and DC trigger coupling and watch the trace start position.
Adjust R603 ( 35) so that there is no difference regarding the signal start position on the signal
slope between DC and AC trigger coupling.
Summary of Contents for HM 303-4
Page 3: ...Subject to change without notice 2...
Page 5: ...Subject to change without notice 4 Y Preamplifier CH I YP Board...
Page 6: ...Subject to change without notice 5 Y Preamplifier CH II YP Board...
Page 7: ...Subject to change without notice 6 Y Intermediate Amplifier and Trigger Amplifier YP Board...
Page 8: ...Subject to change without notice 7 YPA Board Top side...
Page 9: ...Subject to change without notice 8 YPA Board Top side...
Page 10: ...Subject to change without notice 9 XY Amplifier YF Amplifier OS Circuit...
Page 11: ...Subject to change without notice 10 XY Board Top side...
Page 12: ...Subject to change without notice 11 XY Board Top side...
Page 13: ...Subject to change without notice 12 Sync Amplifier...
Page 14: ...Subject to change without notice 13 Time base...
Page 15: ...Subject to change without notice 14 Sweep Generator...
Page 16: ...Subject to change without notice 15 TB Board...
Page 17: ...Subject to change without notice 16 CRT Board...
Page 18: ...Subject to change without notice 17 CRT Board Top and Bottom side...
Page 20: ...Subject to change without notice 19 PS Board Top side...
Page 21: ...Subject to change without notice 20 PS Board Bottom side...
Page 22: ...Subject to change without notice 21 Component tester Calibrator...
Page 23: ...Subject to change without notice 22 CCT Board Top and Bottom side...
Page 24: ...Subject to change without notice 23 Front control board...
Page 25: ...Subject to change without notice 24 Front Control board Top and Bottomside...
Page 26: ...Subject to change without notice 25 Adjustment Procedure...
Page 31: ...Subject to change without notice 30 10 12 7 11 9 8 YPA Board PS Board...
Page 35: ...Subject to change without notice 34 A C D B 24 B D C A 23 YPA Board 21 A D B C...
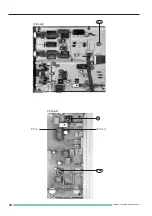
Page 39: ...Subject to change without notice 38 YPA Board 35 32 34 31 33 TB Board XY Board...
Page 41: ...Subject to change without notice 40 37 36B Pin 14 Pin 1 CT Board 36A XY Board...

