background image

 13

PROBLEM

PROBABLE CAUSE/SOLUTION

Blender fails to start 
and program lights 
are not illuminated.

•  Make sure that the main power RESET/OFF (

I

/

O

) button is 

in the RESET (

I

) position. 

•  Check to see if unit is securely plugged into an electrical 

outlet of the proper voltage and frequency.

•  Check to see if the fuse for the electrical outlet has blown 

or if a circuit breaker has tripped.

Blender stops while 
it is running and the 
program lights are 
illuminated.

•  This blender is equipped with motor overload protection. 

If the motor stops during operation due to overheating, 
unplug and allow the blender to cool down. Plug blender 
back in after 15 minutes. 

•  Resume normal operation.

Blender stops while 
running and START/
STOP (

) light 

flashes.

•  Mixture in blender is too heavy of a load on the motor. This 

blender is programmed to stop running to protect itself from 
electrical damage. Remove some of the ingredients from the 
blender jar. Turn VARIABLE SPEED DIAL to 1 and press the 
START/STOP (

) switch to continue to process in MANUAL 

mode. Increase speed as necessary. If this issue happens again, 
remove more of the blender mixture and start the process again.

Ingredients will not 
mix properly.

•  Check to see if enough liquid has been added to the 

ingredients. Mixture should be fluid and free-running at all 
times.

•  Solid pieces are too large. 
•  Container is too full. Do not fill past highest (8 cups/1.9 L) 

graduation marking.

•  Cutter assembly blades are not sharp or are damaged. 

Inspect container and cutter assembly daily. 

•  Select speed to create a fluid blend.

Blender smells like it 
is burning.

•  Turn off blender and allow unit to cool.
•  Although motors are tested during the manufacturing 

process, heavy use may cause curing of motor windings. 
The smell may quickly dissipate after a few heavy uses.

•  If smell continues after additional heavy uses, call our 

customer care center.

There is grease 
around the bottom of 
the blender jar or on 
the counter top.

•  Monitor the problem and source. This may indicate an 

issue with the jar bearings.

•  Call our customer care center if the condition persists.

Blender jar is cloudy 
or stained. 

•  Some cloudiness may be natural after use. The minerals 

from fruits, produce, and leafy greens, in addition to the 
oils of various nut butters, can sometimes cause a film on 
the blender jar or may be difficult to clean. 

•  Sprinkle 1/4 cup (59 ml) baking soda in blender. Add 1 cup 

(237 ml) white vinegar. Mixture will bubble. When bubbling 
subsides, add 2 cups (473 ml) water and blend on the HOT 
SOUP ( ) cycle. Wash any remaining residue with dish 
soap and water. Rinse and dry thoroughly.

Blender fails to start.

•  Jar is not in place.

Troubleshooting 

(cont.)

Summary of Contents for 58911-TW

Page 1: ...READ BEFORE USE Questions www hamiltonbeach com tw Blender...

Page 2: ...al injury and or damage to the blender or available attachments attachments may not be provided with blender A rubber spatula may be used but must be used only when blender is not running 13 Blades ar...

Page 3: ...ing of the extension cord must be equal to or greater than the rating of the appliance The extension cord must be a grounding type 3 wire cord Care must be taken to arrange the extension cord so that...

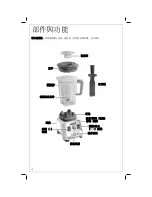
Page 4: ...Switch Blender Jar Base Jar Pad Lid Emulsion Cup Tamper START STOP Switch BEFORE FIRST USE After unpacking the blender follow the instructions in Cleaning Your Blender Cutting Blade Assembly PULSE Sw...

Page 5: ...processed with regular blending It prevents air pockets from forming and is a handy tool when making nut butters or frozen desserts Automatic Overload Protection This machine is equipped with motor ov...

Page 6: ...SET I position to turn on power to the blender and ready it for blending The front lights will illuminate Move the RESET OFF I O switch to the OFF O position anytime the machine is left unattended If...

Page 7: ...uice run the WHOLE JUICE program The WHOLE JUICE setting gives a smooth consistency to pureed fruit or vegetables and a fine texture when whole grains or seeds are included in the juice recipe It is g...

Page 8: ...o not fill blender jar with hot liquid beyond the 6 cup 1420 ml level With the protection of an oven mitt or thick towel place one hand on top of lid Keep exposed skin away from lid Start blending at...

Page 9: ...ion and press the START STOP switch to stop blending Turn off the blender with the RESET OFF I O switch on the right side of the base Unplug blender after blending Remove blender jar Remove lid by lif...

Page 10: ...pulse a few times Do not allow ice to stand or freeze in jar Immediately crush ice after placing in jar NOTE This machine is equipped with motor overload protection If the motor stops during operatio...

Page 11: ...and add 2 3 drops of dish soap Blend for 30 seconds Rinse and dry thoroughly To clean after blending oily foods sprinkle 1 4 cup 59 ml baking soda in blender Add 1 cup 237 ml white vinegar Mixture wi...

Page 12: ...sts turn unit off unplug from electrical outlet and contact the customer service center The HOT SOUP and WHOLE JUICE buttons are flashing The blender speed has ramped up to high too quickly and run on...

Page 13: ...added to the ingredients Mixture should be fluid and free running at all times Solid pieces are too large Container is too full Do not fill past highest 8 cups 1 9 L graduation marking Cutter assembly...

Page 14: ...14 Notes...

Page 15: ...ation abuse misuse or damage to the product resulting from fire earthquake flood lightning and other natural disasters abnormal voltage and other external factors Original sales receipt is required as...

Page 16: ...16 1 2 3 4 5 6 7 8 9 10 11 12 13 14 15 16 17 PO 18 19 20 O 21 22 22...

Page 17: ...17 w...

Page 18: ...18 I O I O...

Page 19: ...19 I O I O I O I O...

Page 20: ...20 1 2 3 4 I O I O I I O I O O I...

Page 21: ...21...

Page 22: ...22 2 w 3 1 O 4...

Page 23: ...23 6 7 8 5 I O I O w...

Page 24: ...24...

Page 25: ...25 3 PO PO PO 1 2 w w...

Page 26: ...26 O I I...

Page 27: ...27 I O I Model Type Capacity Rating 58911 TW B79 1800 110V 60Hz 1200W 58912 TW 58913 TW Dist Hamilton Beach Brands Inc Glen Allen VA 23060 2017 Hamilton Beach Brands Inc USA 1 800 851 8900...

Page 28: ...24158 5 646 1 www hamiltonbeach com tw ________________________________ ____________________________________ ____________________________________ ____________________________________ _________________...

Reviews: