background image


7

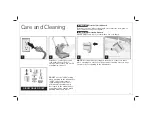
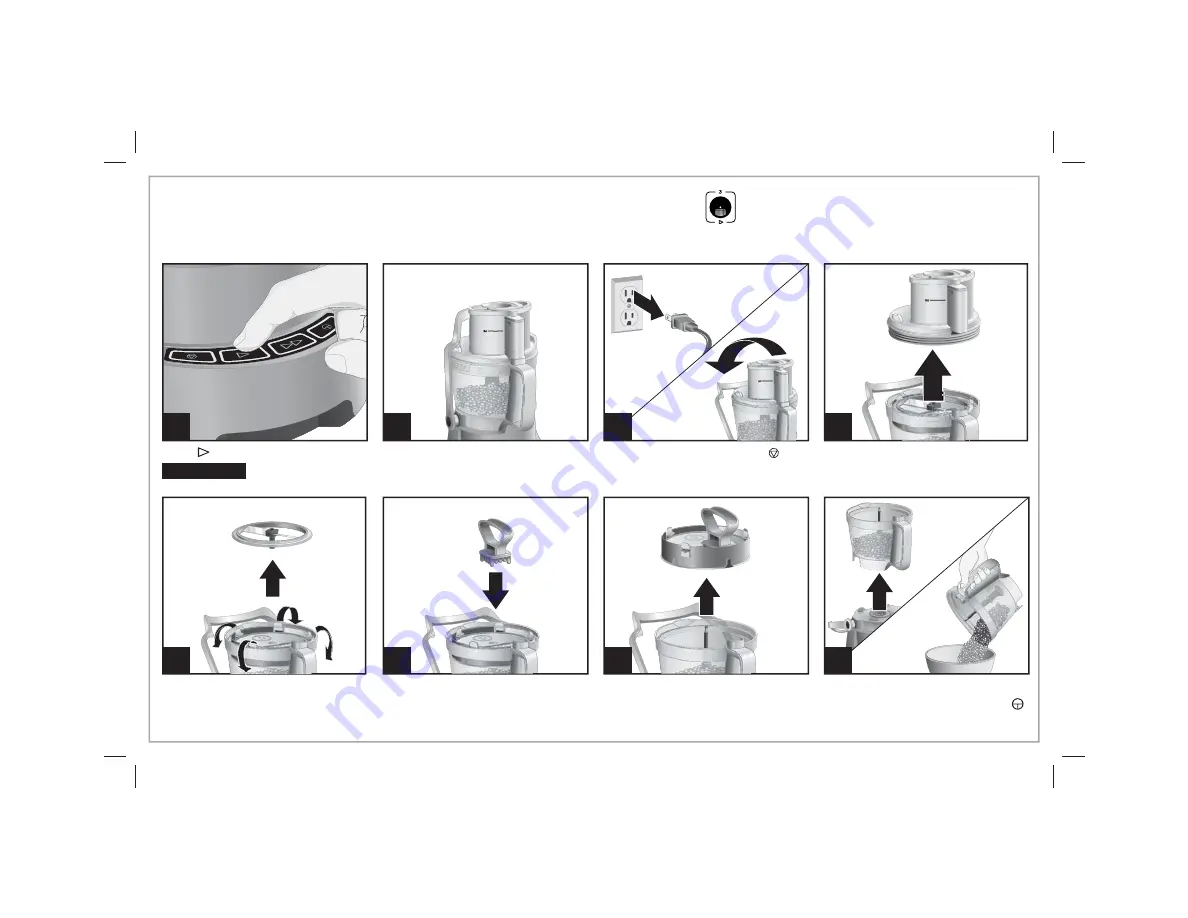
How to Use Dicing Assembly    

(cont.)

15

11

10

When finished, press STOP ( ) 
and unplug. Push locking arm back 
to unsnap and lower onto counter.

Remove lid from bowl. 

8

Press   button. For best results use medium or small pusher.

w


WARNING

 Laceration Hazard. 

Always use food pusher to feed food 

into the chute. Never push food through chute with hands or other objects.

13

Use cleaning tool to press food 
from dicing grid into bowl. 

NOTE:

 Dicing parts are color-

coded green to remind you to 
use the medium pusher when 
dicing and the green cleaning 
tool to clean out the grid.

9

12

Unlatch four metal clips. Carefully 
remove cutting disc.

14

Remove dicing disc from motor 
shaft by grabbing metal clips.

NOTE:

 If cutting disc stops 

working during operation, press ( ) 
button to continue operation.

Summary of Contents for 70825-TW

Page 1: ...tw for our complete line of products and Use and Care Guides as well as delicious recipes and tips 840283801 11 17 Hamilton Beach Brands Inc 4421 Waterfront Drive Glen Allen VA 23060 USA www hamilton...

Page 2: ...Keep hands and utensils away from moving blade and disc while processing food to reduce the risk of severe personal injury and or damage to the food processor A rubber scraper may be used but ONLY whe...

Page 3: ...To avoid an electrical circuit overload do not use another high wattage appliance on the same circuit with this appliance This machine is equipped with motor overload protection If the motor stops du...

Page 4: ...rk bowl Note that the removable dicing grid will fall out of the dicing disc when turned upside down Handle blades and discs carefully they are very sharp Wash all parts except base in hot soapy water...

Page 5: ...potatoes tomatoes beets onions peppers carrots and apples Adjustment Post Shredding Disc Dough Blade Chopping Mixing Blade Adjustable Slicing Disc Dicing Cleaning Tool Cutting Disc Store dicing assem...

Page 6: ...blades 4 5 Secure four latches of the dicing disc into place Place lid on bowl so the chute lines up with the handle 2 To insert the dicing assembly lower the dicing disc onto the motor shaft making...

Page 7: ...the chute Never push food through chute with hands or other objects 13 Use cleaning tool to press food from dicing grid into bowl NOTE Dicing parts are color coded green to remind you to use the medi...

Page 8: ...Place lid on work bowl TIP Check to make sure no other blades are in the bottom of the work bowl 6 NOTE Unit will not work unless the large food pusher is inserted and the locking arm is snapped into...

Page 9: ...sert the large pusher w WARNING Laceration Hazard Always use food pusher to feed food into the chute Never push food through chute with hands or other objects Never remove locking arm during operation...

Page 10: ...ly it is very sharp Press STOP and unplug before inserting or removing blades 2 Place work bowl on base with handle facing forward 3 Carefully place disc onto motor shaft Place lid on work bowl so the...

Page 11: ...Shredding Disc cont 9 8 When finished press STOP and unplug 7 Push locking arm back to unsnap and lower onto counter 12 Carefully remove blade from motor shaft using finger holes 11 6 Press button 13...

Page 12: ...on 7 4 Place lid on work bowl so the chute lines up with the handle w WARNING Laceration Hazard Handle blade carefully it is very sharp Press STOP and unplug before inserting or removing blades 2 1 Pl...

Page 13: ...t Push locking arm back to unsnap and lower onto counter 12 8 If the lights on the control panel are flashing then the food processor is not assembled correctly Either the locking arm is not in place...

Page 14: ...te Never push food through chute with hands or other objects Never remove locking arm during operation 7 4 Place lid on work bowl so the chute lines up with the handle 2 Place work bowl on base with h...

Page 15: ...Push locking arm back to unsnap and lower onto counter 13 8 If the lights on the control panel are flashing then the food processor is not assembled correctly Either the locking arm is not in place or...

Page 16: ...es like potatoes as they are easily overprocessed and will become gummy To slice or shred cheese use only firm cheese like Cheddar or Swiss that has been chilled for at least 30 minutes Cheese should...

Page 17: ...ing in the dishwasher DO NOT use the SANI setting when washing in the dishwasher SANI cycle temperatures could damage your product All removable parts may also be cleaned in the sink with hot soapy wa...

Page 18: ...uts chopped 20 25 seconds 250 g Onions 5 pulses 10 15 seconds One 3 to 4 inch diameter onion approx 200 g Parmesan cheese 60 75 seconds 140 g Parsley or cilantro 10 pulses 20 30 seconds 20 g Pesto 1 2...

Page 19: ...0 seconds per egg 1 boiled egg 60 70 g Pepperoni 5 10 seconds per stick 1 stick 227 g Potatoes 5 10 seconds per potato half 1 half 75 80 g Tomatoes 5 10 seconds per tomato half 1 half 90 100 g 3 Carro...

Page 20: ...c 1 Chopping Mixing Blade 5 Shredding Disc 2 Herbs Chopping Mixing Blade 5 Hummus Chickpeas Chopping Mixing Blade 5 Mayonnaises Chopping Mixing Blade 5 FOOD BLADE OR DISC PROCESS Nut Butters Chopping...

Page 21: ...l working Check it by plugging in a working lamp or other appliance You may have overloaded the circuit and blown a fuse or tripped the circuit breaker Press STOP unplug allow to stand for 15 minutes...

Page 22: ...e section on page 6 Clips are not latched on dicing assembly Remove lid Latch the four metal clips on dicing assembly Place lid on work bowl and move locking arm up and snapped into place Control pane...

Page 23: ...tion abuse misuse or damage to the product resulting from fire earthquake flood lightning and other natural disasters abnormal voltage and other external factors Original sales receipt is required as...

Page 24: ...24 Notes...

Page 25: ...25 1 2 3 4 5 6 7 8 9 10 11 12 13 14 15 16 17 18 19 20 21 22 23 24 25 26 27 28...

Page 26: ...26 w...

Page 27: ...27 886 2995 9258 shop Quoview com...

Page 28: ...28...

Page 29: ...29 7 1 w 4 5 2 3 6...

Page 30: ...30 15 11 10 8 w 13 9 12 14...

Page 31: ...31 2 1 14 1 32 1 4 0 8 6 w 4 6 7 5 3...

Page 32: ...32 8 w 10 12 13 14 11 9...

Page 33: ...33 w 4 4 w 2 3 5 5 30...

Page 34: ...34 9 8 7 12 11 6 13 10...

Page 35: ...35 w 7 4 w 2 1 3 6 5...

Page 36: ...36 11 10 13 9 12 8 14...

Page 37: ...37 w 7 4 2 3 6 5 1...

Page 38: ...38 11 10 14 9 13 8 12...

Page 39: ...39 KHGGDU 6ZLVV 0 9 3DUPHVDQ...

Page 40: ...40 2 3 1 w w 4...

Page 41: ...41 3DUPHVDQ SDUPHVDQ...

Page 42: ...42 0...

Page 43: ...43 1 3 5 4 2 4 1 3 2 5 4 5 1 3 5 1 5 3 5 5 3DUPHVDQ 1 5 2 5 5 5 5 5 1 5 3 1 5 5 4 1 3 2 5 3 5 5 5 1 3 1 5 3 2 5...

Page 44: ...44...

Page 45: ...45...

Page 46: ...Parts O O O O O O Brass Parts O O O O O Power Cord Set O O O O O 1 ZW ZW Note 1 Exceeding 0 1wt and exceeding 0 01wt indicate that the percentage content of the restricted substance exceeds the refere...

Page 47: ...47 Model 70825 TW Dist Hamilton Beach Brands Inc Glen Allen VA 23060 U S A 2017 Hamilton Beach Brands Inc USA 1 800 851 8900 Type FP28 Rating 110 V 60 Hz 600 W Capacity 3000...

Page 48: ...1 www hamiltonbeach com tw ________________________________ ____________________________________ ____________________________________ ____________________________________ ____________________________...

Reviews: