background image


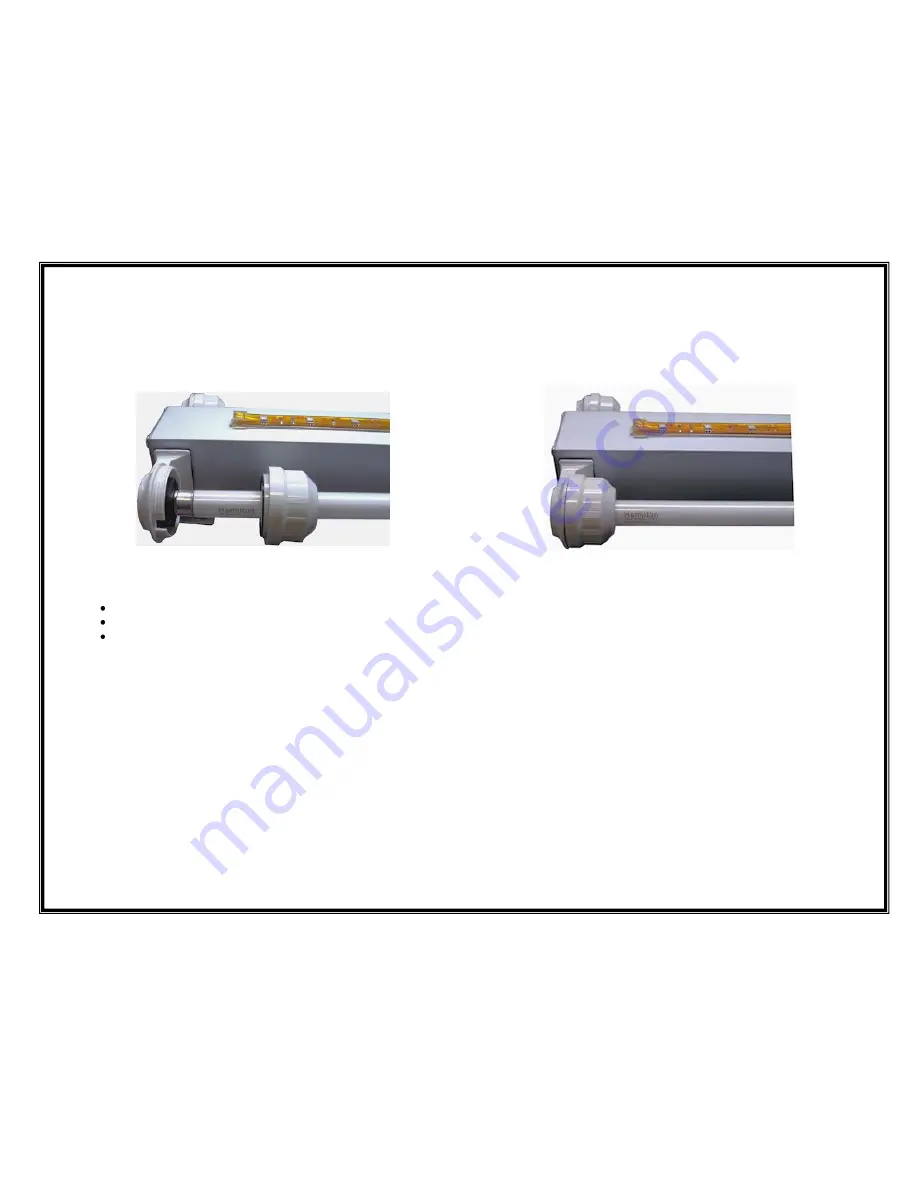
3.)  Place the bulb pins horizontally into each socket and carefully                        4.)  Screw the end cap sleeve back onto end cap contact until it  

push pins into end cap mounts until they are secured in place.                              has a tight seal.  Make sure the T5 lamps are in full contact  
Make sure the bulb pins make full contact with the metal pins                               with the red rubber ring to ensure a moisture proof seal. 
the socket contact. This ensures a safe operation and avoids  
burning of either bulb and/or end cap.  


7. 

Mount the T5 reflectors:   


Place each reflector over the T5 bulb then center the reflector.  


Place your hands over the reflector and under the bulb (were reflector clips are located) and gently press the reflector clip onto the bulb.  


Then turn the reflector to your desired position.  


8. 

Once the bulbs, sockets and T5 reflector have been mounted to the Aruba Sun you can mount it to you canopy.  
You will need 4 screws (not included). Carefully screw the reflector to the desire location or you can follow the note on step 5.  
 

9. 

Place the fixture lamp cord in a location away from water. 
 

10. 

Before connecting the system into the power supply verify that all connections are secure and that all of the lamps are properly installed.  
 

11. 

Plug the fixture into a timer (optional) then to a GFI outlet.  


12. 

Follow all safety precautions listed on the first page of your manual.  


13. 

Keep manual and purchase receipt in a secure location for future reference.        


Summary of Contents for Aruba Sun Series

Page 1: ...ARUBA SUN SERIES LIGHTING SYSTEM USER MANUAL ...

Page 2: ...actor in creating and maintaining a healthy marine environment for your aquarium inhabitants Lighting is needed for aquatic plants and animals to sustain life functions Light is also used to display the natural beauty of the tank and its inhabitants The typical coral reef receives an amount of solar radiation that was difficult until now to match in an aquarium particularly in terms of light inten...

Page 3: ...uarium Avoid accidental water spillage or splash on electrical items place on a dry protected shelf away from water splash All plug connections must be tight do not leave gaps between the cord connections Do not use this system if any part has been in contact with water even if still operational electrical contacts may become corroded by water exposure Unit operates at high temperatures Lamps get ...

Page 4: ...nit will fit into your canopy 5 For easier mounting hold the fixture inside your canopy and mark the location where you will be mounting the screws not included that will hold the reflector in place Note If you have an easy access to your canopy it is will be best to install the reflector into the canopy before placing the bulbs onto the system Read all the instructions before installation to find...

Page 5: ...under the bulb were reflector clips are located and gently press the reflector clip onto the bulb Then turn the reflector to your desired position 8 Once the bulbs sockets and T5 reflector have been mounted to the Aruba Sun you can mount it to you canopy You will need 4 screws not included Carefully screw the reflector to the desire location or you can follow the note on step 5 9 Place the fixture...

Page 6: ...RRANTIES AND EXCLUSION OF CERTAIN DAMAGES The company disclaims liability for incidental and consequential damages for breach of any express or implied warranty including any implied warranty of merchantability with respect to this product This writing constitutes the entire agreement of the parties with respect to the subject matter hereof No waiver or amendment shall be valid unless in writing s...

Reviews: