


Due to the gradual introduction of European
Chimney Standards chimneys will be specified
according to their performance designation as
defined in BS EN 1443 that covers the General
Requirements for chimneys. The minimum
performance designation required for use with solid
fuel burning stoves is T450 N2 S D3.
The flue and chimney installation must be carefully
checked by a competent person before fitting the
stove to ensure it is suitable and will work safely.
If the chimney is old (i.e. built of brick or stone
without a liner) or being opened up for reuse
additional checks and smoke testing as described in
Appendix E of the Approved Document J 2002
Edition should also be carried out to ensure the flue
and chimney are in good operating condition.
Unless the existing flue is in good condition with
suitable access for collection and removal of debris.
If the flue size is more than 225mm (9 inches)
diameter or 200 x 200mm square, a suitable lining of
150mm (6 inches) diameter should be fitted, or if the
flue length is over 5.5 metres one size larger than the
appliance outlet should be fitted. This should be a
double skin stainless steel flexible flue liner that is
independently certified for use with solid fuel.
Details of suitable linings for use with solid fuel are
given in the Official HETAS guide that can be
viewed on their website at www.hetas.co.uk
It is also important that suitable flue pipe
complying with the Building Regulations is used to
connect the stove to the flue in the chimney and that
suitable access is provided into the flue for regular
inspection and sweeping of the flueways.
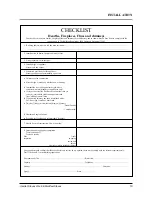
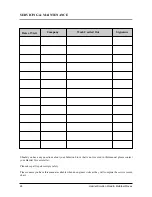
The installer should comply with the Building
Regulation requirements in respect of providing a
Notice Plate giving details on the chimney, flue
lining, hearth and fireplace installation. Approved
Document J of the Building Regulations for
England and Wales is available from The Stationery
Book shops and can also be
viewed at the ODPM website at
www.safety.odpm.gov.uk/bregs/brads.htm
Details on the relevant Building Regulations and
BS British Standards are given in the "General
Precautions" section page 9 of these instructions.
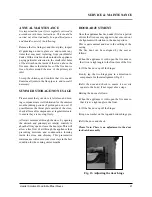
A chimney may comply with the regulations but
still be subject to down draught and similar
problems. A chimney terminating above the ridge
level is generally less likely to suffer such
problems.
Chimneys should be as straight as possible.
Horizontal runs should be avoided except where
the rear outlet of the appliance is used, in which
case the horizontal section should not exceed
150mm (6'') in length.
If the fire appears to be working hard but produces
very little output to the room it is likely that
excessive draw is present in the chimney, and that
heat is being sucked out of the appliance and up the
chimney. If this is the case we recommend the
fitting of a draught stabiliser in preference to a flue
damper, in the interest of safety and efficiency.
We do not recommend the use of a damper when
burning solid fuel.
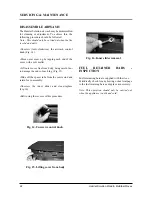
FOR ALL APPLIANCES
Access for cleaning the flue should be incorporated
in the system other than through the appliance (e.g.
a soot door or access through register plate).
Purpose-made soot doors and inspection lengths
are available from manufacturers of all systems.
Ensure that the whole length of the flue can be
reached from the soot door.
Note: if the appliance is fitted with a draught
stabiliser or if one is fitted to the flue pipe or
chimney in the same room as the appliance, then
the permanent air entry opening (or openings)
should be increased by 300mm
2
for each kW of
rated output.
For advice on flues and chimneys contact;
NACE (National Association of Chimney
Engineer): telephone 0800 0924019
www.nace.org.uk
or
NACS (National Association of Chimney
Sweeps): telephone 01785 811732
www.chimneyworks.co.uk
Hamlet Solution Wood & Multifuel Stoves
11
INSTALLATION


